Dragon Age logo

BioWare


Dragon Age: Origins Online Walkthrough by David Milward


INTRODUCTION  |  GETTING STARTED  |  NPCs  |  ORIGINS  |  RECIPES |  ITEMS   
Areas in the original game:  
Brecilian Forest  |  The Camp  |  Circle Tower  |  Denerim  |  The Final Battle  |  Haven  |  Landsmeet  |  Lothering  |  Orzammar  |  Ostagar  |  Redcliffe  |  Ruined Temple  
Areas available as Downloadable Content:  
Honnleath  |  Return to Ostagar  |  Warden's Keep 
About the Walkthrough  |  About the Maps  |  About the Author  |  About Playing the Game  |  Where to Begin
Disable all ads!

Lothering: 
Deep in the Wilds  |  Lothering  |  Lothering Chantry  

Lothering

Lothering

  1. Here you'll find a few Bandits who want to layway you. If your Coercion skill is good enough, you can convince them to leave you alone, or even to shell out the silvers to you. If not, it boils down to a fight. If you cut their leader down to size, he'll quit the fight and beg for mercy. You can extract some profit from him, or make him promise not to harass anyone on the road anymore. For those of you who are XP savvy, an idea worth considering is killing all of his henchman for xp before going to work on him, if you think you can hold on long enough for it. In fact, the most profitable avenue may be to defeat him and his bandits, and then force him to give up all of his 'earnings' to you. If you choose to kill the Bandit Leader, he'll leave behind the Surveyor ring.

    Nearby is also the body of Sir Henric. Click on it to get the Knight's Locket and the Knight's Note. These can be brought to another Knight in a nearby Chantry.

  2. Here are several refugees and crates with odds and ends like Deep Mushrooms and such.

  3. Here you'll happen upon a squabble between a Sister of the Chantry, and a merchant. The heart of their squabble is the prices that the merchant wants to charge for his goods. You can throw your lot in with the merchant, and he won't mind you insisting on driving a bargain. It won't take much to convince the Sister to leave. This will win you influence with Morrigan but cost you influence with Leliana. If you go this route, the merchant will let you purchase his goods at a discount (or so he says), which will include poisons, potions, herbs, and trap components. He'll sell recipes for Concentrated Deathroot Extract, Concentrated Venom, Fire Bomb, and Freeze Bomb. He also sells armor and weapons, including items of Dwarven make, weapons and armor made from Red Steel and Veridium, and bows made from Whitewood.

    Alternatively, you can use either Persuasion or Intimidation to convince the merchant to lower his prices for the villagers. A successful Coercion check will convince him to comply, but he insists that when he sells to you, it will be at regular prices. As you can guess, this will lose influence with Morrigan but win influence with Leliana.

    A nearby chest and barrel hold random items.

    Note also that a Rogue with a good enough Pickpocket skill can filch him for the Imperium Crossbow (Dragonthorn).

  4. Here you'll notice a Doomsayer predicting Darkspawn destruction of Lothering. How you handle this is up to you. If you're so inclined, you can convince the bystanders to give you money for their protection.

  5. Here is Chanter Devon, who has taken a vow to speak only in the form of quoting verses from the Chant of Light. Nearby is the real point for coming here. The Chanter's Board, which has a number of quests for anyone who is willing.

    The first task is to wipe out three groups of Bandits who are on the outskirts of town. They are at #15, #16, and #17.

    The second task is to find the body of the missing Goodwife Sarha, and bring back a keepsake. This is located at #18.

    The third task is to take out some Bears that have become dangerous due to disease. They are located at #19.

    Complete all three tasks and Chanter Devon will reward you with Oathkeeper (Steel).

  6. Here is Ser Maron, a Templar. He stands guard over the entrance to the local Chantry.

  7. Here you'll encounter a family that has been robbed. Nearby there is a container that holds 6 Flasks and Golden Scythe 4:90 Black.

  8. Around here you'll find some Rubble and a Crate with random items.

  9. Here you'll find a little boy standing at the near end of the bridge.

  10. Leliana intervenes
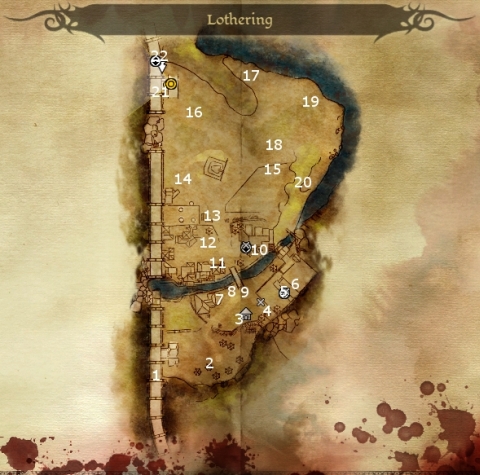
Here is the entrance to the Dane's Refuge. When you first enter, you'll get accosted by soldiers who are loyal to Teryn Loghain. Leliana will intercede on your behalf for an inevitable fight. If you want to end the fight quickly, cut the Commander down to size first. You can try to take out his soldiers first for xp before moving onto the Commander. This can be risky, since the Commander packs a mean two-handed sword. Once you win, you have the choice between killing the Commander or letting him flee. Leliana is now a joinable NPC.

    Also present here is Barlin. He has a quest for you. To acquire three flasks of Venom for him so that he can set up poison traps around his farm. The convenient route is find or buy at least 3 flasks. Get 3 Toxin Extracts, for example from the Spiders that linger north of the village. Leliana can then make three flasks of Venom. Bring them back to Barin for 75 silvers. In the meantime, Barin also sells an assortment of goods, including poultices, salves, trap components, bucklers, and Leather Armor pieces made from both cured and hardened leather. He also sells recipes for Small Grease Trap, Lyrium Potion, Lesser Injury Kit, Incense of Awareness, Mild Lure, Large Shrapnel Trap, and Large Claw Trap Plans. Other notable items in his inventory include:

    Thorn of the Dead Gods (Grey Iron)
    Lightning Rod
    Kaddis of the Courser
    Warpaint of the Vanguard
    Sailor's Crossbow (Sylvan Wood)
    Amulet of Accord
    Golden Rope Necklace
    Golden Ring

    You'll also notice a representative of the Blackstone Irregulars, sort of like a Robin Hood kind of organization, here in the Inn. His organization has a number of tasks for you that you can take on by clicking on the chest next to him and then clicking. They are as follows:

    Scraping the Barrel - Delivering Letters of Conscription to Patter Gritch in Lothering (the Chantry more specifically), Dernal Garrison in Redcliffe, and Varel Baern in Denerim.

    Dereliction of Duty - Hunting down three deserters, Sammael in Lake Calenhad, Layson in Denerim, and Tornas in the Frostback Mountains.

    The Kitchen is watched over by a cook. You can search the bags and crates for random items.

  11. Here is Allison. She wants you to assemble traps for her farm from basic components. To do this, you need a character with at least one rank in the Traps skills. Once you have such a character, you can do this over and over again. Simply buy a set of three trap components, assemble them into 3 traps, and then bring them to Allison for silvers and xp. You can repeat as long as Barlin has the trap parts.

  12. Here is Elder Miriam, who phrases her request as wanting you to turn herbs into healing potions that she can use. But you can really just cut to the chase by giving her 3 Lesser Health Poultices. A nearby chest has a random item.

  13. Sten in a cage
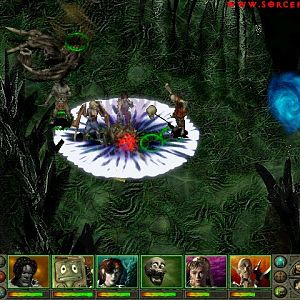
Here is the cage of the huge Qunar'i warrior, Sten. You can free him to have him join you, but you have to get the key from the Reverend Mother in the nearby Chantry first.

  14. Here are a group of Refugees who are determined to take the bounty on your heads offered by Teryn Loghain. You can get surrounded quickly, so either have powers that can deal with this (e.g. Mind Blast) or try to quickly position everyone so that the Refugees are all on one side so that you can nail them with forward attacks or spells as they surge forward.

  15. Here is one of the three groups of Bandits. If you have area of effect spells, by all means hit them first.

  16. Here is the second of the three groups of Bandits.

  17. Here is the third group of bandits, which includes their Leader and a Mabari War Hound. If you're having trouble, you might try employing the drawing out technique in such a way as to oblige the first few to follow you around the bend in the hill. Their leader leaves behind a Qunar'i Thickened Cap (Reinforced), Heavy Chainmail Gloves, Heavy Chainmail Armor, and Heavy Chainmail Boots.

  18. Here is the corpse of Goodwife Sarha. Once you come within sight of the body, a LOT of wolves are going to attack you, so be ready. My preference was to cast a Glyph or Repulsion in their path to keep many of them back while picking off the stragglers. Once they looked like they were going to break through en masse, I then cast Glyph of Paralysis on top of the other glyph to trigger the explosion combo. Search the body to obtain Sarha's Keepsake and bring it back to the Chanter's Board.

    Incidentally, the tree here is one of the Landmarks that the Mabari War Hound will be able to assert dominance over.

  19. Here is where you will find the three Bears who have gone mad with disease. My preferred approach, since they were few but powerful, was to immobilize one and then hit it hard. Then the next, and then the next.

  20. Here are several Spiders. Each of them will drop a Toxin Extract, rather conveniently if you have Barlin's quest.

  21. Here you'll find two Dwarves about to get attacked by Darkspawn. They're packed tight, so fire away with area-effect spells if you have them. Once you've finished, Bodahn and Samuel will thank you. If you're so inclined, and your Coercion skill is good enough, you can milk them for 200 silvers. The nearby body of a Blood Mage will provide a Codex Entry for "Maleficarum Regrets". A nearby crate has a Small Carved Statuette, which Alistair will be particularly appreciative of.

  22. Here is the exit to the World Map. Your first stop will be the Camp, which will sort of serve as your gathering and resting spot for the duration of the game.


Amazon.com
Amazon.ca
Amazon.co.uk
Sorcerer's Place is a project run entirely by fans and for fans. Maintaining Sorcerer's Place and a stable environment for all our hosted sites requires a substantial amount of our time and funds on a regular basis, so please consider supporting us to keep the site up & running smoothly. Thank you!

Disable all ads!