-

- Forums
- Chatrooms
- Gallery
- Gameplay Videos
- Upload
- Articles
- Mod Reviews
- Shop SP: Games, Movies, Books
|
|
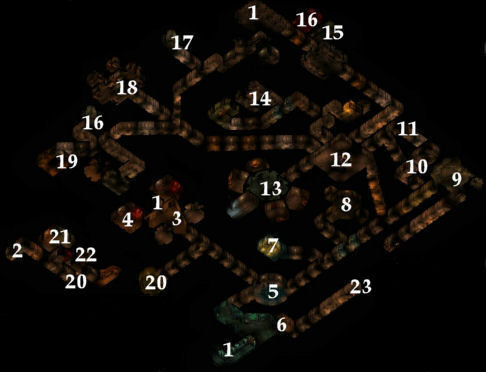
TEMPLE DUNGEON LEVEL 3
On this level, you'll notice that there are plenty of horrors independent in their own right, eager to prey upon your party as well as those who are loyal to the Temple. Indeed, such is the reason for a small corridor that quickly links together both the 2nd and 4th levels.
1. Stairs leading up to Level 2.
2. Stairs leading to the Escape Tunnel. Both the Escape Tunnel and the adjoining Broken Tower provide a more direct route to the surface. For for more information on these two areas, refer to the Daring Rescues quest.
3. Through the north, east, and southwest doors adjoining this room, the party will find several Bugbears and Ogres lying in wait. One of the bugbears, through the east door, is trained to open the other doors so as to bring the other monsters into the fight.
 4.
Here you'll find a Hill Giant named Scorpp. Scorpp
is apparently a joinable NPC. He is also here with his pet Worg
named Splot. If you decide to kill Scorpp, he'll leave behind Wonnilon's
Crossbow +1 and Wonnilon's Scroll of Control Plants, which is
needed for Wonnilon's Quest.
Furthermore, if you accepted Hedrack's Quest
to find out what is causing the disturbance on the 3rd level, Scorpp
is the reason.
4.
Here you'll find a Hill Giant named Scorpp. Scorpp
is apparently a joinable NPC. He is also here with his pet Worg
named Splot. If you decide to kill Scorpp, he'll leave behind Wonnilon's
Crossbow +1 and Wonnilon's Scroll of Control Plants, which is
needed for Wonnilon's Quest.
Furthermore, if you accepted Hedrack's Quest
to find out what is causing the disturbance on the 3rd level, Scorpp
is the reason.
5. In this room full of statues, the party will get attacked by some Will-o-Wisps. They can be pretty dangerous. Their small size and their dexterity gives them a significant Armor Class. They also cause electricity damage through a touch-attack (ignores bonuses to Armor Class relating to wearing body armor or shields). The way I dealt with this was to have Lanatir plant a Protection from Energy: Electricity on every party member. The party is then more than capable of outlasting the Will-o-Wisps.
 6.
Here, the party will get attacked by a Lamia, a creature with a
humanoid torso and a leonine lower body. The Lamia is assisted by
some Hooting Fungi. In her own right, the Lamia is a dangerous opponent.
She can protect herself with Mirror Image. She can also get your
party members to turn on each other with her Charm Person ability.
Any spell that you can use to maximize your saving throws, use it
(e.g. Magic Circle against Evil). Then rush her and kill her as
quickly as possible. She'll also leave behind a Long
Sword +3.
6.
Here, the party will get attacked by a Lamia, a creature with a
humanoid torso and a leonine lower body. The Lamia is assisted by
some Hooting Fungi. In her own right, the Lamia is a dangerous opponent.
She can protect herself with Mirror Image. She can also get your
party members to turn on each other with her Charm Person ability.
Any spell that you can use to maximize your saving throws, use it
(e.g. Magic Circle against Evil). Then rush her and kill her as
quickly as possible. She'll also leave behind a Long
Sword +3.
7. Here the party will find two Jackalweres, and some Jackals. Magic Missiles as well as Silver Arrows prove reliable against the Jackalweres. Beyond that, it is a matter of landing strong enough blows with your usual enchanted weapons. In any event, thin out the Jackals as soon as possible. Then go to work on the Jackalweres, chipping away their hit points one at a time.
8. In this room, you'll find 3 Umber Hulks that come out of the doors on each side. In addition to having powerful melee attacks, these beasts can make things much worse by confusing an opponent with their gaze. Again, its all about your saving throws. My approach was to have Sir Tirion, with his Charisma enhanced saving throws and high Armor Class, tie down one Hulk. I then had Valarian, protected by several spells including Improved Invisibility, tie down another. The rest of the party then took their shots from a distance; Alliria with Produce Flame, and Lanatir with Melf's Acid Arrow and Magic Missiles.
9. Here you'll find 3 Leucrottas. Leucrottas sport powerful bite attacks that can inflict 3d6+3 damage each hit. They can augment this further with spells like Hold Person and Bull's Strength. Be sure to keep your arcane spellcasters well back, since Leucrottas also have the Improved Initiative feat. Since they're widely spaced apart, have summoned monsters hold up two of them. The party warriors can then proceed to take them down one at a time.
10. Here you'll find two prisoners who just want to get out of their predicament. As far as I know, they aren't particularly important by way of material reward or plot advancement.
11. Here you'll find Yellow Molds. Not terribly difficult.
12. Here is where you'll an Ettin, a two-headed giant. Quite deadly, since it can make four powerful melee attacks each round. On the upside, it is easily flanked. Hitting it with spells like Blindness and Doom can also help.
In the same room, you'll also notice several doors. You can pick them if you want. However, there's a handier solution described just below.
13. In this room there are four adjoining doors. Through each door is a single Troll. Upon killing the Troll, you'll find a key that opens one of the doors in the room described in paragraph #12.
14. Here you'll find a Groaning Spirit. Aside from the usual incorporeal undead traits, I didn't notice any attacks besides her poisonous touch, so she shouldn't be too hard to take down.
In a chest she had guarded, you'll find some treasure, a Green Elven Chain, the Thorned Chains of Love +1.
*NOTE* The chest also has a Scroll of Gust of Wind, which you may want to hold onto if you want to destroy the Golden Orb of Death to end the game.
15. In this room, you'll find several Shadows. In addition to the usual dangers involved with fighting incorporeal undead (touch attacks, 50% chance to avoid physical attacks), Shadows can also drain strength temporarily with a touch. Even so, Fireballs wreak havoc upon them.
16. Ogres, led by an Ogre Shaman, can be found at these spots.
17. Here the party will find a Black Pudding. This ooze has to be handled with care. Going after it with slashing weapons or area-affect spells cause it to divide into more Black Puddings, often with more hit points. A single Black Pudding can inflict some pretty horrific damage with a single attack. The key here is to attack it with magical blunt weapons, and single target spells like Magic Missile. These methods of attack will bring its hit points down without allowing it to divide.
18. Here the party will find a whole horde of Goblins, and two Hill Giants. See paragraph #12, my advice on killing the Ettin is equally applicable by now to the Hill Giants.
19. The cell holding Prince Thrommel. You have to find a secret door leading northwards to the room. For more on him, refer to the Daring Rescues section. He's also a joinable NPC, but for limited purposes.
20. These are two points connected together by a secret tunnel.
21. In this room, you'll find an assassin in the employ of the Temple, Smigmal. She'll attack you at the outset. However, if you bring her to 'Near Death', she'll make a desperate plea for her life. Whether or not you spare her is purely a roleplaying decision.
I killed her and looted her body for the Blue Elven Chain. This will be the ideal armor for Valarian.
22. Here you'll find an evil wizard named Falrinth. Unless Alremm has given you a quest to retrieve an artifact on behalf of the Fire Temple, Falrinth will attack the party with very little provocation. He also has a Quasit helping him out. Take out the Quasit, which can cause poisoning attacks, as quickly as you can so that you can concentrate full force upon Falrinth. Apparently only blunt weapons and fire seem to inflict lethal damage on him. He'll constantly keep himself protected with Stoneskin and Improved Invisibility. It's a matter of surrounding him and staying on top of him in order to maximize attacks of opportunity.
Once dead, he leaves behind the key to his treasure chests, as well as Bracers of Armor +3.
In the north chest, you'll find some treasure, vials of poison, and a few healing potions.
You need to go through a secret door in order to find the south chest. It contains many magical potions, and scrolls of Burning Hands, Mirror Image, Lightning Bolt, Dispel Magic, Lesser Globe of Invulnerability, and a Dimension Door. You'll also find a Wand of Identify, and a Wand of Chain Lightning.
Last but certainly not least, the party finds the ORB OF GOLDEN DEATH, an item crucial to ending the game. On its own, it is capable of casting Poison and Discern Lies once a day. For more on increasing its powers (and resultant spoilers), refer to the section on the Elemental Nodes.
23. Stairs leading down to Level 4 of the Temple.
Now that a layout has been provided for the first 3 levels, it is time for the sections on quests.