-

- Forums
- Chatrooms
- Gallery
- Gameplay Videos
- Upload
- Articles
- Mod Reviews
- Shop SP: Games, Movies, Books
|
|
West Harbor
To West Harbor
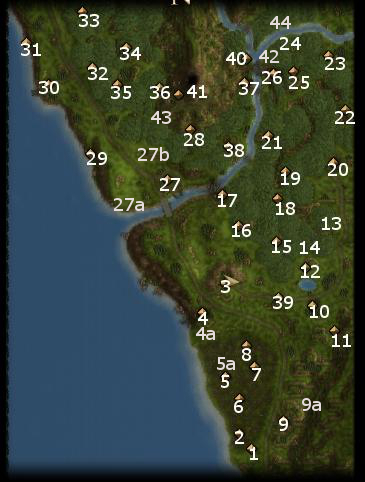
I travel to the town of West Harbor, which is at #5 on the Overland Map. I won't be able to open up a trading post here, at least not yet.
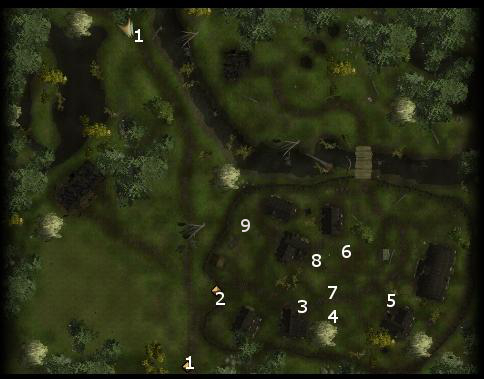
Exits from West Harbor to the Sword Coast Overland Map are marked by #1 on the West Harbor map. I arrive at the #1 on the north side of the map. I go on to #2, where the guard named Caryl Namorem stands watch. It won't take much to convince her to let me through the gate, since the town itself is in a rather desperate situation that I'll soon find about.
At #9 are the Lannon kids, who will drop cryptic hints about what is troubling the town.
At #3 is Shaydann Zinn, who sells almost every Alchemical Silver or Cold Iron weapon possible, as well as an Amulet of Natural Armor +2. I don't need anything from him.
At #4 is a Half-Drow Warlock named Quarrel. More on him later.
At #5 is Jan Buckman. He'll drop hints that his mentor, Tarmas, is missing and that his father, the mayor, is partly responsible for the town's troubles.
At #6 is Goodwife Aruna. She sells recipes for Alchemical Silver weapons, as well as a few other odds and ends. She also wants me to find her shawl for her, which she has lost to Lizardfolk.
At #7 is the Mayor, Lazlo Buckman, he wants me to free the town from the impending threat of a couple of Black Dragons. It is only by speaking to Lazlo and getting this quest from that the nearby Dragon Caves will be revealed on the Overland Map.
Fen-Tamer
I travel to the Dragon Caves, which is at #6 on the Overland Map.
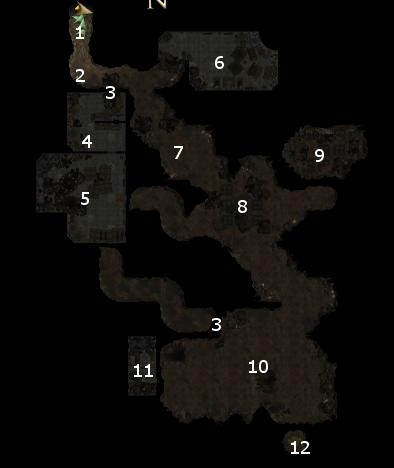
I start off at #1 on the Dragon Caves map. I on ahead a little bit ahead, when three figures that appear to be Tarmas, Pitney Lannon, and Ginni Lannon speak to me briefly before leaving the caves.
I then buff up to the max. Bark Skins, Flaming Weapons, Greater Magic Weapons for the warriors, multiple buffs for Yushai, Superior Resistance for characters with weaker saving throws (e.g. Logan).
Finch casts Greater Invisibility on Gallard. Gallard issues a 'stand your ground' command, goes on ahead, and disarms a couple of traps in between #3 and #6 without alerting nearby enemies.
He regroups with the party. They journey on towards the cave at #6. I have little trouble killing the Lizardfolk there with straight physical combat.
The Lizardfolk Gear Chest has a couple of potions. The Weapon Rack has the Fen-Tamer (Shortbow +1, +3 vs. vermin, +3 Mighty), but Umoja already has better.
The Goodwife's Shawl
I go back west, and then south a little to kill the Bombardier Beetles at #7.
Secret doors are marked by #3. I go through the secret door near the north entrance.
I then enter the room at #4. There is a trap in the middle of the room. A chest in the room will have a Dagger +1 and an Amulet of Natural Armor +1. There is also a Suspicious Barrel in the room. The Barrel contains mead, along with clear indications that the mead came from West Harbor, along with the implication that somebody in West Harbor was bargaining with the Black Dragons.
The party bursts through the door to enter the room at #5. Several large Lizardfolk and a Lizardfolk Shaman capable of offensive spells like Ice Storm attack. Janette starts with a Divine Shield. She, Logan and Gallard charge right in, buffed up by Finch who goes into Stealth once he's put himself in the thick of things. Umoja trains his bow on the Shaman in order to take it out as quickly as possible. Vandala likewise aims her Noxious Blast / Eldritch Chains at the Shaman to help out. The fight is soon won.
The Sacred Chest in the room has two items. One is the Relic of Samuayna (+5% acid damage resistance, +1 saving throw bonus vs. disease), which Vandala keeps in her inventory. The other is the Goodwife's Shawl which Goodwife Aruna wants back.
Statue of Tyr
I continue on through the door that leads east out of the room at #5. There is a trap on the other side of the door.
At #8 is a Statue of Tyr. Trying to destroy it will lead to minor fire damage against the party. Seeking a blessing from it will actually lead to a Mephit Ambush. I just leave the statue be.
Mephit Guano
I head east from #8. There is another trap in the adjoining tunnel. The door at the tunnel is locked and trapped.
In the room at #9 is an Umber Hulk Thrall, which I manage to kill without much fuss. It leaves behind an Umber Hulk Carapace.
A chest in the room has a Wand of Magic Missiles and a Potion of Lore.
Also in the room is a locked Magic Jar. Smashing the jar open causes several Ice Mephits and Fire Mephits to attack. They're killed easily enough, and leave behind their corpses than can be sold. The jar itself leaves behind Mephit Guano, which can also be sold.
Lizardfolk Chieftain
I go to #10, where I fight with several Lizardfolk warriors, a Water Elemental, a Lizardfolk Mage, a Lizardfolk Shaman, and the Lizardfolk Chieftain. The fight goes pretty much the same way as the one where I obtained the Goodwife's Shawl. Janette, Gallard and Logan take care of the warriors and the Water Elemental, buffed up by Finch's Inspire Defense. Finch goes into Stealth once he plants himself in the thick of things. Vandala helps them along with Noxious Blast / Eldritch Chains. Umoja trains his bow first on the Mage, and then the Shaman.
The Chieftain leaves behind a Battleaxe +2, some gold, plus the Chieftain's Key.
The Key opens the door to the room at #11. Inside is the real Tarmas, who shortly thereafter leaves for West Harbor.
Dragon Hunt
I leave the cave, rest up, and return to West Harbor. I buff again on my return.
I speak to Lazlo Buckman, who is just ahead, where I learn of the full details of the bargain he made with the Black Dragons. Suffice it to say that he and the others would like me to kill off the Dragons.
One of the Dragons is straight ahead. I talk with him a bit. He offers a trading post with West Harbor in exchange for killing off Lazlo, Tarmas, and the Lannons. I would get an xp bonus for this if I were to take him up on his offer. That would mean that Dragon Mead becomes available as a tradable resource instead of Harvest Mead. Also, the Dragon would seal off West Harbor to me, which means that a couple of quests would become unavailable to me.
I decide to see through killing the Dragons. A few of their Lizardfolk minions show up. I concentrate my firepower on one dragon, and then the next, then killing off any Lizardolk that are still left. At this point, physically cutting them down isn't hard, and the dragons' acid breath weapons won't inflict that much damage. One of the Lizardfolk leaves behind a Greatsword +2.
Lazlo opens up the West Harbor trading post for me, for free, and Harvest Mead becomes the town's tradable rare resource. I also get 1,200xp for completing the quest.
Dragon Hoard
The spot at #12 on the Dragon Caves map was previously inaccessible, and contained the dragon hoard. It is now open after I've killed the Black Dragons.
I return there and loot the hoard. Notable items include:
West Harbor Trading Post
Now I return to West Harbor, and pay out the gold to maximize caravan routes between West Harbor and Highcliff and Leilon.
Path of the Master
I do some grinding until I get everyone to about 176,000xp, although I don't show it in the video.
I return to West Harbor and speak with Goodwife Aruna. She rewards me with 2,000xp and the Gardener's Spade (Quarterstaff +1, +2 Constitution, Cure Moderate Wounds (10) 1 / day). I have no use for the staff though.
Next I pursue the dialogue options whereby Aruna feels something is amiss with Quarrel. I then speak to Quarrel, who reveals that he is fascinated with legends surrounding Ammon Jerro. He then leaves West Harbor.
I make my way back to Crossroad Keep, killing plenty of monsters along the way. I enter the interior of the Keep, where I speak some more to Quarrel. Quarrel now becomes a joinable companion, and I get 1,100xp whether or not I have Quarrel join me then and there. I can find him in the Merchant Headquarters along with the others.
I make my way back to West Harbor. I then speak with Goodwife Aruna again, this time about Shaydann Zinn, whom she is openly suspicious of. I in turn speak to Shaydann Zinn himself, who makes a backhanded compliment towards Lazlo.
The reason for initiating these dialogues now is that I want to open a quest called Whispers in the Marsh later on. The prerequisites seem to be 1) having these dialogues beforehand 2) all characters being at least 16th level or higher and 3) being away from West Harbor for some time after having had the dialogues.
Liam Haverstead
I grind it out until I get about 180,000xp. As it so happens, another special encounter shows up in the Swamp, Liam Haverstead. I get some xp for freeing him from being tied up by a Hag. I could have scored a Harvest Mead off of him, but chose not to as a roleplaying decision.
Strange as it may sound, I now want to do some grinding to reach the epic levels.