-

- Forums
- Chatrooms
- Gallery
- Gameplay Videos
- Upload
- Articles
- Mod Reviews
- Shop SP: Games, Movies, Books
|
|
RIVERGUARD KEEP
Master's Sarcophagus
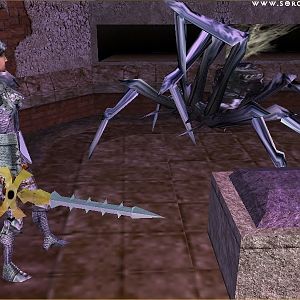
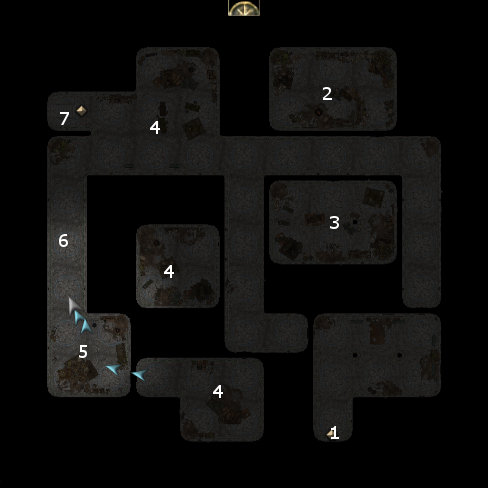
I enter and arrive at #1 on the Level 1 map. Just a little ahead is a sarcophagus that hints that a blade, a shield, and a scepter may be needed to make progress.
Ralidor the Restless
I go north along the eastern hallway, with Valeria disarming a trap along the way.
I then go into the room at #2, where I have to fight an Ogre and a pair of Goblins. They're easily killed, and leave behind a Warmace +2 and a random weapon of +2 enchantment. The nearby chests will have random loot.
Now I enter the room at #3, where I meet a Bugbear chief named Ralidor. Of all the three Goblinoid Leaders, Ralidor's quest is easily the least beneficial because there's no xp reward for doing it. I choose the dialogue option that immediately picks a fight with Ralidor and the other Bugbears.
A double shot of Firebrand from both Valeria and Qara pretty much suffice to blow them all away. One of the Bugbears leaves behind the Feywarden Crossbow (+2 attack bonus, +5 vs. Orcs). Ralidor himself leaves behind:
Feyduster +2
There are plenty of traps on the west side, and near the monsters too. Valeria casts an Extended Greater Invisibility on herself and then does a sweep to recover the traps.
Rooms marked by #4 will have plenty of Goblins in them, some of them having Clerical or Warlock-like spellcasting abilities. These can be dangerous since they can cast Confusion or area-effect damaging spells. It is often enough to just march in and physically overwhelm them, although I may have to put up with the odd inconvenience like a character getting Dazed or Confused. Qara makes generous use of Empowered Firebrand spells during these fights. Zhjaeve wins another outright with a Word of Faith spell.
The room at #5 will have two Ogres in them that I can overwhelm as well. One of the chests in the room has the Feyduster +2 (Shortsword +2, Sleep DC=16 50% / 2 rounds).
The exit to the next level is at #7.
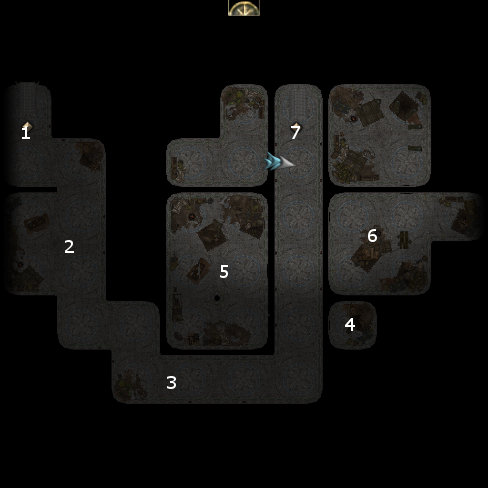
Ogre Chieftain
I start off at #1 on the second level map. There will be a pair of Ogres and a few Goblins at #2. I cut them down with physical attacks after flanking them. Note how Qara will sometimes target an individual Ogre, which is capable of very damaging attacks, with Bigby's Interposing Hand, which will impose a -10 penalty to attack bonus.
Several Ogres, Bugbears, and Goblins from throughout the dungeon start to trickle in afterwards. My responses adjust to that predicament. Valeria continues to add buffs. Casavir activates his Divine Might power. Qara will use Firebrand or Chain Lightning if she can catch enough enemies with it. If she spots an enemy spellcaster in the distance, she'll target it with Empowered Flame Arrow spells.
There are also couple of traps at either end of the hallway starting at #3.
I skip the room at #4 for reasons that will be explained at the bottom of this page.
At #5 is a room with the Ogre Chieftain in it, plus a couple of other Ogres. This is another instance where Qara makes effective use of Bigby's Interposing Hand. The Beetle Familiar follows up with a Vampiric Touch spell on the Chieftain. The Chieftain leaves behind the Master's Shield, which is the second of three items that can be used to open a door down stairs. A nearby chest also has the Brawler's Belt (blunt resistance 5/-). One of the other Ogres left behind an Adamantine Greataxe.
The rest of the monsters, such as the Bugbears and Goblins, can be found in room #6. It also has a trap, so Valeria issues a 'stand your ground' command, uses Greater Invisibility on herself, recovers the trap, and regroups with the party. After that, I charge in to wipe out the rest of the monsters. Zhjaeve unleashes Word of Faith upon them, while Qara is of course happily helping matters along with her offensive spells. Two of the Bugbears leave behind Bugbear Tusks that can be distilled into Glowing Water Essences. The exit to the next level is at #7.
Ula's Heart
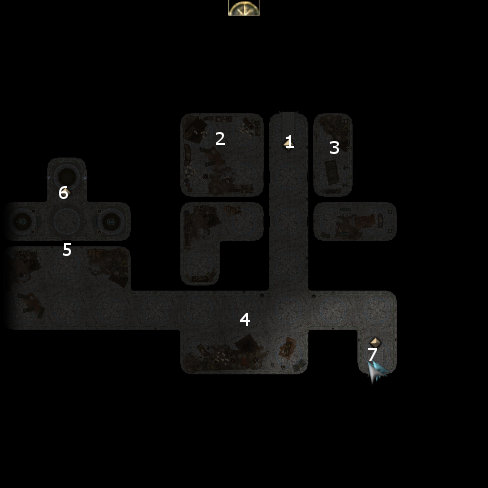
I start off at #1 on the third level map. The room at #2 has a couple of containers that will yield random loot, plus a Book of Banes. The room south of #2 has another container with random loot.
The room at #3 has a weapon rack that has Ula's Heart (Scimitar +2, Keen, Fear DC=14 50% / 2 rounds). The room south of #3 has a chest that can be squeezed for a high value gem. This time I want a Beljuril gem.
I then head back to the Sunken Flagon, and combine the Beljuril gem with a Radiant Water Essence, two Leather Hides, and an Eagle's Splendour spell to craft a Nymph Cloak +8 for Zhjaeve. Turn Undead becomes quite useful as more and more undead saturate the later stages of the game. More Charisma means more undead that will get immobilized by Turn Undead, and the more times that Turn Undead can be used.
The reason I want the Nymph Cloak for her now is because I will soon explore a dungeon that is filled with undead, the Gem Mines. And there won't be another high value gem until I've pretty much cleared out the Gem Mines as it is. I may as well fulfill this part of my long-term setup for Zhjaeve now.
Ghellu
I continue on to #4, where I find an Ogre Mage named Ghellu flanked by two Ogres. He wants to open the door leading to another Statue of Purification, which is protected by a door that kills anything that tries to open it but is apparently weakening. He offers his own quest, to kill Unthanck instead. If you take him up on the offer, you could get 2,500gp, 1,500xp, and he'll have his Goblins hurl themselves at the door to open it without any repercussions for him. There are two other ways to open the door that I'll mention later.
However, I prefer to side with Unthanck. All of the Goblins on the level will join in, including a Goblin Warlock named Blix. I was buffed up beforehand, but now I grab the opportunity the buff up some more in the first round. Casavir activates his Divine Might ability. Valeria casts Bladeweave while Qara uses Greater Invisibility on herself. Zhjaeve also casts a Holy Aura spell on the party.
After that, Qara lets loose with her offensive spells, while Zhjaeve unleashes a Word of Faith on as many enemies as she can. It becomes a mop up afterwards.
Ghellu leaves behind:
I go back to Unthanck to inform him of my success, and get 1,500xp.
Corpsewalker Clan
Here I show a way of having my cake and eating it too, getting the 1,500xp quest bonus, and all the xp for annihilating all of Ghellu, Uthanck, and Ralidor and their followers, and collecting all of their items as well.
After having gotten the 1,500xp bonus from Uthanck, I then speak to Unthanck's shaman named Ihlra. I deliberately choose the dialogue option that's a put down of the Orc deity, Gruumsh. A fight ensues, and it's easily won after Zhjaeve hits almost everything with her Word of Faith spell and after Qara lets loose with her damaging spells. Uthanck leaves behind the Ice Reaver (Battleaxe +3, +1 cold damage, +15 cold resistance), which I'll just sell. Ihlra leaves behind an amulet called The Ancient Sermon (+3 natural bonus to armor class, +1 1st-level Cleric spell, +1 2nd-level Cleric spell, +1 3rd-level Cleric spell). This will be Zhjaeve's amulet for the rest of the game. She can always cast Death Ward on herself if she needs immunity against level / ability draining.
Shining Shield
Now I head back down to #5 on the third level map. Within the room is an armor rack that has Elven Chainmail (Chainmail +3, +1 Fortitude saving throws) that I'll just sell.
There is a door that blocks the way to the next Statue of Purification. One way is to simply keep trying to open it (without all three of the Master's items) and taking damage multiple times until the enchantment dissipates and the door weakens. Doing it this way will increase influence with Zhjaeve by +2. However, as far as I'm aware, there are really no in-game repercussions to gaining or losing influence with Zhjaeve. I show the simpler way. Simply having the Master's Shield, the Master's Sword, and the Master's Scepter in my inventory allows me to open it painlessly.
The Statue of Purification is at #6 and it provides the Shining Shield Power, which raises cold resistance and negative energy resistance each by 3 points per character level. It isn't much to write home about though, since it only lasts for 2 rounds.
Ribsmasher
Now I open the door at #4 on the level 2 map, and get 100xp for freeing Ribsmasher.
Ribsmasher will go around breaking doors, chests, and possibly take xp away from me when it comes to other monsters had I released him earlier. So I wait until I've done literally everything else in Riverguard Keep first before collecting the 100xp.
Next up is the Temple of Seasons.