-

- Forums
- Chatrooms
- Gallery
- Gameplay Videos
- Upload
- Articles
- Mod Reviews
- Shop SP: Games, Movies, Books
|
|
GEM MINES
Balaur
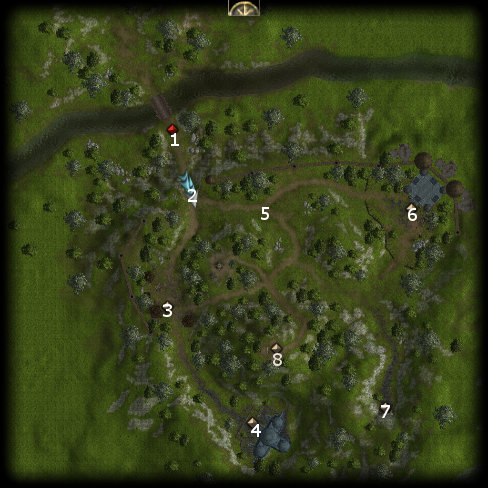
The entrance to the Gem Mines is at #7 on the Ruins of Arvahn map.
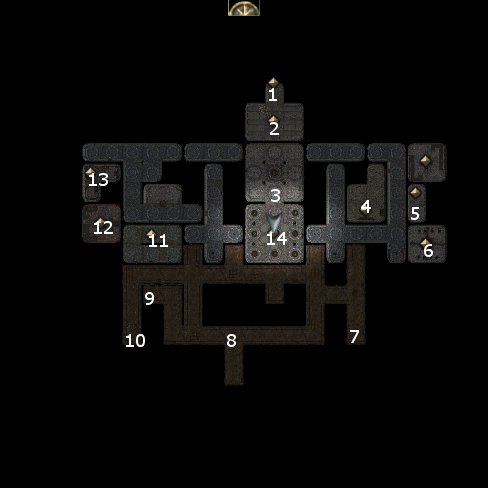
I start off at #1 on the Gem Mines map. Just a little ahead at #2 is the spirit of an Elven lorekeeper named Balaur. I speak with him at length for background information.
Master Isym
Straight ahead at #3 will be a few Ghasts, and an Elven Lich-like creature called a Balneorn. I train Casavir on it with a view towards interrupting its spells and taking it out as quickly as possible. The rest of the undead soon follow.
Master Isym soon appears. He is one of the six spirits needed to open up the Communion Tree at #14. I speak with him for a bit for background information. I also verbally acknowledge the Guardian's "noble sacrifice" for Illefarn, in order to gain +2 influence with Casavir. Had Bishop been present, I would have lost -2 influence with him.
*Evil* Master Isym
The equivalent video for Zarathos. I chose the "Patriotism is a foolish notion" dialogue option in order to gain +2 influence with Bishop. Had Casavir been present, I would have lost -2 influence with him.
Elf Maiden Spirit
Now I head east over to the room at #6, where I have to fight another Balneorn and more Ghasts. And again, I train Casavir on the Balneorn to minimize the danger. It is now that Zhjaeve reveals the utility of Turn Undead, which basically works like an area-effect spell that can stun or hold multiple undead. The higher the Charisma of the Cleric who uses it, the more undead that will get held or stunned.
A trapped and locked chest in the room has the King's Scythe (Scythe +2, Keen, Slow DC=14 50% / 2 rounds). I have no use for it, so I'll just sell it.
The spirit of an Elven maiden who is apparently angry over the pain the Guardian had to go through in the course of his transformation now appears. I spend a few minutes listening to her story.
There's a certain method for getting a spirit to the Communion Tree. You may notice some glowing crystals on the walls at intervals throughout the Mines. You can click on them to either dull their light, or have them shine brightly again. A spirit won't pass the crystal lights while they're still shining. The trick is to manipulate the lights so that you can force the spirit to go in the path you want it to. The method becomes apparent. Turn off the lights that you want the spirit to go past. Click on the spirit so that it walks past the now dulled lights. Click on the lights again so that the spirit can't backtrack. Click on the next lights that you want the spirit to go past, and so on and so on until you lead the spirit in a path towards the Communion Tree.
Mystran Belt of Priestly Might
I head over to the room in the northeast corner, and kill a few Skeletons and Ghasts over there.
I then enter the room at #5, and kill an enormous Dread Wraith there. It leaves behind a Wraith Residue. A nearby chest has the Mystran Belt of Priestly Might (+4 Strength, +2 deflection bonus to armor class, good characters only). This becomes Khelgar's belt for the rest of the game. It provides obvious benefits as both a source of deflection bonus to armor class, and his source of Strength bonus.
Annaeus
Now I go south to the room at #6. I charge in, and have Casavir take out the Balneorn. The rest of the undead fall easily as well after Zhjaeve uses Turn Undead.
There will be three chests along the north wall. Two of them have random loot. The third one has 25 Adamantine Ingots, and the Ring of Improved Evasion. Grobar gets the Ring of Improved Evasion, as it will provide him with a defensive resource that is normally unavailable to Bards.
But in the meantime, the spirit of Annaeus shows up. I speak with him at length, and then guide him to the Communion Tree.
*Note* I don't show it, but the Adamantine Ingots provide the same opportunity to craft armors for profit. I sold off 8 more Adamantine Full Plates to Dayne Lynneth.
Dwarven Miner Spirit
I go south from where I found Annaeus earlier, and then kill some Ghasts after Zhjaeve freezes them in place with Turn Undead. One of the Ghasts leaves behind Ghast Claws that can be distilled into a Glowing Air Essence and a Weak Power Essence.
Further south still is an Iron Golem. Here is where Elanee shows just how potent the Crumble spell can be against even an Iron Golem, as it then and there brought to 'near death'. It leaves behind Iron Golem Fragments that can be distilled into a Radiant Earth Essence.
There are also a couple of nearby traps, which Valeria recovers.
At #7 is the spirit of a Dwarven miner who provides more information. I then guide him to the Communion Tree as well.
Hammer of Blasting
Now I go west from #3 just a little and then head south down the long hallway. I battle plenty of Ghasts and Skeletons along the way, and one of the Skeletons leaves behind a Skeleton Rib that can be distilled into a Faint Earth Essence. One of the Ghasts also leaves behind a Ghast Claw, which again can be distilled into a Glowing Air Essence and a Weak Power Essence.
There will be a mining tunnel that runs around in a rectangular pattern on the south side of the Mines. I go east once I reach the tunnel, and then south. There will be plenty more undead to fight along the way.
After having gone south, I continue on and back west. At #8 is a Skeleton that once killed leaves behind a Skeleton Rib that can be distilled into a Faint Earth Essence, as well as the Hammer of Blasting (Light Hammer +3, Knock DC=14, +1d6 electrical damage). Just to be clear, the Knock feature only means imitating the Knock spell for purposes of opening locked doors and chests. It does not give its wielder the ability to use the Knockdown effect on its targets. Were it not for that point, I may well have considered it as a weapon for Casavir or Neeshka or somebody else.
Truly Horrid Umber Hulk
Now I head towards #10, where I run into a Truly Horrid Umber Hulk. Besides highly damaging physical attacks, the Umber Hulk can also cause confusion in a single character with its gaze, although I managed to avoid it here. I soon wear it down.
It leaves behind at least two items. One item is an Umber Hulk Mandible that can be distilled into a Weak Water Essence and a Faint Power Essence.
I don't show it in the video, but I now have two Umber Hulk Hides. I therefore craft another Umber Hulk Hide Light Shield and sell it away for plenty of gold.
Thunderbelly
Now I head to the spot at #9. There will be a trap near the end of the tunnel, which Valeria recovers. One of the corpses has some gold. The other has the Broenewede Family Armor (Chainshirt +1, immunity to mind-affecting spells, +5 acid resistance, +5 fire resistance).
I then speak with the spirit of a Dwarven warrior named Thunderbelly, and guide him to the Communion Tree as well.
Courtesan Blade
I head south and towards #11, where I fight a couple of Wraiths. One of them leaves behind Wraith Dust that can be distilled into a Weak Air Essence and a Weak Power Essence.
There will be a few chests here. The one along the south wall is guarded by a couple of traps that Valeria disarms. The chest can yield a high value gem, and I cherry pick it for a Beljuril.
There are two more chests along the north wall. One of them yields random loot, especially scrolls. The other has the Courtesan's Blade (Dagger +2, Keen, Stun DC=14 50% / 2 rounds).
The video concludes with me using the Beljuril, an Iron Ingot, a Radiant Water Essence, and an Owl's Wisdom spell to craft a Periapt of Wisdom +8 for Khelgar. It will increase both his armor class and his Will saving throws.
Silken Sisters
I now make my way towards the room at #12. There will be plenty of undead on the other side of the door. I charge right in, aided by a Haste spell. Casavir stays on top of the Balneorn. Valeria unleashes a Firebrand spell, while Zhjaeve uses Turn Undead. The Skeletal Blacksmiths from the nearby room at #13 also come over and join in, but I take them out too.
A spirit appears, which is actually several spirits of the Silken Sisters that have been forcibly fused together by the King of Shadows. Like the others, I lead it to the Communion Tree.
*Evil* Silken Sisters
The parallel video for Zarathos, where he's more nasty towards the Silken Sisters, and receives responses in kind.
Rune-Inscribed Iron Piece
There will be a Blacksmith's Forge and a Magician's Workbench in the room at #13. A trapped chest has the Hammer of the Lost Empire (Warhammer +3, +1d6 fire damage, +2 Strength, +1 regeneration). Another trapped chest has the Gem of True Seeing (True Seeing (9) 1/day).
There is one more item. The Cauldron has the Rune-Inscribed Iron Piece, which is the last ingredient needed for Grobnar to awaken the Construct.
Re-Activating the Contruct
Now I finish a side quest. I need three items to help Grobnar re-activate the Construct. I already have two of them, the book called The Ancient Book of Golemcraft that I previously found when I first entered Crossroad Keep, and the Vial of Glowstone Water from the Glowstone Cave. The third is the Rune-Inscribed Iron Piece that I just found in the Gem Mines.
I then go to the basement of Crossroad Keep. Note that Grobnar has to be out of the party so that I can speak to him in the basement. He then uses the three items to make the Construct a joinable companion, and I get 1,000xp. Note also how I always choose dialogue options that will win influence with Grobnar, like 'good job' and 'it will be a useful asset' and so on.
*Note* I did this last because I wanted to get as much xp as possible from killing monsters before getting any xp quest bonuses that could possibly have put me to the next level of experience.
The Communion Tree
All of the spirits have by now gathered at #3. I simply nudge them ahead so that they'll go to the Communion Tree at #14. They combine their wills together in order to reveal the Statue of Purification beneath the Tree.
Soothing Light
I now acquire the Soothing Light power from the Statue of Purification. It will remove any negative levels, bestow 1 point of negative energy resistance for every 5 character levels, and cures all party members of 1 hit point for each character level for 10 rounds. Just to clarify, all of these effects activate for 10 consecutive rounds. I also get 1,500xp.
16th Level
Here is where all the party members advance to their 16th level. Everyone gets to add a +1 to one of their important attributes.
Grobnar acquires the Dirge, Energy Immunity, Greater Heroism and Remove Fear spells all at once. Neeshka and Shandra both acquire the Improved Two-Weapon Fighting feat.
Balaur's Scrolls
Now I make to leave, whereupon Balaur indicates that the spirits won't truly be free until the King of Shadows has been defeated.
Some of the shelves in the room will have scrolls that I can now loot without worry, as all of the monsters have been cleared out. I'll sell most them since any of them I could find useful I'll simply take during level ups.
However, I found two powerful Clerical scrolls, Blade Barrier and Heal. I'll save those for Ammon Jerro, since he can potentially use them to expand his versatility.
Next I must travel through the Song Portal.