Baldur's Gate 2 Online Walkthrough by Montresor


CREATING A CHARACTER  |  GENERAL TIPS AND TRICKS  |  NPCs  |  ITEM LISTS  |   SHOPS   
Watcher's Keep: Outside  |  Ritual Level  |  Elemental Level  |  Maze Level  |  The Machine of Lum the Mad  |  The Final Seal  |  The Imprisoned One
Shadows of Amn  |  Throne of Bhaal  
About the Walkthrough  |  Organization of the Walkthrough  |  About the Maps  |  About the Author  |  Where to Begin
Disable all ads!

The Final Seal
The Final Seal  |  The Test of Stamina  |  The Test of Bravery  |  The Test of Wits  

THE FINAL SEAL

Congratulations! You have reached the last level but one of Watcher's Keep. Your job on this level is to open the final seal. But to do that, you'll have to open three partial seals first. And to open them, you'll have to acquire some keys by passing some tests.

Also, when you open the seals you will be attacked by some very high-level enemies!
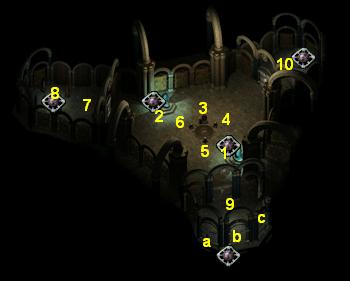
  1. This is where you arrive. The portal leads back to the Machine of Lum the Mad.

  2. This portal leads to the Outside Area.

  3. This opens the final seal, once you have opened the other three seals at 4, 5, and 6.

  4. This is the Mind seal. You need the Mind Key from 8 to open it. For opening the seal, each party member receives 20,000 XP.

    You will be attacked by an Aurumach Rilmani and four Ferrumachs. The Aurumach drops the Club of Detonation +3.

  5. This is the Spirit seal. To open it you need the Spirit Key from 10.

    When you open the seal, each party member receives 20,000 XP. But the seal also releases a Lich named Azamantes and four Flaming Skulls. The Skulls can be a major pain – they zip around, do a lot of fire damage, cast Incendiary Cloud, and when killed they explode in one final Fireball.

    Azamantes drops the Erinne Sling +4 and the Serpent Shaft.

  6. This is the Heart seal. To open it you need the Heart Key from 9. Opening the seal nets each party member 20,000 XP. But...

    Before opening the seal, prepare for one of the hardest battles in Baldur's Gate 2. You will have to fight a Succubus named Nalmissra, a Marileth named Y'tossi, a Hive Mother, Xei Win Too who can use Kai and Greater Whirlwind attacks, a Drow Cleric named Ameralis Zauviir, and a demonic Ranger called The Huntress with the Called Shot ability.
    Nalmissra drops a Scroll of Wish and a Diamond.

    Y'tossi drops the Gauntlets of Extraordinary Specialization and a Rogue Stone.

    Xei Win Too drops a Star Sapphire gem and a King's Tears gem.

    The Huntress drops the Taralash +4 long bow.

  7. Once you enter this room, you are attacked by a few Sword Spiders, Vortex Spiders, and Mutated Spiders. Watch out for poisoning!

  8. Here you have to drop globes into the corresponding cylinders. Click the machine to obtain some advice and the globes.

    Pick the red globe and you'll be ambushed by a band of Hobgoblins. Place it in the red column.

    Pick the blue globe and you'll be attacked by a Mage.

    Pick the green globe and you'll be attacked by a few Mutated Spiders. Kill them as fast as possible and make sure to have Antidotes ready!

    Pick the Purple globe and you'll be attacked by a few Skeleton Warriors.

    Once you have placed all four globes in the appropriate columns, each party member receives 10,000 XP and you also get the Mind Key which can be used to open the Mind seal back at 4.

  9. Here you are met by a Helmite Ghost who explains to you that you need to complete some tests. Accept.

    Behind the ghost are three doors:

    1. Leads to the Test of Stamina, where you will have to kill a large number of Orcs that keep respawning.

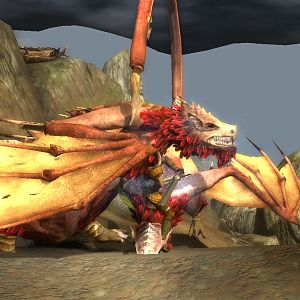
    2. Leads to the Test of Bravery, where you will have to kill a Dragon.

    3. Leads to the Test of Wits, where you have to guess two riddles.

      Once all three tests are done, the Ghost gives you the Heart Key and each party member gains 10,000 XP. You can now open the Heart seal at 6.

  10. Here you will have to fight random tough monsters.

    Once all monsters are destroyed, click the altar. If you have already done the Test of Bravery, you should have the Warrior's Skull. Your mind is transferred to a Spirit Warrior. Follow these steps to solve the maze:

    1. Go East.
    2. Kill the Goblin.
    3. Go East.
    4. Examine the Treasure Chest.
    5. Attack the Skeleton.
    6. Open the chest to get a Wand of Missiles. Each party member receives 4,000 XP.
    7. Go North.
    8. Kill the War Dog.
    9. Search the room to get an Iron Key and a Blue Potion which heals the Spirit Warrior somewhat. Each party member receives 4,000 XP.
    10. Go West.
    11. Search the room to find a scroll with a Gibberling on it. Each party member gets 4,000 XP for this.
    12. Go West.
    13. Don't drink from the fountain! It will harm the Spirit Warrior.
    14. Go North.
    15. Kill the Ghost.
    16. Open the chest to get a magical helm that will protect the Spirit Warrior. Each party member receives 4,000 XP.
    17. Go East.
    18. Go East again.
    19. Open the desk drawer. You will take a some poison damage and find a pair of Bracers that will help protect the Spirit Warrior. Each party member receives another 4,000 XP for this.
    20. Go North.
    21. Use the scroll with the Gibberling picture on it to scare the Gibberling away. This nets each party member 3,000 XP.
    22. Go West.
    23. Examine the chest to get a Blue Potion which heals the Spirit Warrior greatly. Each party member gets 3,000.
    24. Go through the ominous archway.
    25. Use the Wand of Missiles, then kill the mummy.

      Once done with the Spirit maze, the party gets the Spirit Key and each party member receives 21,000 XP. You can now open the Spirit seal at 5.


Amazon.com
Amazon.ca
Amazon.co.uk
Sorcerer's Place is a project run entirely by fans and for fans. Maintaining Sorcerer's Place and a stable environment for all our hosted sites requires a substantial amount of our time and funds on a regular basis, so please consider supporting us to keep the site up & running smoothly. Thank you!

Disable all ads!