-

- Forums
- Chatrooms
- Gallery
- Gameplay Videos
- Upload
- Articles
- Mod Reviews
- Shop SP: Games, Movies, Books
|
|
THE ELEMENTAL NODES
After clearing out all four levels of the Temple, it is now time to use the dimensional gateways that Hedrack had previously controlled access to. The gateways lead to a part of one of the four elemental planes; Air, Earth, Fire, and Water. Each portion of the elemental plane is watched over by a guardian, a Demon from the Abyss that is somehow representative of the Elemental Node that it resides in. Each Demon guards one of the four Elemental Gems used to empower the Orb of Golden Death. The objective then is to join all four of the Gems to the Orb so as to pursue a final ending.
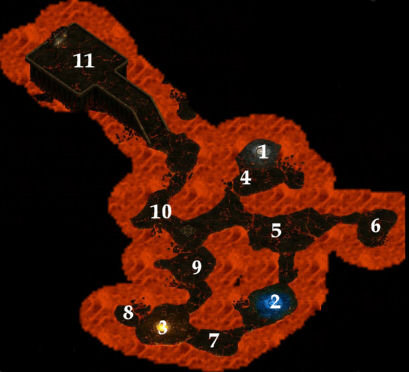
Fire Elemental Node
Of all the Elemental Nodes, the Fire Node has the toughest of the guardians. It is none other than a mighty Balor. As will be seen in my advice concerning the Balor, there’s a specific reason for doing the Earth and Air Nodes first. Generous use of Protection from Energy: Fire is earnestly recommended for this Node, and not just when the time comes to confront the Balor.
1. This is a gateway to the Air Elemental Node.
2. This is a gateway to the Water Elemental Node.
3. This is a gateway to the Earth Elemental Node.
4. Two Efreeti, genie-like beings with an emphasis on fire, lie in wait to attack the party.
5. A collection of Large Fire Elementals and Fire Snakes will attack the party here.
6. Here the party will run into a large collection of Salamanders, who love to crank out Fireballs. It is advisable to have Protection from Energy: Fire on everybody beforehand in order to absorb the initial onslaught. It is then recommended that your primary damage caster catch as many Salamanders as he can with a Cone of Cold. This makes the mopping up much easier.
Once they’re gone, they’ll leave a chest behind. Along with the treasure, you’ll also find a Holy Greataxe +1, and an Amulet of Wisdom +4. Ferofist dons the Amulet of Wisdom at last.
7. Here you’ll run into several Bodaks, undead creatures that apparently have damage resistance penetrated only by silver weapons. They’re also capable of a death gaze, though good enough saving throws will overcome this. Remember those Silver Arrows in the Temple? Just a thought that I didn’t test out. Holy weapons also make a good mark on them. They aren’t too dangerous in any event.
8. Here you’ll run into Darley, a joinable sorceress. My Paladin ended up seeing her evil aura, prompting her to reveal her true form as an Alu-fiend and then provoking a rather easy fight where I wasted her.
9. Here you’ll run into 3 Fire Toads. If I remember correctly, they’ll also inflict fire damage in addition to the usual crushing damage after swallowing a victim. Kill and kill quickly is the motto.
10. 3 Salamanders lie in wait here.
 11.
Now it is time for the big challenge. I’ll give you a brief
rundown of the Balor’s procedure for killing your party. It
spends the first couple of rounds casting Suggestion in order to
have party members turn against you. It then activates its fear
aura to try and divide the party further. It will then summon Quasits
to its aid. It will then cast Slay Living at a target for the next
2 rounds. After that, it spends about the next 2 to 3 rounds trying
to dispel your buffs or protections. At that point, the Balor unleashes
its devastating melee attacks. Anybody close enough to the Balor
is always subject to damage from the flames that surround its body.
Incidentally, the Balor is also assisted by two Efreeti.
11.
Now it is time for the big challenge. I’ll give you a brief
rundown of the Balor’s procedure for killing your party. It
spends the first couple of rounds casting Suggestion in order to
have party members turn against you. It then activates its fear
aura to try and divide the party further. It will then summon Quasits
to its aid. It will then cast Slay Living at a target for the next
2 rounds. After that, it spends about the next 2 to 3 rounds trying
to dispel your buffs or protections. At that point, the Balor unleashes
its devastating melee attacks. Anybody close enough to the Balor
is always subject to damage from the flames that surround its body.
Incidentally, the Balor is also assisted by two Efreeti.
Maximum preparation beforehand is the key. The first couple of rounds are spent getting off any additional buffs of shorter duration such as Haste. Indeed, Sir Tirion casts Divine Favor on himself simply because the Balor’s Armor Class is that high! Alliria summons a Fire Elemental. Lanatir uses the Orb of Golden Death to summon a Glabrezu and Vrock to the party’s aid. As distasteful as this may be to a party committed to the cause of good, it must be borne in mind that the Balor has a Challenge Rating of 18 to 20. In the meantime, 10 is the cap on the number of levels that you can advance.
The ideal then is to have Sir Tirion and the Glabrezu create flanking positions around the Balor. The two of them should then be able to cut down the Balor to (a smaller) size. Indeed, I delayed the casting of Haste until I could plant it on both Sir Tirion and the Glabrezu. Even so, be mindful that the Balor has 250 or so hit points. Lanatir cranks it out with Magic Missiles and Cone of Cold. He does not however, expend any of his remaining 3rd level spell slots. The reason for this is that he may have to cast Protection from Energy: Fire again on a character if the Balor has dispelled it.
The Balor will leave behind the Fire Elemental Gem, which empowers the Orb of Golden Death to cast Flamestrike once a day, Summon Fire Elemental once a day, and Summon Balor once a week. Wow…
The party is now ready to leave the Node through the door that had been behind the Balor.