-

- Forums
- Chatrooms
- Gallery
- Gameplay Videos
- Upload
- Articles
- Mod Reviews
- Shop SP: Games, Movies, Books
Prologue | Chapter 1 | Chapter 2 | Chapter 3 | Chapter 4 | Chapter 5 | Tales of the Sword Coast | Chapter 6 | Chapter 7 | |
Ice Island | Balduran's Isle | Durlag's Tower - Above Ground | Durlag's Tower - Level 1 | Durlag's Tower - Level 2 | Durlag's Tower - Level 3 | Durlag's Tower - Level 4 | Cult of the Demon | |
DURLAG'S TOWER
Greater Wyverns
As soon as the party comes down the stairs, there will be a door just ahead. On the other side is a large circular room with a well in the middle. The well unleashes a Fireball at regular intervals. A corpse in the room also has a few Potions and ammunition, but it's not really worth the risk. The room itself also has three other doors that branch out northwest, southwest, and southeast.
There's a way to get across safely to one of the doors. Avastrian waits for a Fireball to go off. As soon as one does, using his Boots of Speed, he races across to the northwest door in order to open a revealed path across. He opens the northwest door (my first choice) and then puts himself out of distance from the next Fireball. The rest of the characters follow suit one at a time. Each takes their turns by waiting just outside the edge of the blast radius, waiting for a Fireball to go off, and then going by the shortest path possible to the door across and outside the radius of the next Fireball. It is better to take the time to do this one at a time, to avoid characters blocking each other and putting them at risk of getting caught by the next Fireball.
The party continues northwest towards a large cave. They encounter a Skeleton who warns them of magically empowered ancient beasts who have never been defeated. He also suggests that you can click on one of the statues in the room so that a Hero will be under your control temporarily. He also warns that the Hero will turn on me once my temporary control wears off. I didn't bother.
The beasts he refers to are Greater Wyverns. They have a lot of hit points, hit for massive damage even if their targets make a saving throw against poison, and have a lot of magic resistance. Fortunately they are also spaced apart far enough that I can take them on one at a time.
My method was to have Imoen use her Wand of Summoning, and Yeslick to cast Animate Dead, with a placement so that my summoned monsters are well ahead of me. I then send the monsters well ahead of me so that they become the initial targets for the nearest Greater Wyvern. While the Greater Wyvern is occupied with fighting my meat shields, Yeslick, Jaheira, Kivan, and Imoen are taking aim with their missile weapons. Note how Kivan switches over to Arrows of Piercing in order to maximize his chances of hitting the beast. The point of this is to reduce its hit points as much as possible before it closes in.
Note also that I position Avastrian and Khalid ahead of the rest of the party as the front guard. When there's about one or two summons left, Avastrian starts to get ready by casting Mirror Image. When the Wyvern looks nearly ready to charge, Avastrian follows up with Haste on the party. Once it does close in, Jaheira whips out Defensive Harmony.
The party, now having softened up the Greater Wyvern beforehand, are now able to bring it down in close up combat.
I rest up after each fight, and then repeat the process for the other two Greater Wyverns.
Skeleton Platforms
The door on the south side of the Fireball room leads to another large room. This room has several suspended platforms. Each platform will have several Skeletons that fire Arrows of Fire, and have more magical ammunition in their quivers. Avastrian is content to blow them away with shots from a Wand of Fire. Note that charging them can be dangerous, because there are several traps that unleash Stinking Cloud that can give the immune Skeletons a distinct advantage over you. Given how little experience you actually get from this, you may decide that it is worth your while to avoid this room altogether.
Topiary Room
Now the party crosses the Fireball room again, this time heading for the door leading southeast.
On the other side of the door is a large room filled with topiary. There's plenty of traps here, as well as Greater Ghouls. Greater Ghouls are basically tougher Ghouls that attack and move as though under a Haste spell, which makes them much more dangerous. And remember, in SCS, they'll spread their attacks around to try and paralyze multiple party members.
My method for this area was to have Imoen search ahead for traps, but with the rest of the party staying close behind. Whenever one or more Greater Ghouls come into view, Imoen regroups with the rest of the party. Avastrian and Khalid take up front guard positions. Yeslick, Jaheira, Kivan, and Imoen then fire away the nearest Ghoul. Avastrian and Khalid engage in melee combat only once the Ghouls have closed in.
In the middle of the room is a large fountain with several potions, a scroll of Hold Monster, and Bala's Axe (each strike of the axe can inflict Miscast Magic on its target). Khalid equips this weapon since it may be useful in select situations where he's faced with magic users, although the Defender scimitar remains his primary weapon.
At the south end of the room will be a new kind of monster, Ashirukurus. An Ashirukuru can 'passively' turn invisible every combat round, allowing it to go for backstabs. The backstabs, if they connect, can really hurt. Ironically they were easier in SCS than they were in vanilla BG1. I couldn't use Stoneskin in vanilla BG1, so Imoen was often the soft target who forced a reload. She's protected in SCS. A decently equipped and protected party should be able to avoid damage from the backstabs, and pounce during those moments when the Ashirukuru's invisibility is blown.
Masked Statues
The party leaves the topiary room through the south door. They then go west a little, and kill off a couple more Greater Ghouls. Imoen disarms a large trap nearby.
There will be several masked statues. When I click on them, they provide vague clues about guardians who will bar the way to the next level.
Phoenix Guards
*Note* I am now at the east end of a long hallway at the south end of the level. Along the south edge of the hallway will be four doorways. Each doorway leads to guardians that represent the four elements, earth, air, fire, and water. All of them must be defeated to reach a special room that opens the way to the next level.
Now here's the catch. When you defeat the last of the guardians, you will immediately get transported to the special room without any opportunity to rest. The special room itself will force you into a battle that can be quite tough (even more so in SCS).
So the objective should be to make the last of the four elemental guardians fights the one where you can win with relative ease, taking a minimum of damage and expending a minimum of spells, before getting transported to the next fight. Concurrently, you should fight those elemental guardians who are likely to inflict damage on you and force you to expend spells earlier rather than last. This way you can rest up after them.
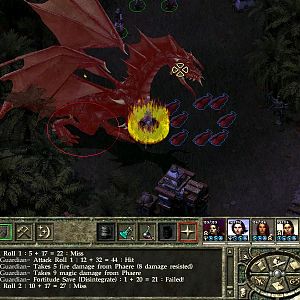
My first choice is the fire room, which is immediately south of the masked statues. I have everyone drink a Potion of Fire Resistance beforehand. The room itself has two Phoenix Guards. In vanilla BG1 I could instantly kill one Phoenix Guard with a shot from a Wand of Frost and then get transported to the special room. It's not that simple in SCS. The Phoenix Guards now only take partial damage from a Wand of Frost. They also use Potions of Extra Healing. So it is pretty much impossible to stop them from getting close to the party. This means that once I do kill them, they'll explode and cause fire damage to party members within a certain radius. This is the reason for drinking Potions of Fire Resistance beforehand.
Air Aspect
The next room up the hallway is the air room. The guardians will be a wyvern-like creature called an Air Aspect, and three Invisible Stalkers. The Air Aspect can be a dangerous opponent, basically being an enhanced version of a Wyvern that can cause poisoning. This fight can be fairly dangerous, so Avastrian begins with a Haste spell. Imoen then casts Greater Malison, and Avastrian follows up with Slow in order to tip the scales of physical combat. After that it becomes a matter of hacking them down.
Kaldren the Bear
First, Avastrian had expended his Minor Spell Sequencer (Blur, Mirror Image) during the previous fight, so now I decide to try a little experiment with Stinking Cloud and Web together that I might try in a future fight (although this didn't materialize).
I skip the next room, which is the one I want to save for last, and on to the room beyond. On the other side is Kaldren the Bear and some Winter Wolves. All of them can target a single character with cold projectile attacks, with Kaldren's being the most damaging. They also tend to single out the foremost character. I have Yeslick drink a Potion of Cold Resistance beforehand as he'll be the foremost.
Once I go in I bombard everything all at once with a Wand of Fireball shot from Avastrian, a Potion of Explosions from Yeslick, an Oil of Fiery Burning from Khalid, a Necklace of Missiles shot from Jaheira, and a Wand of Fireball shot from Imoen. This combined attack suffices to kill off the Winter Wolves outright, and severely weaken Kaldren. The fighters then wade in and mop up.
Fission Slime
Now I go back to the third doorway. On the other side is the Fission Slime, which can only be damaged by fire. I use multiple fire spells or bombs on it from off-screen in order to kill it without taking a scratch, and thus fulfilling my previously described goal of being at optimum readiness for the next fight.
Imoen hints that the party has a few moments to spare before the next fight.
Game of Chess
The party begins to make extra preparations: Mirror Images, Haste, Remove Fear, Armor of Faiths, Potions of Giant Strength. They are then teleported to a room that resembles a chess board. Indeed it is a chess game of sorts, where you have to defeat the other pieces, with a King (now a Fighter/Mage in SCS), a Queen (still a Mage in SCS), Bishops (still Clerics in SCS), Knights (still human warriors), Rooks (still Elven archers), and Pawns (still Dwarven fighters).
Everybody's somewhat tougher in the SCS version of this battle. In vanilla BG1 the enemies started off standing still, allowing my party to set up crowd-control and then offensive spellcasting at leisure. One of the key differences introduced in SCS, and one that ramps up the difficulty considerably, is that the enemy forces will immediately rush towards me. And most of them are going to head straight for Avastrian. I flirted briefly with the idea of a Minor Spell Sequencer of Stinking Cloud and Web, but then realized that you still need to target a monster specifically with the Sequencer. By the time the Sequencer hits an enemy he'll have reached me, leading to a backfire.
So I had to try a different strategy. I hit pause as soon as I arrive at the chess board. I then have Khalid throw an Oil of Fiery Burning, Jaheira send a blast from her Necklace of Missiles, and Yeslick throw a Potion of Explosions, all at the same central point. The idea is to inflict multiple sources of fire damage on as many incoming enemies as possible.
Avastrian and Imoen don't do anything just yet. The Chaos and Slow combo is often sufficient to win a fight by itself. Both spells are party friendly. Chaos means many of the monsters won't even target my party members. Slow means that even when they do target my party members, they attack less often and are much less likely to connect. Both spells also force their targets to save at a -4 penalty. In this battle, the Chaos and Slow combo can make the difference between life and death. Both Avastrian and Imoen wait until they're about halfway across the board, and then time the combo to affect as many of the enemies as possible.
Now I begin to take out the Pawns and Knights that have reached me. There are rules about which characters can move where without taking damage, but I just find it easier to keep everyone on their original squares. If an enemy is immediately adjacent to a party member, that party member switches over to melee attacks. If the enemies are at a distance from the party member, the party member then switches to missile attacks. Imoen helps matters along by pecking the Knights, and then the Pawns, with blasts from her Wand of Frost.
Jaheira, once the enemies have closed in, casts Defensive Harmony to give the party a further edge during the up close combat. Once that's in place, she aims an Insect Plague at the Bishop standing right next to the Queen. Note that you can't target an invisible enemy with Insect Plague, but once you hit a visible monster with the spell, invisibility will be no protection against the Insect Plague swarming to other nearby enemies. The Insect Plague spreads to the Queen, the other Bishop, and the King, preventing all of them from casting spells.
The party wipes out the Pawns and the Knights that are close by. They then switch over to missile weapons, and begin taking out the remaining Pawns, the Rooks, the Bishops, and the Queen, one by one. The King is left for last, and becomes a mop up.
The King leaves behind a few clerical scrolls, as well as a Two-Handed Sword +3. Kivan wields this, and it now becomes his usual weapon. He keeps the Spider's Bane Sword for when he needs to protect himself against paralyzation.
The way is now open to the last level.