-

- Forums
- Chatrooms
- Gallery
- Gameplay Videos
- Upload
- Articles
- Mod Reviews
- Shop SP: Games, Movies, Books

|
|
New City | Orkogre Castle | Nyctalinth | Munkharama | The Hidden Temple | Land of Dreams | Rattkin Ruins | The Funhouse | Giant Cave | Witch Mountain | Ukpyr | Sphynx Cave | Dionysceus | Return to Nyctalinth | Return to New City | Dragon Cave | City of Sky | Hall of the Dead | Hall of Gorrors | Hall of the Past | Tomb of the Astral Dominae |
RATTKIN RUINS
The Sacred Grove
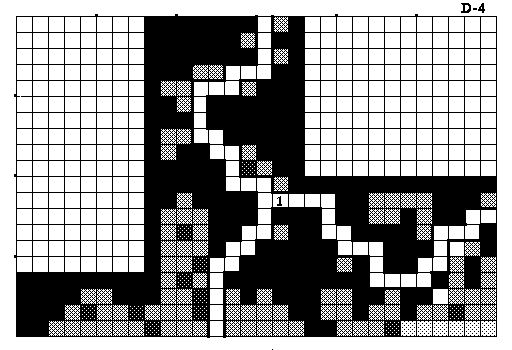
I actually end up leaving through the north exit from Munkharama. I travel from the east side of the D4 map until I reach a fork in the road. Going south would lead to New City, but I take the north road.
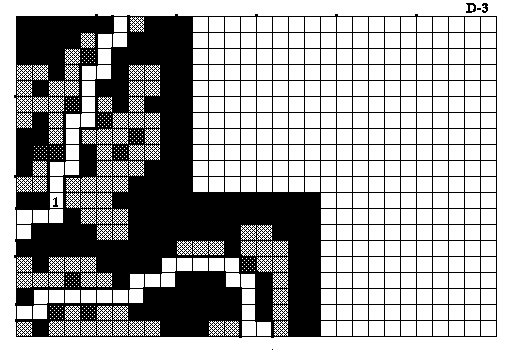
I arrive at the south edge of the D3 map, but the road turns westward.
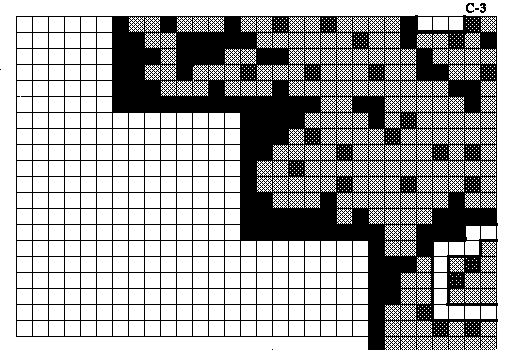
Which shows up as a brief curve on the C3 map.

And the curve leads back to the D4 map, where the road more or less goes straight north.
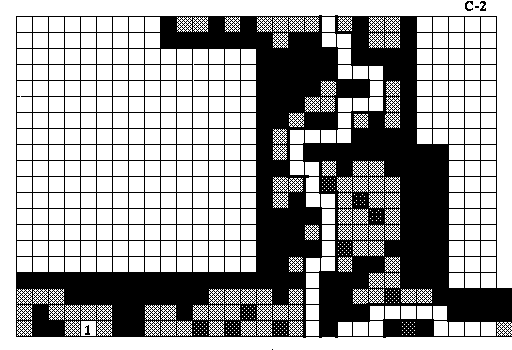
And then I end up in the southeast corner of the C2 map. The road leads west (showing up briefly in the northeast corner of the C3 map) and then north.
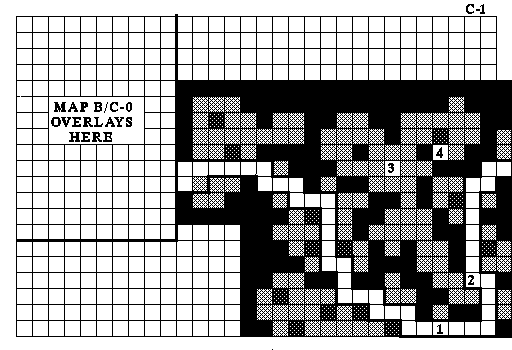
And that brings me to the south edge of the C1 map. I want to turn left into the forest itself at #2, but I stop there for the time being.
I spin around for monsters and xp. The reason is that I have some level-ups coming soon. And deeper in the forest will be several intense encounters that take place one after the other, without the party getting a chance to cut its breath, and worth plenty of xp. I don't want to go through that trouble only to have to do it over again if I get crappy level-up rolls.
The near end of the video illustrates something you need to be on the lookout for. I make progress with grinding for xp when Xen Xheng shows up. I select the trade option just to double check. And sure enough it turns out that he's acquired the Temple Map, so I buy it from him. This happens once in a while. Whenever you run into a NPC, do this check while you have the opportunity.
I resume spinning around until Ryu and Terra both reach their 11th levels. Ryu takes Poison Gas, which can be a potent offensive option that can poison multiple enemies in a group over the course of several rounds. Terra adds 2 points to Theology, just enough to reach the 5th-tier Theology spells, and puts the rest in Thaumatury. She takes Healthfull.
I spin around and Zara gains his 12th level. My insistences for him are 10+ Hit Points and more than 1 Personal Skill Points, with an emphasis on building up his Power Attack skill as high as I can.
The Sacred Grove
Now I put up my long lasting protections, Enchanted Blade, Armor Plate, and Magic Screen, because I have a prolonged series of battles up ahead.
I am making for #3 on the map. On my way there, I have to fight a few Man O' Groves, tree like monsters that can strike at extended range for significant damage, have high armor, and take a fair bit of damage themselves before going down. I do not have my Monk and Ninja practice hiding during these fights, because it will increase the risk to my back rank characters.
I get closer to #3, and I'm now in for three fights in succession. The first one is against another group of Man O' Groves. The second one will be against two groups of Man O' Groves. The third will be against a group of Man O' Groves, a pair of Halloweeches and a Tobagan. The latter two are like Man O' Groves except they can cast pells like Terror and Weaken and Powder Gas. Chun-Li used Silence on the Tobagan. Rothgar used Silence on the Halloweeches. Terra used a Snake Dust on the Man O' Groves to gradually weaken them over the course of the fight. It goes with saying that I take out the Tobagan first, the Halloweeches second, and the Man O' Groves last.
Once all three fights are done, the party goes to #3. Chun-Li uses the Bonsai Tree from Orkogre Castle and a giant tree temporarily appears. He says that he will grant access to the nearby ruins, and then dwindles away.
The chest at #4 has a Studded Hauberk, a Phyrigan Cap (which my Bard already has), a Lute of Sloth, and a few other random items as well. One of the random items was an Ankh of Speed. Ryu invokes it to raise his Speed to 19. There's a particular reason why I have him emphasize Speed, including being the character who will get the Snake Speed skill. Being able to act first can be helpful, even crucial, against certainly very powerful enemies during the latter part of the game.
I then leave the Grove and take the road eastwards.
Getting to the Rattkin Ruins
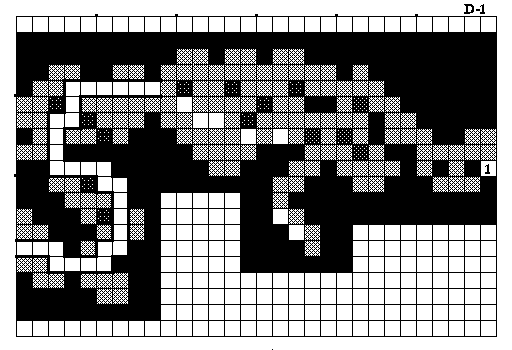
Following the road brings me to the west edge of the D1 map. I continue until I reach #1 on the east side. After the Bonsai Tree has been planted, the branches at #1 will transport me inside of the Rattkin Ruins themselves.
Forest Cape
Now keep in mind that you'll often run into numerous groups of Rattkin as you explore their ruins. Here's a breakdown of what you can expect:
Thieves and Bandits - The weakest, and can often be easily taken out with Sleep or an offensive spell.
Hunters - Rattkin Rangers basically. Can be dangerous if they hit the party with Sleep, Blinding Flash, or Confusion. Itching Skin isn't really much of an encumbrance. If a small group is within hand's reach, your warriors can probably take them out without trouble. A more numerous group, especially one in the back ranks, will often require spells (e.g., Fireball, Sleep, etc.) to take them out quickly before they get off their own spells.
Leaders - Not as numerous, but they are tougher. They can attack with poisoned Skeleton Daggers if they're in the back ranks, or attack multiple times with poisoned Vorpal Blades if they're in the front ranks. These should be your immediate priority for killing. If Hunters are alongside them, take the Hunters out with spells while letting your warriors go after the Leaders.
If a Rattkin battle is numerous enough, it is often worth your while to cast Missile Shield, which will prevent many of their arrows, darts, and bullets from ever reaching you.
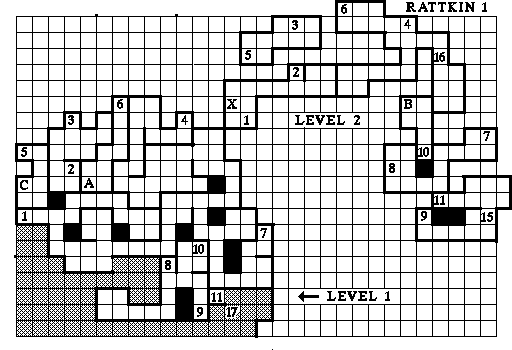
Anyway, I start off at the place marked 'X' on Level 2 of the Map. I then go down the ladder at #2 of Level 2, then up the ladder at #3 of Level 1, then down the ladder at #5 of Level 2.
The place marked 'C' has a chest that will include a random missile, random ammunition, a random hand-held weapon (lower-tier), a Rapier, and a Forest Cape (+3 armor class, Rangers only). I don't have any use for the Cape, but it will sell for about 5000gp when I get the chance.
Bertie's Bungalow
I now backtrack to where I first started. I then go down the ladder at #1 on Level 2. I then go quite a long ways and then up the ladder at #4 on Level 1.
I fight many Rattkin and other monsters along the way, often when they interrupt me during resting. I'll fight them whenever I can for the xp.
One such fight shows you often have to be creative depending on the situation. A fight that interrupted my rest meant that only Chun-Li and one other character was awake. But the monsters included Rattkin Hunters ready to throw Alchemy spells at me. So Chun-Li hits them with a Psionic Blast spell. It doesn't kill them outright, but it does prevent them from using any spells on me. It's fights like these that can show the value of hybrid characters.
I then go through the door at #16. On the other side is Bertie's Bungalow.
He's initially unwilling to trade with me because I previously killed Ratsputin. So Rothgar negotiates and makes "Peace" overtures to him. If he attacks or "appears reserved" and leaves, I'll reload. If he "looks pleased" and leaves, I'll leave too and savegame. The latter occurrence means Rothgar gains a skill point in Diplomacy. I had to make three "pleased" checks before Bertie was willing to trade with me.
I take the opportunity to sell any excess loot I've been carrying. What I need to buy from him is the Feather Weight potion, which will help me get past a dungeon that is coming up soon.
Errol is very close to his 12th level-up, so I spin around to get him there and avoid having that level-up occur after my next major fight. He takes Anti-Magic, which can creates a shell that can prevent a monster group's spells from ever coming towards the party.
Grimal
Now I leave Bertie's Bungalow and head down the stairs at #6 on Level 2. I then go towards the location marked 'A' on Level 1.
Before I step through the door for a fight against a boss Rattkin named Grimal and 4 Rattkin Ronin. This is potentially a dangerous fight. Rattkin Ronin are basically Samurai who can often get off offensive spells right away since they have a very good initiative. Terra cast Silence on the Ronin. And since they used physical attacks against me during the first round, they wound be able to get off any spells during subsequent rounds. I gagn up on Grimal, and then wipe out the Ronin.
'A' marks a chest that will have a couple of keys, a few Ninja stars, a random lower-tier armor, and the Vorpal Blade (4-14 damage, 35% poison on target). Errol uses this as his back-stabbing weapon for the rest of the game, but he also keeps a Cutlass as a weapon in his bag for importing into Wizardry 8.
I backtrack and go back up the ladder at #1 on the Level 1 map.
Bleinmeis
Now I go down the ladder at #4 on Level 2, and then I leave for the outdoors by way of the exit that is in between #1 and #8 on Level 1.
At #17 is a blind and old Rattkin named Bleinmeis. The key to progress is to attempt and fail at picking his pocket. Don't worry, he won't go hostile. He's testing you, and soon departs. He'll also leave behind a Signet Ring, which will come in handy very shortly.
Now I go back inside the compound the way I came. I go east and fight some random monsters. Rothgar takes Cure Disease on his 12th level-up. It's one of the nastiest conditions a party member can be afflicted with, so I make a point of having at least one or more characters get the spell when I can.
I go up the ladder at #7 on Level 1, and then down the ladder at #8 on Level 2. Going up the ladder at #10 on Level 1 leads to a chest with random magical loot at the location marked 'B'. I reload until I get an Invisibility Potion from it. The Book of Banishment,which Terra will scribe when she gains access to 6th-tier spells, is sugar on top. I then go up the ladder at #9 on Level 1.
From there, I go to #15 on Level 2. The Rattkin on the other side tell me to put my hands through the window. Make sure one of your characters is wearing the Signet Ring. Go one square north of #15, and put your hands through the window. I can now go through the door at #15, where I see Bleinmeis again. There are two key words to speak to him.
"Funhouse" - This will prompt him to give me a Red Rubber Ball.
"Reflextion" - If you mention this to him, he offers to sell you a Ring of Reflextion for 12,000gp. I bought it and had Errol invoke it. He now has the Reflextion skill, which grants a bonus to armor class in correlation to how high the skill is. I gave the skill to my Bard since when attacks are capable of reaching the back rank characters, He tends to get targeted the most often.
Wooden Dowel
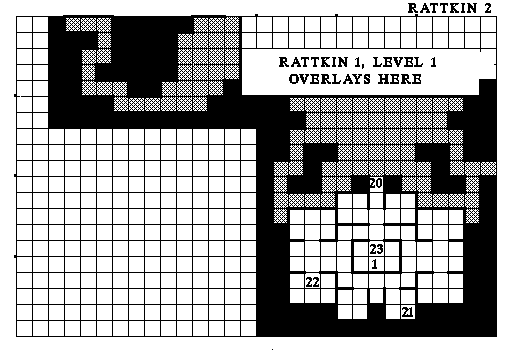
Now the party heads south. The door at #20 requires the Red Rubber Ball given by Bleinmeis.
I of course go to every room to collect experience and treasure and such. Chun-Li takes Sane Mind on her 12th level-up.
I encounter a new foe at some point, Shadow Crusts. It can cause Disease with either its physical attacks, or its bile spits. And Disease left untreated can lead to nasty things like permanent reduction of ability scores, permanent loss of Hit Points, or even death. So my warriors make Shadow Crusts the first priority for killing off when I encounter them. I blow away less dangerous slimes with fire-based spells. And it turns out that Rothgar having the Cure Disease spell becomes fortuitous, as he gets rid of it on Zarax when he's afflicted.
Zarax levels up soon afterwards. As long as I get 10+ Hit Points, and more than one Personal Skill point to put into Power Attack, I'll be happy with that.
At #21 is a chest that holds a generic set of Robes, a Lodestone (which is useless), and a Wooden Dowel (you'll need to hold onto this as well).
Black Pyramid
One square south of #22 is a Black Pyramid. It weighs 200 pounds, so it can present a carrying capacity problem. It is important for the sake of making progress, so you'll have to live with it as a temporary convenience.
I afterwards end up in a really tough fight against four groups of Rattkin Ronin, and a pair of T'Rang Wisers who can themselves cast Psionic spells. Chun-Li, Rothgar and Terra each use Silence on one group of Ronin. Ryu and Errol each use Web to neutralize the pair of Wisers for the time being. But the Ronin group that I can't cover gives me trouble when they cast spells of their own, and Sleep in particular sometimes slows me down a lot. I tough it out, using Healthfull either from Terra's scroll or as a spell when needed, and eventually wear everything down one group at a time. Ryu chooses Crush on his 12th level-up.
I open a door at #23 that has 5 tumblers. Errol has nearly perfected his Skullduggery skill after pouring his Physical Skill points into it, so he manages without much difficulty. Now I go down the ladder at #1 and enter the Funhouse.

