-

- Forums
- Chatrooms
- Gallery
- Gameplay Videos
- Upload
- Articles
- Mod Reviews
- Shop SP: Games, Movies, Books

|
|
New City | Orkogre Castle | Nyctalinth | Munkharama | The Hidden Temple | Land of Dreams | Rattkin Ruins | The Funhouse | Giant Cave | Witch Mountain | Ukpyr | Sphynx Cave | Dionysceus | Return to Nyctalinth | Return to New City | Dragon Cave | City of Sky | Hall of the Dead | Hall of Gorrors | Hall of the Past | Tomb of the Astral Dominae |
DIONYSCEUS
Orchid Field
Now, as for how to get to Dionysceus, simply head west out of New City. I then end up at the northeast corner of the B5 map.
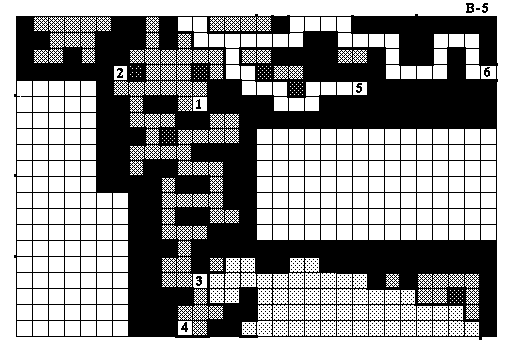
I simply follow the road west and then north. This brings me to the south edge of the B4 map.
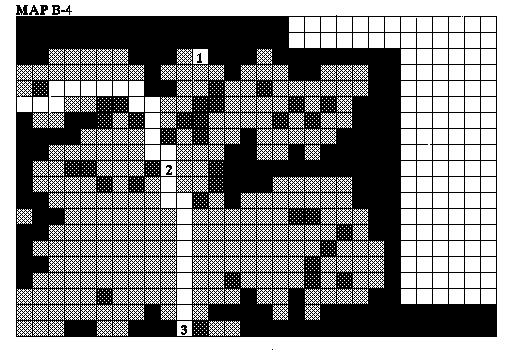
The long stretch of road in between #2 and #3 is the orchid field. This would normally prevent a lower-level party from reaching the side in order to reach Dionysceus, but a higher level party will have greater resistance and can make it. I then end up at the northeast corner of the A4 map.
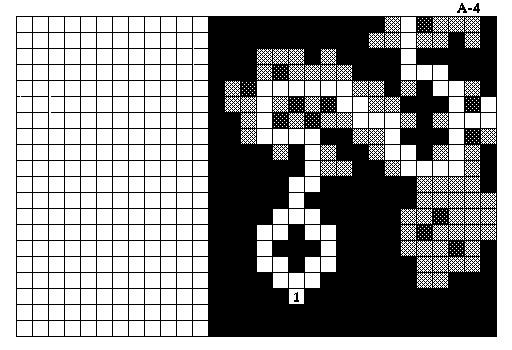
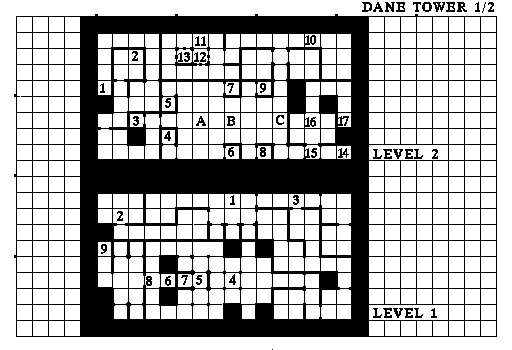
#1 on the A4 map is the entrance to Dionysceus.
Temple of the Initiate
Each level of the tower is in fact a 'Temple' that obliges you to pass a series of tests or challenges to prove your worthiness.
Level 1 is the Temple of the Initiate. The ladder whereby I first entered the tower is at #1.
At #2 is a Dane named Almagorte. "No" is a suitable answer to his first question, while "yes" is the answer to the second question, and "Gold" is the natural answer to his next question.
Note that the monsters here are very low-level and easy, and the toughest Danes you'll find here are Initiates, who can only cast puny 1st-tier spells like Make wounds.
Now I head to #3, press the button there, and continue southwards.
I then go to #6, and kill the Spirit of Dane there. He leaves behind the Ashes of Diam. Hold onto this, since this is a quest item that will be needed at the top level. I then open the chest, and find the Golden Idol.
Going to #5 will cause the party to take damage, and possible Nausea, but this is unavoidable. I then place the Golden Idol on the altar at #7 to open the gate at #8.
On the other side of #8 is Tollen Dane, who will want membership dues for the next rank of Disciple. At #9 is the stairs leading to Level 2.
Temple of Divine Order
#1 on Level 2 is where I start, the Temple of Divine Order. #2 is simply a sort of cheeky advertisement for Belcanzor's Magical Emporium.
Getting through the next part is tricky. You need to get to the other side of the room, but there are plenty of pits in the room. You can make progress by stepping onto the locations marked 'A', 'B', #4, #5, #6, #7, #8, and #9. These squares will close some pits but open others. The key is to find the right combination until you can make it across. The catch though is that I don't think there is a set sequence that you can use every time. The problem is, as far as I can tell, that the location marked 'B' is random in which pits it closes or open. So for the early part, simply go around and get a feel for opening and closing pits by going to 'B', #4, and #5. First goal is to get to #6, which will leave the way open to #7. Then you have to experiment again until you can reach #7, which leaves open the way to #8. Then you have to experiment again until you can reach #8, which will leave open the way to #9. Then you have to experiment some more until you can reach #9, which will allow you to make it across the room.
#10 is Belcanzor's Magical Emporium, which I don't show in this video. He sells all sorts of magical goodies if you can catch him at the right time. He keeps shop here during the day, but then keeps shop in New City at night time.
I then go to #11 and press the button there, which opens the way to #12. I then press the button at #12 in order to open the way to #13. At #13 is a chest that holds the Golden Idol.
I then leave the Golden Idol on the marble altar at #14, which opens the gate at #15. I then pay my dues at #16, and then go up the stairs at #17.
Psi-Beast
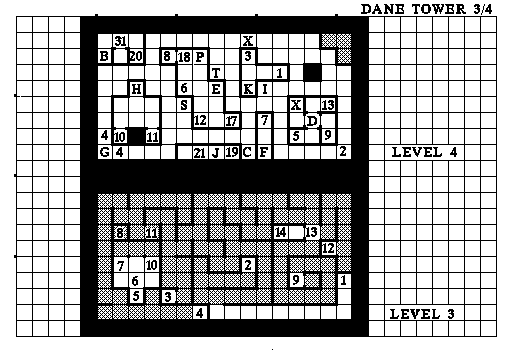
The party now finds itself at #1 on Level 3, which is the Temple of Eternal Night. The areas that are shaded are always dark. Use the Direction spell if you need to keep your bearings.
Now as a word of warning, there's a spot that is 5 squares north of #4 on the Level 3 map that is not marked. This spot always hits the party with a 'purple haze' (and an obvious Jimi Hendrix reference) that can damage party members, and render them insane. Also, a fight always immediately starts after the purple haze effect. Save your game before you cross this spot. If too many party members go insane, or if there's too many monsters for an only partially sane party to handle, simply reload your game. Unfortunately, crossing this spot at least once is a necessary evil.
There is a fountain at #3 which replenishes both Stamina and Mana. It can be useful to get yourself back on your feet if you had to expend mana to get yourself back on your feet after crossing west from the purple haze.
In any event, I make my way to #4, which teleports me to #5. I then step north to #6, where a group of Dane tell me to seek out the beast, and leave behind the Key of the Beast.
I step through the wall to #8, where I find the Golden Idol.
I step north through the wall again. I cross the purple haze spot and go to #9 on the map. I then open the gate with the Key of the Beast, and step in.
Waiting for me is a Psi-Beast that can use spells like Mental Attack and Psionic Blast. I avoid that danger when Terra casts Silence on it. I ended up killing it quickly in any event. The point to this is that I now faintly hear the word "Moo". The point to this will become apparent very quickly.
Chamber of MOO
Now that I know the secret word of 'Moo', the party makes its way back to #5 on the map, the Chamber of MOO. First, go ahead to #6, and choose 'Meditate on the word'. Chances are you'll notice that some of your characters fell asleep and others didn't. Now check the skills of those party members who didn't fall asleep. They will have at least 1 in the Personal Skill, Mind Control. The more a character can meditate on the word without falling asleep, the more it raises that character's Mind Control skill.
This is your perfect opportunity to train everybody to have a Mind Control skill of 100. Simply step ahead, meditate on the word, step back to #5, sleep just a bit in order to awaken the sleeping characters, and repeat until everybody has maxed out their Mind Control skill. Yes, it is very tedious, and requires a lot of patience. But it is well worth it, especially when you fight the T'Rang, or the Dark Savant, or some of his more elite cyborg minions.
In fact, the Ring of Stars (imported from Wizardry 6) can help with this. If a character is falling behind, you can give that character the Ring. That character will almost never fall asleep, which means a faster raising of the Mind Control skill.
Temple of Eternal Night
Now I head back east and through the purple haze. I use the Golden Idol at the altar at #12, which opens the gate at #13. I step through, and have to pay my fellowship dues to Tollen Dane.
The stairs to the next level is at #14.
Temple of Aerial Whimsey
Now I find myself at #1 on Level 4, the Temple of Aerial Whimsey. As the name might imply, there's a lot of teleporters plus a spinner here. The video shows the most circumspect route for completing this level.
To understand the map for this level, note that a number on the map will often correspond to a letter's place in the alphabet. So, I take the teleporter at #3, and wind up at the spot marked 'C', the third letter in the alphabet, right?
Then I go to one of the teleporters marked as #4, which brings me to 'D'. 'D', besides being the destination for a #4 teleporters, is also a room spinner that can have the party facing a random direction. Whenever you wind up here, always use a Direction spell to get your bearings.
Now I take the teleporter at #5 to wind up at 'E' in a large room. I go west, fight a few Danes, and go west again to reach the teleporter at 6 to end up at 'F'. I then keep going down the corridor to take the teleporter at #7, and wind up at 'G'. At 'G' is a chest that holds the Key of the Stone.
Now I take a #4 teleporter again to wind up at 'D' again. Now I take the teleporter at #9, and wind up at 'I'. The party then takes the teleporter at #2, and winds up at 'B'.
Now the party uses the Key of the Stone to open the gate at #31. On the other side is a chest that holds the Stone of Gates. This is a quest item that you'll need quite soon.
Now the party takes the teleporter at #20 and ends up at 'T'. And from there I take the teleporter at 4 to return to the spinner at 'D'. I next take the teleporter at #13, and end up one square south of the northeast corner of the map (which is unmarked). The party goes one square north to hit the northeast corner. They then see a vision of Vi Domina, and also get the Golden Idol. They then go one square west.
They are then teleported to 'P'. They then place the Golden Idol on the marble altar at #17. This opens the gate at #18.
They go to the teleporter at #8, which brings them to 'H'. They then pay their fellowship dues to Tollen Dane, and then take the teleporter at #10, which brings them to 'J'.
Past #21 is the stairs to the next level.
Temple of Deadly Coffers
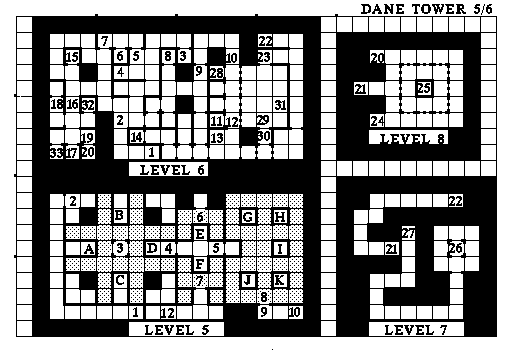
Level 5 is the Temple of Deadly Coffers. Now a little explanation is in order. The places marked by the letters 'A' to 'K' are chests that will unleash a trap on the party if the party ever faces the lock-side of the chest. There's no way to prevent the trap from going off if you face the lock-side of the chest. You can however go to the same square as a chest without its trap going off as long as you are not facing its lock-side.
The chests usually contain a Key of Coffers. Problem is, not all of the Keys of Coffers will work to open one of the gates on this level. So you need to be discriminating about which chests you let explode on you.
The chest at 'C' holds a Key of Coffers that will open the gate at #4. If the trap has disastrous results for you (e.g., party members dying outright), then simply reload.
#4 is another "Purple Haze" spot. I have to fight a bunch of monsters, get hit by the haze, and then fight another bunch of monsters after that. Errol gets 6 Academic Skill Points on his 16th level-up. He therefore brings his Thaumaturgy to the 98 Skill Points needed for access to 7th-tier Mage spells. He selects Nuclear Blast, which provides a powerful option for wiping out multiple groups of monsters all at once.
The chest at 'F' holds a Key of Coffers that will open the gate at #5.
The chest at 'K' holds a Golden Idol.
The chest at 'G' holds a Key of Coffers that will open the gate at #6.
On the other side of the gate at #6 is a Marble Altar, where you can use the Golden Idol to open the gate at #7.
Past #7, Tollen Dane collects his fellowship dues from me.
At #12 is the stairs to the next level.
Temple of Wanderers
Now the party is at #1 on Level 5, the Temple of Wanderers. *NOTE* I recommend you back up your savegame now. There's a specific reason for this.
At #2 is a spinner, and again, just use the Direction spell to get your bearings.
Note that mass combats are pretty frequent here. Sometimes it's lot of Dane who can cast higher-level spells, or lots of slimes led by Shadow Crusts, or lots of undead. Use spells of mass destruction (e.g., Nuclear Blast, Asphyxiation) if you have to. And sleep plenty in between fights in order to recoup your mana, even allowing for alternating between different elemental sources of mana.
Rotghar takes Death Wish on his 16th level-up, after a fight where Errol wiped out several groups of Dane with Nuclear Blast.
Now the thing about this level is that it has lots of squares whereby when you step onto them, they'll open up one wall but close another. So the key is to figure out the right patterns to get where you need to go.
First, I go to #3 and open the chest there. It will hold a Chrome Key, a random magical item, and a choice between a Chamail Doublet +2 (U), Chamail Pants +2 (L), a Mitre de Sanct, or a Faerie Cap. I chose the Pants for Errol. The Chamail Doublet +2 (U) won't be an upgrade on the Studded Haubert (U), but the Chamail Pants +2 (L) is a considerable improvement on the Leather Leggings. But I keep the Leggings for import.
*NOTE* It is EXTREMELY important to get the Chrome Key while you still can. Otherwise, you could find yourself stuck on this level, with literally no way to get out short of a backed up savegame.
The square at #4 opens the wall north of #5. The square at #6 opens the way to #7. I then make my way back to the spinner.
I go east and then north. I step onto #8, as well as the spot 4 squares south of #8, to make progress.
I then make my way to one square south of #9 and continue south along the hallway. I fight more monsters after I reach the end of the hallway and turn west. Chun-Li takes Cure Paralysis on her 16th level-up.
I step on the square that is two squares west of #13. And from there I go to the square that is one square east of #14. That opens up the square that is two squares west of #11. Stepping on to that opens the way to the chest at #14, which holds the Golden Idol.
Now I make my way to #15, and press the hidden button to open the way to the Marble Altar where the Golden Idol needs to be placed. This opens the gate to #16.
Once I get across #16, Tollen Dane is there to collect Fellowship dues.
I step onto the square at #17, which opens the way past #18. There will be a chest that holds a Key of Ascension.
The Key of Ascension opens the gate at #19. On the other side is a spot at #20 that teleports me to ....
Pit of the Demon Spawn
.... #20 on Level 8. I go down the stairs at #21. I then go from #21 on Level 7 to the stairs at #22.
Note now that a new kind of Dane appears on my way there, a High Father. These are likely to be at the front, and able to resist an Asphyxiation spell. So, I cast Asphyxiation anyway to take out the Apostles and Priests, and have my warriors concentrate on the High Father exclusively.
This brings me to the stairs at #22 on Level 6. I then go to #23, and speak with the leader of the Dane, the Magna Dane. He says to kill the Demon in the pit, and tells me what is needed to coax him forth, the flesh of the enemy, the dust, and the stone. I am then shoved out of the chamber, and the gate closes.
I then backtrack and make my way back to Level 8. I spin around for more xp, as I want Terra to level-up at a different time then Ryu. I fight a few monsters and she takes Nuclear Blast on her 16th level-up.
I now cast all of my long lasting protections, Armor Plate, Enchanted Blade, and Magic Screen. I then hit the lever at #24.
This sends me to #25. Now I use the Munk Innards, the Ashes of Diam, and the Stone of Gates. This summons the demon, * SPAWN*. As long as you have both Fire Shield and Magic Screen up, you should be fine. My warriors manage to kill him the first round, helped along with a Deep Freeze from Terra.
Now I cast Levitate, and climb down the pit. I 'search', and find the Cornu of Demonspawn. The Cornu is a quest item in Wizardry 7, but will also become a very useful instrument that Errol can import into Wizardry 8.
Book of Immortals
The party ends up at #26 on Level 7. The party then takes the stairs at #27. This brings them to #11 on Level 6.
*NOTE* Please note that there is a gate at #12 that can only be opened by the Chrome Key. Also, the walls to the west will likely be closed off since they require stepping on certain squares beyond the walls themselves. This is why it is critically important to grab the Chrome Key before you do anything involving *SPAWN* or the Magna Dane and such. If you end up here without the Chrome Key or a backed up savegame, you're screwed, literally.
Now I step beyond the gate and waste the horde of Dane that are waiting for me with an Asphyxiation spell.
At #13 is a chest that contains:
The Magna Dane
I now make my way back to the Magna Dane again.
But I spin around for xp just before that fight, in order to advance Zarax another level. I don't want his level-up to take place after an enormous fight with the Magna Dane. That's a lot of effort just to possibly get level-up rolls I won't like.
Now I put up my long-lasting buffs. Now this time it is a fight against the Magna Dane, and several High Fathers. These guys often use Fire spells, so my Bard puts up a Fire Shield. The Magna Dane can cast the highest level spells, and they can be hard to resist, even with Magic Screen. He also uses a touch attack that can score devastating damage on a single character. My warriors thus go all out for the Magna Dane to take him out as quickly as possible. Asphyxiation is unlikely to do anything to either the Magna Dane or the High Fathers, so Terra uses Nuclear Blast instead, to damage all of them. Chun-Li threw in a Mind Flay as well. This turned out to be a good strategy, as my warriors managed to take out the Magna Dane before anything critical happened. The one surviving High Father was easy pickings afterwards.
The Magna Dane leaves behind Robes of Enchantment (U) and Robes of Enchantment (L). Terra equips them, and hands over her Robes +1 (U) and Robes +1 (L) to Chun-Li. The Magna Dane also left behind an Amulet Pro Magic.
Coil of the Serpent
Now I search and find a Ring of Demon. Don't equip this, it's cursed. Just 'use' it to open the gate to the south.
On the east wall of the chamber are two fountains. The more northerly one is poisonous, while the more southerly one will recoup mana, health, and stamina.
I then use the Cornu of Demonspawn to open the gate at #29. At #30 is a chest that holds a Jewelled Cushion (which can be sold), the Crystal Map (but I had already bought it from Kymas Turan), and a Coil of the Serpent, which is a quest item I'll need later on.
I next fight some monsters towards the southeast corner and then go back the stairs at #22. I then go from #22 to #21 on the Level 7 map. That brings me to #21 on the Level 8 map. I go to #20 and use the lever there.
That brings me to #32 on the Level 5/6 Map. Now I make my way to #33, the Egress. This is a teleporter that takes me close to the ladder leading out at the bottom of the Tower.
It is now time for me to Return to Nyctalinth.

