-

- Forums
- Chatrooms
- Gallery
- Gameplay Videos
- Upload
- Articles
- Mod Reviews
- Shop SP: Games, Movies, Books
|
|
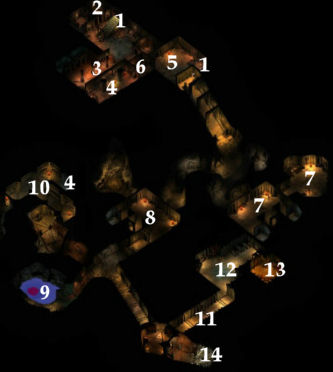
DUNGEON LEVEL 2
1. Stairs leading up to the first level.
2. Look along the northwest wall. Through the door to the right, you'll find a treasure chest. It contains 8 Cloaks of the Eye. The significance of this will become apparent later on.
3. Here, you get ambushed by Zombies and Green Slimes. The danger here is one of sheer numbers. Green Slimes should, if possible, be taken out with spells like Burning Hands and Magic Missile before they reach the party. Everyone should stick together so as to be within easy reach of healing spells, and as much as possible gang up on the zombies one by one.
4. There are two spots marked as #4. Each is one end of a tunnel, the ends of which are concealed by secret doors.
 5.
Here is an Ogre named Lubash. It is possible to talk him into letting
you pass by if party members are wearing those Cloaks of the Eye
found at #2. You'll need Bluff or Diplomacy to pull it off. If you're
up to the challenge, be mindful that Ogres are always capable of
great damage with their attacks. This danger is exacerbated by the
long reach of their clubs, which can really make themselves felt
when you step up to them and thereby provoke an Attack of Opportunity.
My approach is to weaken it with spells like Doom, Flare and Ray
of Enfeeblement. The party then gangs up on Lubash, while Lanatir
pumps away with Magic Missiles. The Ogre then leaves behind a Cloak
of Elvenkind.
5.
Here is an Ogre named Lubash. It is possible to talk him into letting
you pass by if party members are wearing those Cloaks of the Eye
found at #2. You'll need Bluff or Diplomacy to pull it off. If you're
up to the challenge, be mindful that Ogres are always capable of
great damage with their attacks. This danger is exacerbated by the
long reach of their clubs, which can really make themselves felt
when you step up to them and thereby provoke an Attack of Opportunity.
My approach is to weaken it with spells like Doom, Flare and Ray
of Enfeeblement. The party then gangs up on Lubash, while Lanatir
pumps away with Magic Missiles. The Ogre then leaves behind a Cloak
of Elvenkind.
6. Here you'll find two gnomes and an elf being held as captives. The gnome named Nybbie is the only one who's apparently willing to speak to you. As a reward, he'll give you a ring that signifies you as a friend of gnomes. (You might want to hold on to this for a much later quest). He then hints that people who wear the Cloaks of the Eye are able to pass by the Ogre. A little late to hear that, right?
 7.
Here there are several Bugbears. There are two archers lying in
wait in the first room. There are two more waiting behind the closed
doors. There are several others in the room to the east. Among them
is a Bugbear Barbarian who packs a Great Axe.
7.
Here there are several Bugbears. There are two archers lying in
wait in the first room. There are two more waiting behind the closed
doors. There are several others in the room to the east. Among them
is a Bugbear Barbarian who packs a Great Axe.
If at all possible, take out the Archers first and then save the game. Step forward a little to the east to start the fight. A good strategy is to form a bottleneck at the west end of the corridor. Have your fighters select Tactical Options - Ready vs. Approach to allow stray Bugbears to come within reach of your waiting attacks. Summoning an Elemental is likewise a good method to keep your opponents divided.
 8.
Here you'll find a pack of Gnolls. The Gnolls can be Intimidated
or bribed into leaving, since they don't feel that they're reaping
enough benefit for their part in the Master's plans. For an even
greater bribe, the Gnoll leader is willing to indicate the location
of the Master on your map, at #13. However, because they've committed
past atrocities in the name of the Master, and because I want the
experience points, I just slaughter them. By now, the party should
be at least fourth level. Bane can make a difference here, as can
summoning. Beyond that, it is a matter of chopping them down one
by one.
8.
Here you'll find a pack of Gnolls. The Gnolls can be Intimidated
or bribed into leaving, since they don't feel that they're reaping
enough benefit for their part in the Master's plans. For an even
greater bribe, the Gnoll leader is willing to indicate the location
of the Master on your map, at #13. However, because they've committed
past atrocities in the name of the Master, and because I want the
experience points, I just slaughter them. By now, the party should
be at least fourth level. Bane can make a difference here, as can
summoning. Beyond that, it is a matter of chopping them down one
by one.
9. There is a Giant Crayfish lying in wait in the pool. With 3 attacks per round and some hefty damage, the beast should be handled with some care. Its weakness is a relatively low number of hit points. Approach it at full health, and spells to go. Rushing it and ganging up on it should work just fine.
You'll then find a treasure chest that includes scrolls of Knock and Stinking Cloud.
10. In this room, you'll find about 4 Ghouls. Ghouls are dangerous for no other reason than their ability to paralyze upon a successful melee attack. As much as possible, try to soften them up before they reach the party. The concept of gang up on and kill off one at a time is particularly relevant here, so as to reduce as quickly as possible the number of attackers. The party should also stay close to one another instead of spreading out.
In the chest, you'll find 3 Potions of Cure Light Wounds, and scrolls of Sleep and Cat's Grace. Valarian will definitely want to copy the Cat's Grace scroll to his spellbook, with the future Gloves of Dexerity in mind.
11. Along this tunnel, you'll find some Guards led by a Sergeant. You can Intimidate the Sergeant into leaving. If a character is wearing a Cloak of the Eye found in the chest at #1, then a character can also Bluff the Sergeant into admitting him to see the Master at #13. Note that only the character who pulled the Bluff off is brought to the Master. This won't go very far though. The Master calls your bluff, and you'll end up fighting the Master, all the guards at #11 and all the guards at #12. Suffice to say, this would be a bad proposition for the character left stranded near the Master.
I just cut to the chase and waste the guards. Notice that there will be an archer at the east end of the tunnel. Don't rush him with melee attacks. This may end up bringing a lot of other opponents into the battle. Instead, take him down with missile weapons and spells. This way, the party will have the option of taking a breather before the next battle.
Among the bodies, Sir Tirion and Ferofist will find Scale Armors to improve their Armor Class.
12. In the room at the other end of the hallway, there will be a large number of Guardsmen, led by a Lieutenant and a Sergeant. The Lieutenant is quite a good archer. His problem is that he never seems to change over to a melee weapon. As such, you can exploit this by surrounding him at the earliest opportunity. This way, whenever he draws his bow, nearby characters will be able to cut him down with Attacks of Opportunity. As for the rest of the crew, summoning spells, and Bane do their job here as well. It then becomes a matter of mopping up.
Among the bodies, Valarian finds a Long Bow and plenty of arrows to make the changeover. Be sure to loot the Lieutenant's body for plenty of treasure.
 13.
Finally, you've found what you came looking for. Through the door
in the southeast corner of the room, you'll meet the Master you've
heard so much about, Lareth. Lareth is a Drow Cleric of Lolth, who's
assisting the Temple of Elemental Evil for his own reasons. Combat
naturally ensues. This fight isn't very difficult for the very reason
that the party can surround him tightly. Thereafter, any spell he
casts should inspire multiple Attacks of Opportunity. If you bring
him close enough to dying, Lareth
makes a desperate attempt at a bargain. He offers his services as
a Cleric, and the location of the Temple of Elemental Evil, if you
let him live and join. Suffice to say, I didn't go for it because
he'll betray the party once they reach the Temple.
13.
Finally, you've found what you came looking for. Through the door
in the southeast corner of the room, you'll meet the Master you've
heard so much about, Lareth. Lareth is a Drow Cleric of Lolth, who's
assisting the Temple of Elemental Evil for his own reasons. Combat
naturally ensues. This fight isn't very difficult for the very reason
that the party can surround him tightly. Thereafter, any spell he
casts should inspire multiple Attacks of Opportunity. If you bring
him close enough to dying, Lareth
makes a desperate attempt at a bargain. He offers his services as
a Cleric, and the location of the Temple of Elemental Evil, if you
let him live and join. Suffice to say, I didn't go for it because
he'll betray the party once they reach the Temple.
Loot his body to find Lareth's Breastplate, a Ring of Freedom of Movement, and Lareth's Staff of Striking.
Loot his nearby drawer for more treasure, and his journal which will pave the party's path to the next stop in the journey, Nulb.
14. An exit that leads to the surface.