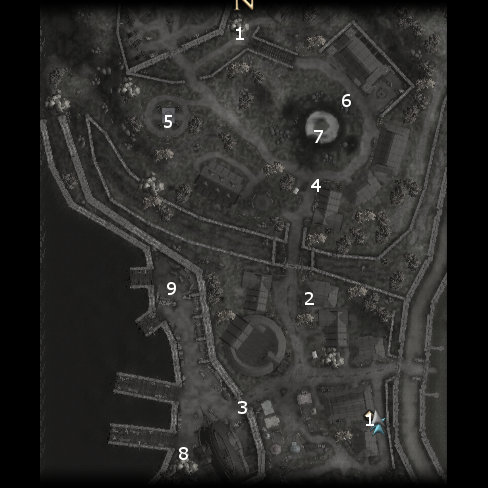
These are portals leading back to Mulsantir in the Prime Material Plane.
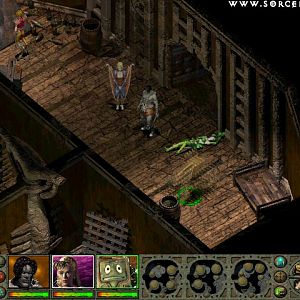
Here is the entry to Heilari’s House. Heilari was a male Rashemen wizard who apparently felt slighted by his cohorts. So much so that he pursued a ritual to become a lich in order to prolong his existence long enough to exact revenge upon them. If you read the various writings that lie around his home, and take note of the two Death Knights standing guard over his corpse, it won’t take much to figure that it went terribly wrong. A chest holds a Rakshasa Staff.
You have 3 options here:
Damage the corpse. This causes the Death Knights to attack you. They hit very hard, but if one of your characters can cast Heal, this can inflict heavy positive energy damage.
If you read the writings and can cast arcane spells, you can complete the ritual that he botched. Safiya can complete it as well. This causes him to revive as an undead abomination and shifts your alignment towards evil. He’ll be upset that you brought him back in such a state, and he and the Death Knights will then attack you. You can put this off until Act II when you'll have the chance to find the Tome of Profane Rebirth which is deep in the nearby Death God's Vault. If you use the tome here, Heilari will be reborn as a full lich. If you demand payment, he'll attack you. His corpse can then be looted for the Ring of Seething Hatred. He'll also give it to you and leave if you're not pushy with him.
If you read the writings and can cast arcane spells, you can perform the alternative ritual that frees his soul from the phylactery and allow him eternal rest. This gets you 250xp and the Death Knights will leave peacefully. A Talisman of Pure Good is left behind on the floor.
A gate that cannot be opened.
Here you’ll have to fight two Nightwalkers.
Here is a shrine to gods different from those of the shrine in Mulsantir. The god statues that appear here are those of Talos, Malar, and Velsharoon. There are also a few Malarites and Shadow Ghasts here for you to fight.
Here you’ll find a couple of unmarked graves. They hold the following:
Here is the entry to the Death God’s Vault. I don’t recommend exploring this in depth for the simple reason that you can take greater advantage of what it has to offer once the story progresses into Act II. But if you insist, here’s the link.
Here you’ll run into a rather shadowy group conspiring to plant organized crime in Mulsantir. They’re led by somebody namedIrvin Borsk. A confrontation with them is inevitable. This can be a tough and prolonged fight. Irvin and one of his thugs will block the bottleneck leading to the Wizard and the Priest of Mask behind them, meaning they’re free to go to work. It is recommended that you buff up as much as you can, particularly with spells that increase your saving throws and Spell Resistance. Start off with a Wail of the Banshee or two to try and make a quick whittling of numbers, as well as summoned creatures. You’ll have to kill the melee attackers as quickly as you can while weathering the storm, then head for the spellcasters once you get the chance.
One of them leaves behind a Brown Dragon Shield. Irvin leaves behind a Letter from Irvin Borsk which clues you in that Sheveldar Nuum is actually a spy planted in Mulsantir.
Here you have a number of roleplaying choices that have repercussions for your alignment. Most of them involve confronting Sheveldar with the letter. You can arrest him, murder him in cold bold, or turn him in but give him notice. These lead to him attacking you along with his two companions. You can also try to squeeze gold out him for the chance to sneak out of town. If you get greedy for 5,000 gp, he’ll attack. If you’re willing to get talked into 3,000gp, he’ll accept and you’ll get 3,000xp for it.
You can also go to Sheva with the news. If you go to Sheva before ever talking to Sheveldar, Sheveldar skips out of town before the Wychlaran can get their hands on him. Either way you’ll get 3,000xp.
Sorcerer's
Place is a project run entirely by fans and for fans. Maintaining
Sorcerer's Place and a stable environment for all our hosted sites requires a substantial amount of our time and funds on a regular basis, so please consider supporting us to keep the site up & running smoothly. Thank you!
Supporting Sorcerer's Place
Has Sorcerer's Place been useful? If you'd like to show your appreciation
for our hard work on the site, and help us pay the bills the site generates
every month, please consider helping support SP.
Thank you!

 My coming here has one purpose in the meantime, to recruit Kaelyn the Dove into my party. Her starting equipment includes the Amulet of Divine Radiance, a Half Plate +4, a Ring of Divine Power (4), a Ring of Protection +3, a Mace +4, a Shield of Dawn, and Boots of Striding +4.