-

- Forums
- Chatrooms
- Gallery
- Gameplay Videos
- Upload
- Articles
- Mod Reviews
- Shop SP: Games, Movies, Books
|
|
| Bard's Tale 3 Remastered Online Walkthrough by David Milward |
Tenebrosia | Dark Copse | Shadow Canyon | Sceadu's Demense |
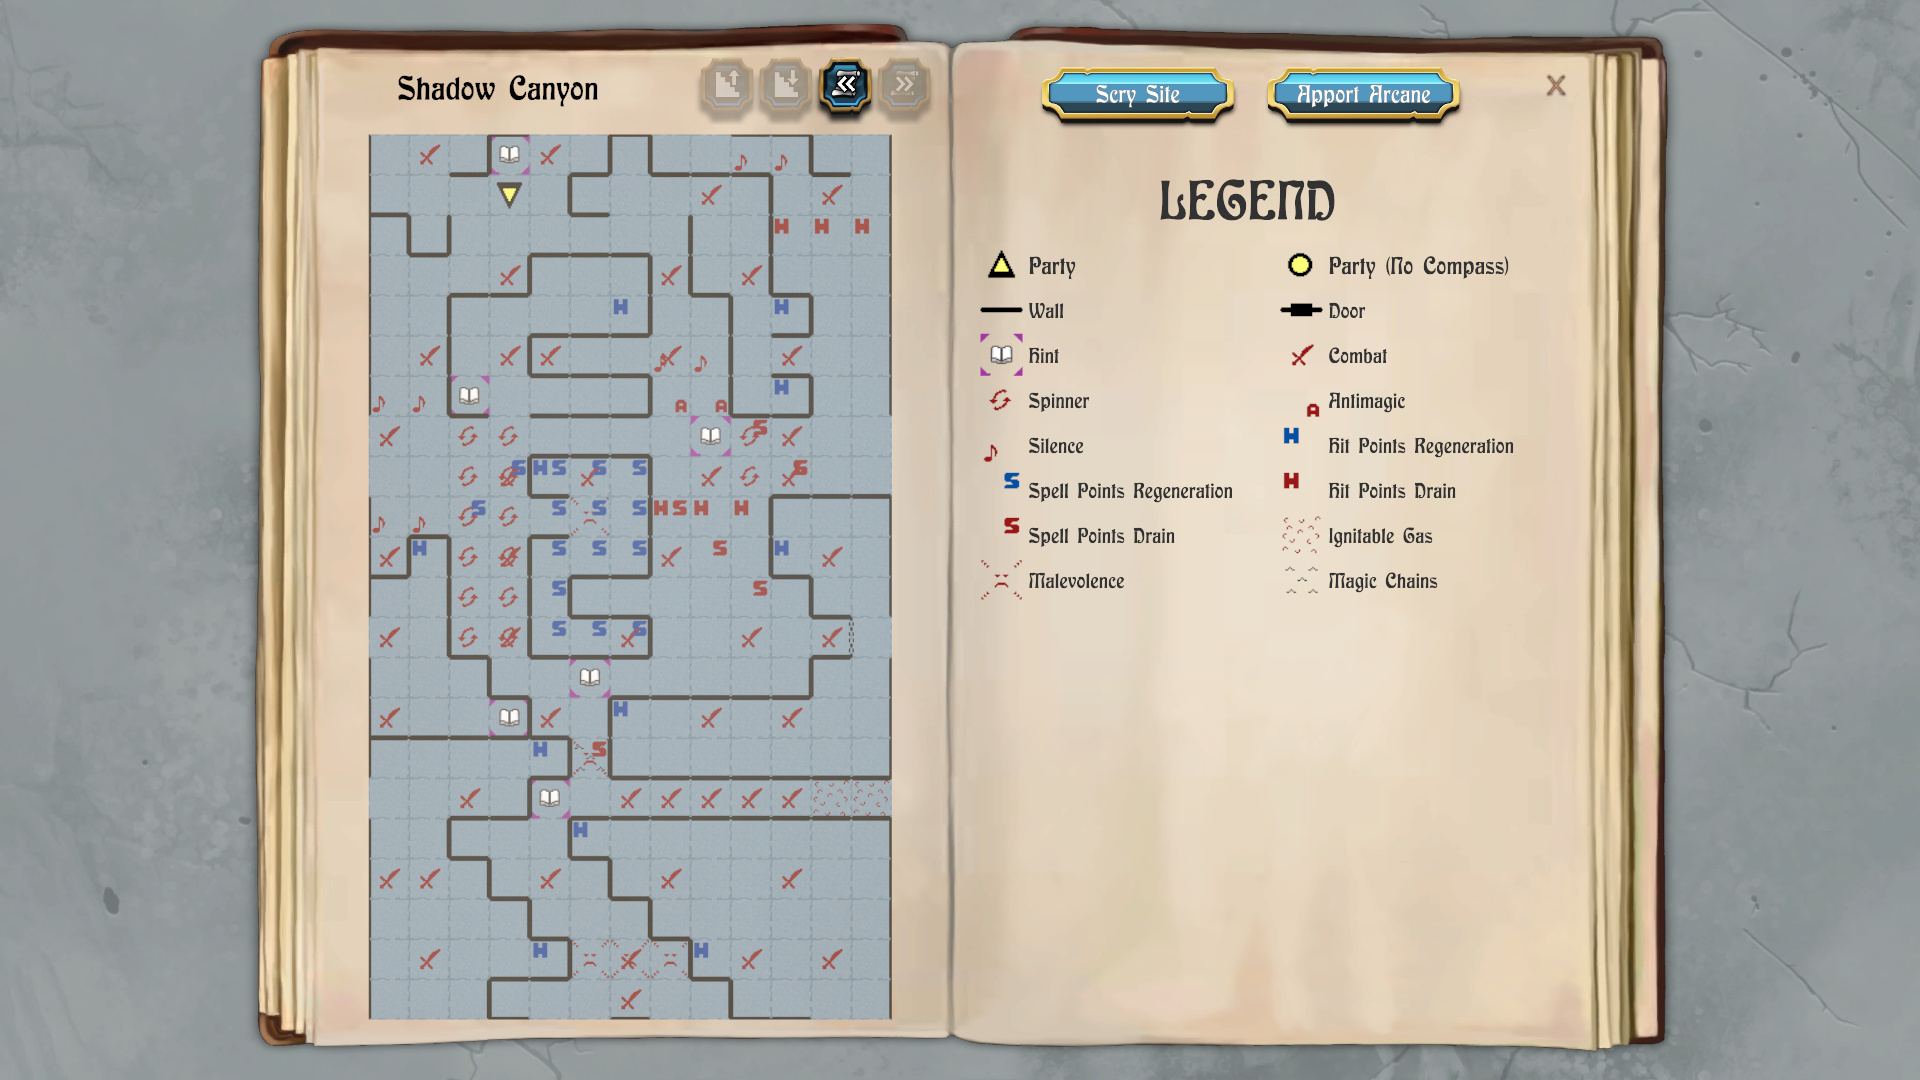
Shadow Canyon
1st Sorcerer's Hood
The entrance to the Shadow Canyon is due east from the Dark Copse.
I start off at 21N 3E of the map of the Shadow Canyon. Zarathos casts
Earth Ward to get rid of any traps, a Cat Eyes spell to see around in an
especially murky dungeon, and also Pathfinder to reveal the walls.
I win fights against random monsters at 21N 4E and 21N 1E. I loop around
north so as to reach the southwest corner of the Canyon.
I win fights against random monsters at 1N 1E, 3N 1E, 3N 0E and 5N 2E.
I get a Sorcerer's Hood after the last fight. It provides a 3 point
improvement to AC. It's real use is that it allows its wearer to use the
Mages' Maelstrom spell on enemy spellcasters without limit. I can now use
it with complete abandon when faced with enemy spellcasters. But I also
have to be careful. Its other feature is that it will resurrect its wearer
should its wearer ever die, but will itself be consumed in the process. I
therefore have to make sure Talia and Mordred never die from this point
onwards. Talia equips the first hood.
West Side
I win fights against random monsters at 18N 3E, 16N 1E, 16N 3E, 13N 3E, 13N 5E, 9N 6E, 11N 3E, 9N 3E, 9N 0E and 12N 0E. I sometimes keep an eye out for Crystal Gems, which can be used multiple times to recharge a spellcaster's Spell Points. I happen to get one with three charges during this run.
3rd Titanium Bracers
I win fights against random monsters at 13N 10E, 13N 8E and 11N 7E. I
avoid the nearby anti-magic squares by fighting random monsters in a
sequence of 14N 10E, 16N 10E, 18N 9E, 20N 8E, 18N 7E, 16N 7E and 16N 4E.
I again avoid the anti-magic squares by going back the way I came and
towards the northeast corner. I win a fight against random monsters at 20N
11E.
I get a third pair of Titanium Bracers after the last fight. Cassandra
equips them for a 2 point improvement to AC.
Southeast Corner
I loop around north to get to the southeast corner of the Canyon. I win
fights against random monsters at 1N 11E, 1N 9E, 3N 7E and 3N 10E.
I go loop back around to the northeast corner, and then go west past the
silent squares on the northeast edge of the Canyon. I thereafter put my
Rhyme of Duotime back up.
Southeast Corner
I loop around north to get to the south edge of the Canyon. I win fights
against random monsters at 0N 6E, 1N 6E, 3N 4E, 5N 6E, 5N 7E, 5N 8E, 5N 9E
and 5N 9E.
I get a second Sorcerer's Hood after one of the fights. Mordred equips it.
Having two of them is advantageous, especially when I am faced with a
group of Mages that are at 90's and out of the reach of Gallard's Sword of
Zar. Two Maelstroms increases the chances of Critical Hit or Petrified
taking effect. Multiple castings of the Maelstrom can also wear down the
enemy spellcasters to 0 Hit Points, especially in conjunction with Ariel's
use of Kiel's Overture.
Shadow Lock
I fight random monsters at 7N 4E. A clue at 8N 5E indicates that a castle
is only as weak as its strongest wall.
I win fights against random monsters at 9N 9E and 9N 11E. The wall east of
the latter square is the only one that you can use either Phase Door or
Wall Warp on, as per the clue. Zarathos casts Wall Warp on it.
I win fights against random monsters at 11N 11E, 7N 10E, 7N 8E, 9N 0E and
7N 0E. I get the Shadow Lock at 7N 3E.
I go back past the warped wall, and then south until I reach the stairs at
21N 3E and leave Shadow Canyon.
14th Level Geomancer
I return to the Wizard's Tower in Black Scar. Everybody advances two
levels except for Zarathos, who advances three.
He acquires two new 7th-tier spells. One is Jolt Bolt, which inflicts 400
to 1600 points damage on all enemies within 90'.
The other is Earth Maw, which is unique in that it works like an
instant-death spell for an entire group of monsters as long as they're
within 50' range. This is potentially one of the most valuable of all
spells, as it can eliminate an entire group of monsters that may be immune
to damaging spells (especially when I get to Malefia).
I leave Black Scar for now, for Sceadu's
Demense is my next destination.