-

- Forums
- Chatrooms
- Gallery
- Gameplay Videos
- Upload
- Articles
- Mod Reviews
- Shop SP: Games, Movies, Books
|
|
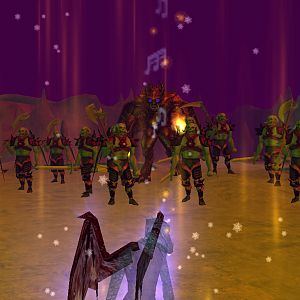
Distance is one of the most important combat concepts in the game. If you're outdoors (either in one of the cities or in the forest) itself during day time, you'll only ever face a single monster group during combat. That increases to possibly one or two monster groups outdoors at night. If you're in a dungeon, you may face anywhere from one to four monster groups. Typically any given monster group will have one to eight monsters in it. However, some monsters may have more than eight, especially during the later dungeons in the game.
Suppose that you get an encounter with four monster groups. The first two monster groups will typically already be within melee range, in which case they won't have any indication of distance from the party. You can attack them with hand-held weapons and they in turn may attack you in melee. Sometimes even the first two monster groups can appear at a range of 20 feet or 30 feet.
The monsters in the third and fourth groups will typically appear in ranges from 20 to 90 feet. Monsters who are beyond the 10 foot range can only be attacked by ranged weapons or spells, but not by melee attacks. They in turn are limited to attacking you with ranged weapons and spells. There are a number of ways of dealing with monsters who are at a distance greater than 10 feet.
One way is to use spells on them. But even then, some spells have a maximum range. Pay attention when deciding on which spell to use.
Another way is to use ranged weapons on them, like a bow and arrows, spears, axes and so on. But again, pay attention to the maximum range of the ranged weapon you are using. The Hunter is easily the best character for ranged missile attacks, since he can apply his Critical Hit ability to distant targets. Gallard arrives in the third game already set with the Sword of Zar that allows him to make ranged attacks at 80' without limit.
The first time the Rogue goes into hiding, she can thereafter attack and land an instant Critical Hit on a monster that is at most 20 feet distant. If the Rogue is still in Hiding at the start of the round, and has not blown stealth by attacking, you have the option of selecting the Hide option again so that the Rogue can increase her backstab attack range by another 10 feet. Suppose that a monster you want to kill is 50 feet distant. You could have your Rogue go into Hiding four straight combat rounds so that she can backstab at a range of 50 feet. Of course, you need to be mindful that it requires the Rogue to successfully make the Hide skill check four times in a row. In fact, a Rogue who makes the check eight times in a row can make the Critical Hit attack at the maximum range of 90 feet. I often had Cassandra take care of enemies at 20' to 30' range (even 40' once in a while) while Gallard kept himself busy with enemies at longer distances.
Another way is to clear a path so that the party can collectively advance on the distant monsters. Suppose you're fighting one group of monsters that is within melee range, and another group that is 30 feet distant. You cannot advance on the distant monsters, because there is a closer group of monsters that is still interposed in between. Now assume that you kill the monsters in melee range, and there's nothing else in between you and the distant monsters. The next round gives you the option to advance forward 10 feet to get closer to the monsters that were previously 30 feet distant. The monsters are now 20 feet distant. Assuming that the distant monsters didn't summon something else like a Wind Warrior to block your way with a new and closer monster (which is a possibility), you can again select Advance another 10 feet and finally bring yourself within melee range.
Be advised that some enemy spellcasters in the third game make generous use of spells like Far Foes and Force of Tarjan to try and keep the party back at maximum 90'. One method is to cast the Melee Men spell on the enemy spellcasters, and pull them within melee range. Another option is the Mage's Maelstrom spell, which can with luck outright kill or petrify spellcasters at maximum range. Keep in mind that if the enemy casts Disrupt Illusion, it will block Maelstroms.
The monsters can themselves decide to advance closer to the party, and in fact some of them can advance 20 feet closer at a time. The ability of monsters to advance can be exploited to your advantage. Suppose that monsters are 20 feet distant, and you know that they will advance the next round because they never cast spells or use ranged weapons. You can have your combat characters choose the option to attack them. The reason is that their advance will sometimes happen before your combat characters attack, and therefore they'll step right into your oncoming attacks. It's literally a matter of getting in free blows as they close in.
This is also one of the most important facets of the combat system, and arguably the most important during the first two games. AC in these games is very much like AC was in the 2nd edition D&D rules, the lower the AC value was, the better protected your characters were against physical attacks. The maximum possible AC in any of the three games is -50.
The idea is that you want characters in the first four slots to have as low an AC as possible, thus leaving the last three characters (often spellcasters) free to use their ranged attacks and spells without fear of melee attacks. The back three characters can still benefit from AC, especially when enemy archers aim projectiles at them, but that is a far rarer consideration. It is important to construct the first four characters as a shield-wall.
The Bard having Traveller's Tune in place as a long-lasting buff, the use of Ybarra's Mystical Coat of Armor as another enduring buff (which stacks), and the first four characters (unless a Rogue) equipping enough of the mid-tier items (e.g. Diamond Plate armor) found in the early parts of the game, is pretty much enough to enable the party to cruise through Skara Brae and the first four dimensions. The Chronomancer spells include Shadow Shield, which provides an indefinite 4 point improvement to AC that will stack with other buffs.
At some point I start to find items not previously found in the previous two games that improve AC even further. Also, I can raise characters' Dexterity to a new maximum of 30, allowing for even greater improvement of AC. By that point my front-rank characters are starting to approach -50 AC even without the aid of Traveller's Tune, and that opens up options for having my Bard use something else as the default song.
If you're so inclined, Kylearan's Invisibility spell provides an AC bonus that stacks with the others during a battle itself, but also provides a bonus to saving throws for everyone.
Note however that once I start getting into the last two dimensions, Tarmitia and especially Malefia, the monsters there have a solid chance of hitting even characters with -50 AC. If the monsters in question can also inflict nasty effects (e.g. Black Slayers with Critical Hits or Rock Demons with Stoning), you may be forced to use magic to survive, either by killing them outright with enough spell damage or using something like Far Foes or Force of Tarjan to push them out of melee range.
Some monsters will simply inflict physical damage that reduces their target's Hit Points without anything more. That is not a concern unless a party member dies as a result of having his or her Hit Points reduced to 0, and lost Hit Points can be healed through spells like Quick Fix, Flesh Restore, Flesh Anew and Restoration. However, some monsters not only inflict damage but will also inflict an additional effect that automatically takes hold on its target should the physical attack connect. I now describe them and how to deal with them.
Poison - A Poisoned character will lose a few Hit Points every combat round, or every three seconds or so while exploring and not in combat. Although a Temple can heal Poison, it is easy enough to cure any poisoned characters yourself with spells like Flesh Restore (single party member only), or Flesh Anew (the whole party) and Restoration (the whole party).
Withered - A party member that is Withered has all of his or her attributes reduced to 1, which can severely impact that character's ability to fight back. It used to be that the only way to get rid of it was to have the priests at a Temple heal it. However, the OLAY spell of the Chronomancer can now get rid of it. Youth Potions found as loot in the game can also cure it.
Insanity - An Insane party member may do any one of a number of things. He or she may continue to attack the enemy monsters, may do nothing during a combat round, or may decide to attack a fellow party member. Which it will be in any given combat round is completely random. Spells that cure Poisoning will also cure Insanity.
Possession - A Possessed character, unlike an Insane character, will ALWAYS target fellow party members for attack, making dealing with it as soon as possible imperative. The Wizard's Dispossession spell has the specific purpose of ridding a party member of the Possession effect. The Archmage's Heal All spell can get rid of it as well. Enemy spellcasters can also cause Possession through the Baylor's Spell Bind spell.
Drained - A Drained character is operating as a character effectively one class level lower that what he or she actually attained through experience points. Drained levels can accumulate. The only way to get rid of the Drained effect is by paying the Priests at a Temple to heal it. Even then, a Drained character still permanently loses 1,000xp for each time he or she has been Drained.
Stoned - A Stoned character has been petrified and effectively killed. It's even worse than death in that you have to first use a Stone to Flesh spell on the petrified character, and then use a Beyond Death or Heal All spell on that same character, before he or she is truly back among the living. Enemy spellcasters can cause Stoned through the Stone Touch spell.
Critical Hit - If an enemy lands a Critical Hit on a party member, that party member will die regardless of how many Hit Points he or she has left. Enemy spellcasters can also cause Critical Hits through the Death Strike or Far Death spells.
You can often deal with the concerns by making your characters' AC good enough so that the monsters will always miss. However, an alternative option is to use a spell like Far Foes or Force of Tarjan to push them further away to a safer distance, which in turn gives you the option to take them out with offensive spells.
If you want one of your first four characters to hit a monster, it must make a successful To Hit Roll that wins out against the target's own AC. Your attacks will pretty much always connect during the early going, although it can be a problem during the last few levels when you're faced with powerful monsters with very good AC.
Maybe you want to play a given character like a tank, it doesn't matter if he can't connect as long as the monsters in turn cannot touch him. However, if you want another character to land those attacks, be on the lookout for items that confers bonuses To Hit. Spells like the Wrath of Valhalla, and the Bard's Seeker's Ballad, can help as well during a tough fight.
Items that provide To Hit bonuses also become quite plentiful in the third game.
Every character defends against spell attacks through a saving throw. Each character's saving throws improve as they level-up, although that apparently stops after level 36.
If it's an offensive spell that damages an entire group, everyone in the party has to make their own saving throws. If the saving throw fails completely, that party member takes full damage. If the saving throw partially succeeds (I don't know the exact formula), the party member takes half-damage. If the saving throw fully succeeds, the party member avoids any and all damage from the attack. By the way, breath weapons from monsters such as dragons are treated as offensive spells that often do more damage than the spells you see in the spellbooks. The saving throws for them are dealt with in the same way.
If it's a single-target damaging spell, the saving throw is treated the same as for damaging spells described above, except that it's only one party member that needs to make the throw. If it's a single-target spell that inflicts an effect that doesn't involve damage (e.g. the Death Strike spell), then it's an all-or-nothing saving throw made by the individual party member that was targeted.
There are some spells that try to inflict a non-damaging effect on the whole party. For example, Freeze Foes tries to worsen AC for the whole party. Curse tries to weaken To Hit and damage for all party members. Hypnotic Image tries to leave multiple party members Stunned in subsequent combat rounds. If enemy spellcasters try these spells against the party, it is the first party member who makes the saving throw on behalf of the whole party. In that respect, a Paladin is an ideal candidate for the party leader. He or she can both fight upfront, and also enjoys a natural bonus to saving throws that help nullify such spells.
Luckshield also provides a saving throw bonus for any melee (i.e. non-spellcaster) characters that equip them. Their AC bonus isn't as good as other shields, so whether the trade off is worth it is up to you.
Elf Boots can be worn in the boot slot, and also provide a saving throw bonus.
It's often the case that many fights can be resolved by letting the front-line characters hack the monsters away, two or three at a time each round. Which is good, since it allows your spellcasters save their spells for when it's really needed.
And when the monsters are numerous enough, or dangerous enough, I tend to think it's best to be more direct with damaging spells instead of beating around the bush with status-effect spells. Even so, always be mindful of the range of the spells you want to use.
As for replenishing Spell Points, Familiar Figurines are available as new items in the third game. Just having one equipped allows a Spellcaster to passively recoup Spell Points without having to be outdoors in sunlight. I therefore have my spellcasters equip both a Familiar Figurine, and a staff that reduces the Spell Point cost of spells (e.g. Staff of Mangar). Recall also my previous comment that having my front-line characters approach -50 AC on their own without Traveller's Tune in turn opens up other options for my Bard. Once I am ready for it, I have Ariel keep the Rhyme of Duotime active as her default song, since it doubles the rate at which my spellcasters recoup Spell Points through their Familiar Figurines.