-

- Forums
- Chatrooms
- Gallery
- Gameplay Videos
- Upload
- Articles
- Mod Reviews
- Shop SP: Games, Movies, Books
|
|
| Bard's Tale 2 Remastered Online Walkthrough by David Milward |
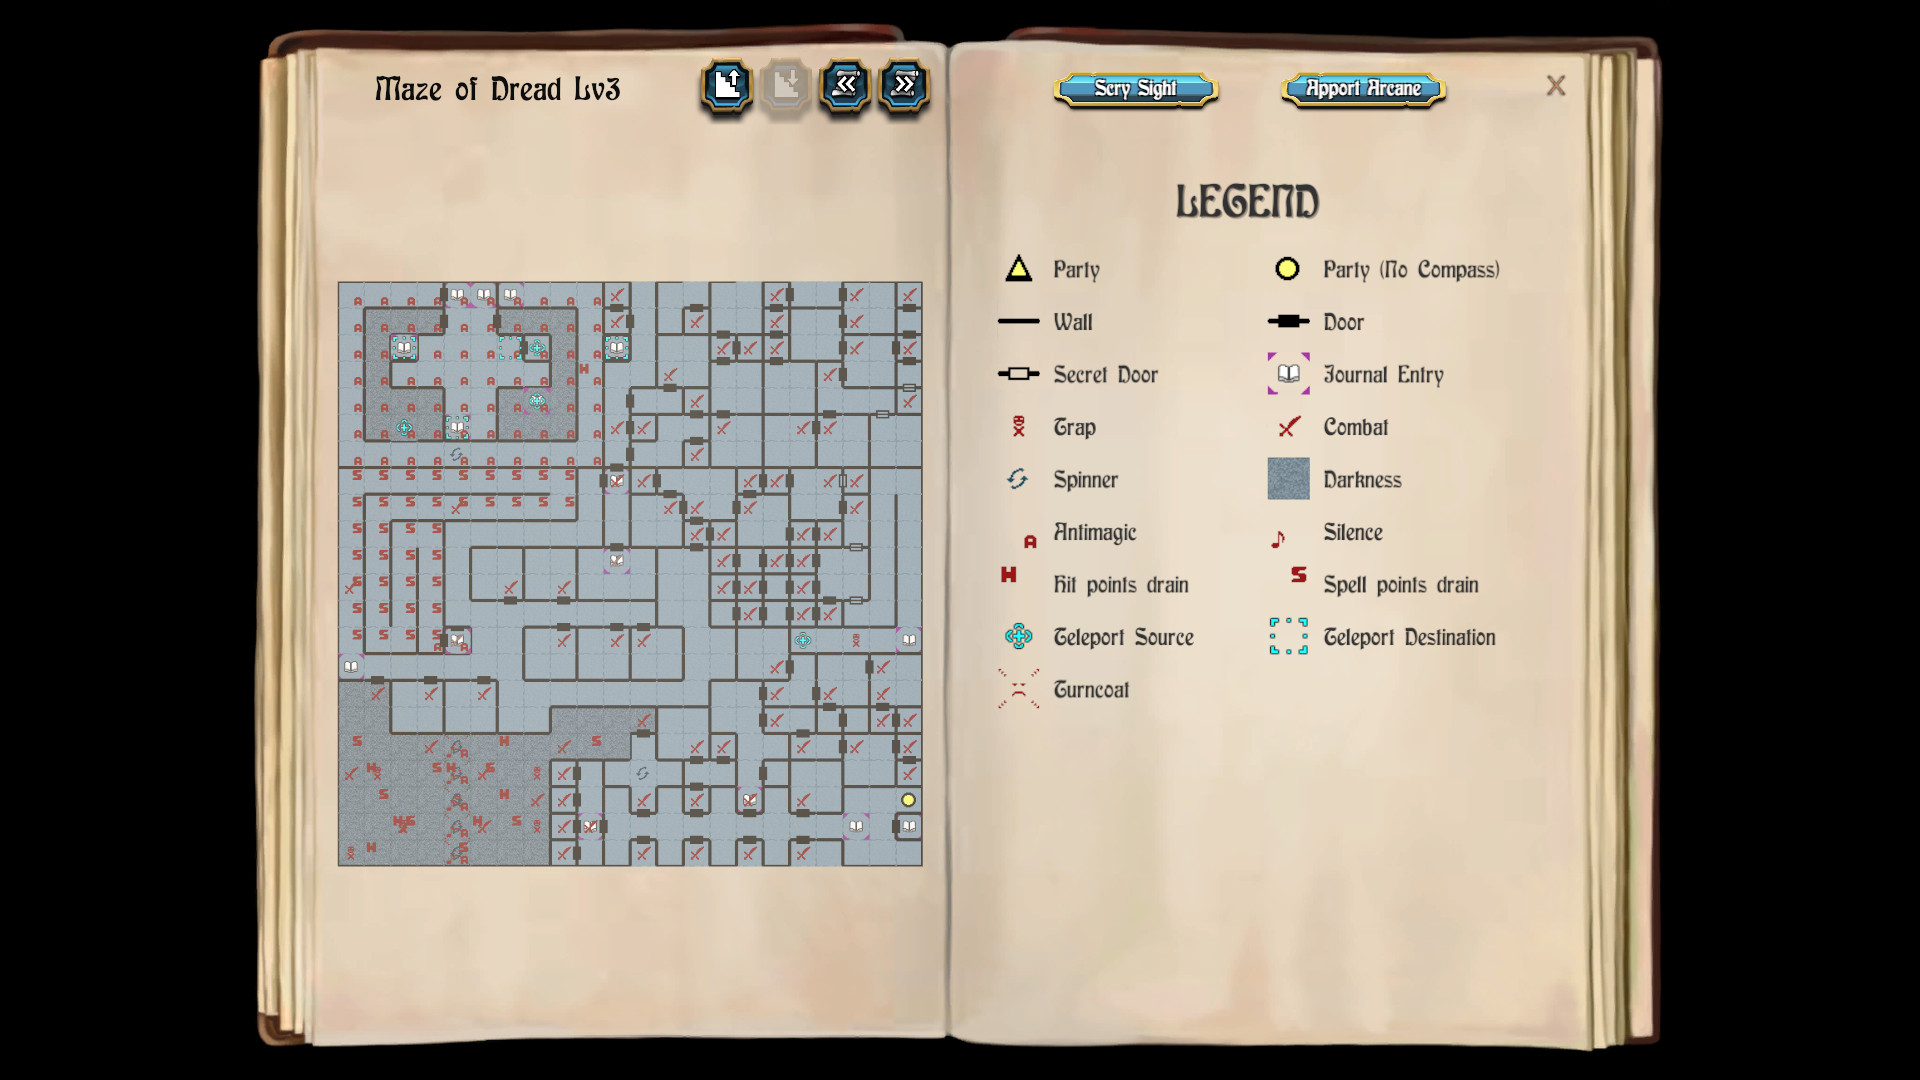
MAZE OF DREAD, LEVEL 3
Grounds of the Graphnar Fist
A sign is at 1N 19E warning against trespassing on the grounds of the
Graphnar Fist on pain of death.
This level will not feature any enemy spellcasters. What it will have is
LOTs of fights against warriors and archers of various sorts, and they can
show up in great numbers during an individual fight, which makes this
level an xp gold mine. I begin by winning fights against random monsters
in a sequence of 2N 17E, 0N 17E, 21N 16E, 20N 16E, 19N 16E, 21N 19E, 20N
19E, 19N 19E, 19N 21E, 21N 21E, 17N 19E, 18N 18E and 16N 18E.
Barracks A
First I win fights against random monsters at 0N 15E, 19N 14E, 19N 15E
and 16N 14E.
I go across the hallway and win a fight against random monsters at 2N 15E.
A sign indicates that I've entered Barracks A for Swordsmen. I proceed to
win several more fights against random monsters in a sequence of 5N 16E,
4N 17E, 4N 19E, 4N 21E, 3N 21E, 6N 16E, 6N 18E, 7N 20E, 6N 20E, 5N 20E and
5N 21E.
I return to the hallway. I win more fights against random monsters in a
sequence of 0N 13E, 20N 13E, 2N 13E, 4N 13E and 4N 14E.
Arms Master
Now I win fights against monsters at 0N 11E, 20N 10E, 21N 10E, 18N 12E,
16N 10E, 16N 11E, 17N 13E, 15N 13E and 14N 10E.
The Arms Master and twelves Pupils are at 11N 10E, but I defeat them
easily. I return to the hallway afterwards.
Barracks B
I go through the door to 1N 9E, and win a fight against random monsters.
A sign indicates that I've entered Barracks B for archers. I proceed to
win fights against random monsters at 0N 8E, 1N 8E, 2N 8E and 3N 8E.
I go back east a little and step through the door to 2N 11E to win another
fight against random monsters. I then step two squares north across the
spinner.
Dark Room
The room in the southwest corner of the level is filled with dark
squares. It also has anti-magic squares, silent squares and traps
throughout. I begin with fights against random monsters at 5N 11E, 4N 8E,
1N 5E and 3N 5E.
There's a solid line of silent squares running north-south in the room at
4E. I get across through 2N 4E, so as to avoid the additional silent
square at 3N 3E.
I put my Traveller's Tune back up. Now I win fights against random
monsters at 1N 2E, 3N 0E and 4N 3E while avoiding other silent squares.
I go north through the door to leave the dark room and arrive at 7N 1E. I
put up Cat Eyes and Locate Traps spells now that I'm out of the room.
Graphnar Lord
I win fights against random monsters at 6N 3E and 6N 5E.
Note the long winding hallway on the west side of the level, and that it's
filled with Spell Point-draining squares. I travel through the length of
it, winning fights against random monsters at 10N 0E and 13N 4E along the
way.
Sitting on an anti-magic square at 8N 4E is the Graphnar Lord and his
eight Elite Guards. I manage to defeat them in straight physical combat.
I leave the room through the door to the north, and then put up a
Batchspell. I next win fights against random monsters at 8N 8E, 8N 10E, 8N
11E, 10N 8E and 10N 5E.
Troops Beware!
I win a whole bunch of fights against random monsters in a sequence of
12N 13E, 12N 14E, 13N 13E, 13N 12E, 14N 11E, 13N 15E, 12N 17E, 12N 18E,
14N 15E, 14N 16E, 14N 18E, 14N 19E, 13N 19E, 11N 17E, 11N 16E, 11N 14E,
10N 17E, 10N 15E, 10N 14E, 9N 18E, 9N 17E and 9N 15E.
Now I follow the winding hallway on the east edge of the level. At 8N 21E
is a sign that warns members of the Graphnar Fist that the Puzzle-Snare is
ahead and they should turn back. I stop just a little short at 8N 18E and
drop a few items, in preparation for the Snare itself.
Snare #4
The teleporter at 8N 17E takes me to 16N 4E.
I go to 20N 4E and go west through the door. From there I go to 16N 2E,
and get teleported to 19N 2E. I get a clue that indicates that the value
of rote actions is "endurable".
I step out the door to the south, then to 21N 4E and go through the door
to the west. I follow the long tunnel all the way around until I reach 21N
6E. The Master Alchemist there gives me a Vial.
I go all the way back out the tunnel to 20N 5E, and then enter through the
door to the east. I go to a Magic Mouth at 17N 7E. If I did not have the
Vial, the Magic Mouth would tell me that it's thirsty. With the Vial in
hand, it takes the Vial from me and asks me what the value of rote actions
is. The answer of course is "endurable".
I'm only partway through though. Remember the earlier clue about how the
thirst leads to an even number of jaunts. I have to repeat the process of
getting the Vial from the Master Alchemist, giving the Vial to the Magic
Mouth and giving it "endurable" as the answer, three more times for a
total of four repetitions.
I go to 19N 7E after the fourth where the voice of Lagoth Zanta informs me
that I've beat the Snare. I get teleported to 19N 10E, and receive Wand
Segment 4 in my inventory.
I step east out the room, cast Scry Sight to get my bearings, and then
cast Apport Arcane with coordinates -18 -18 2 to leave the Maze.
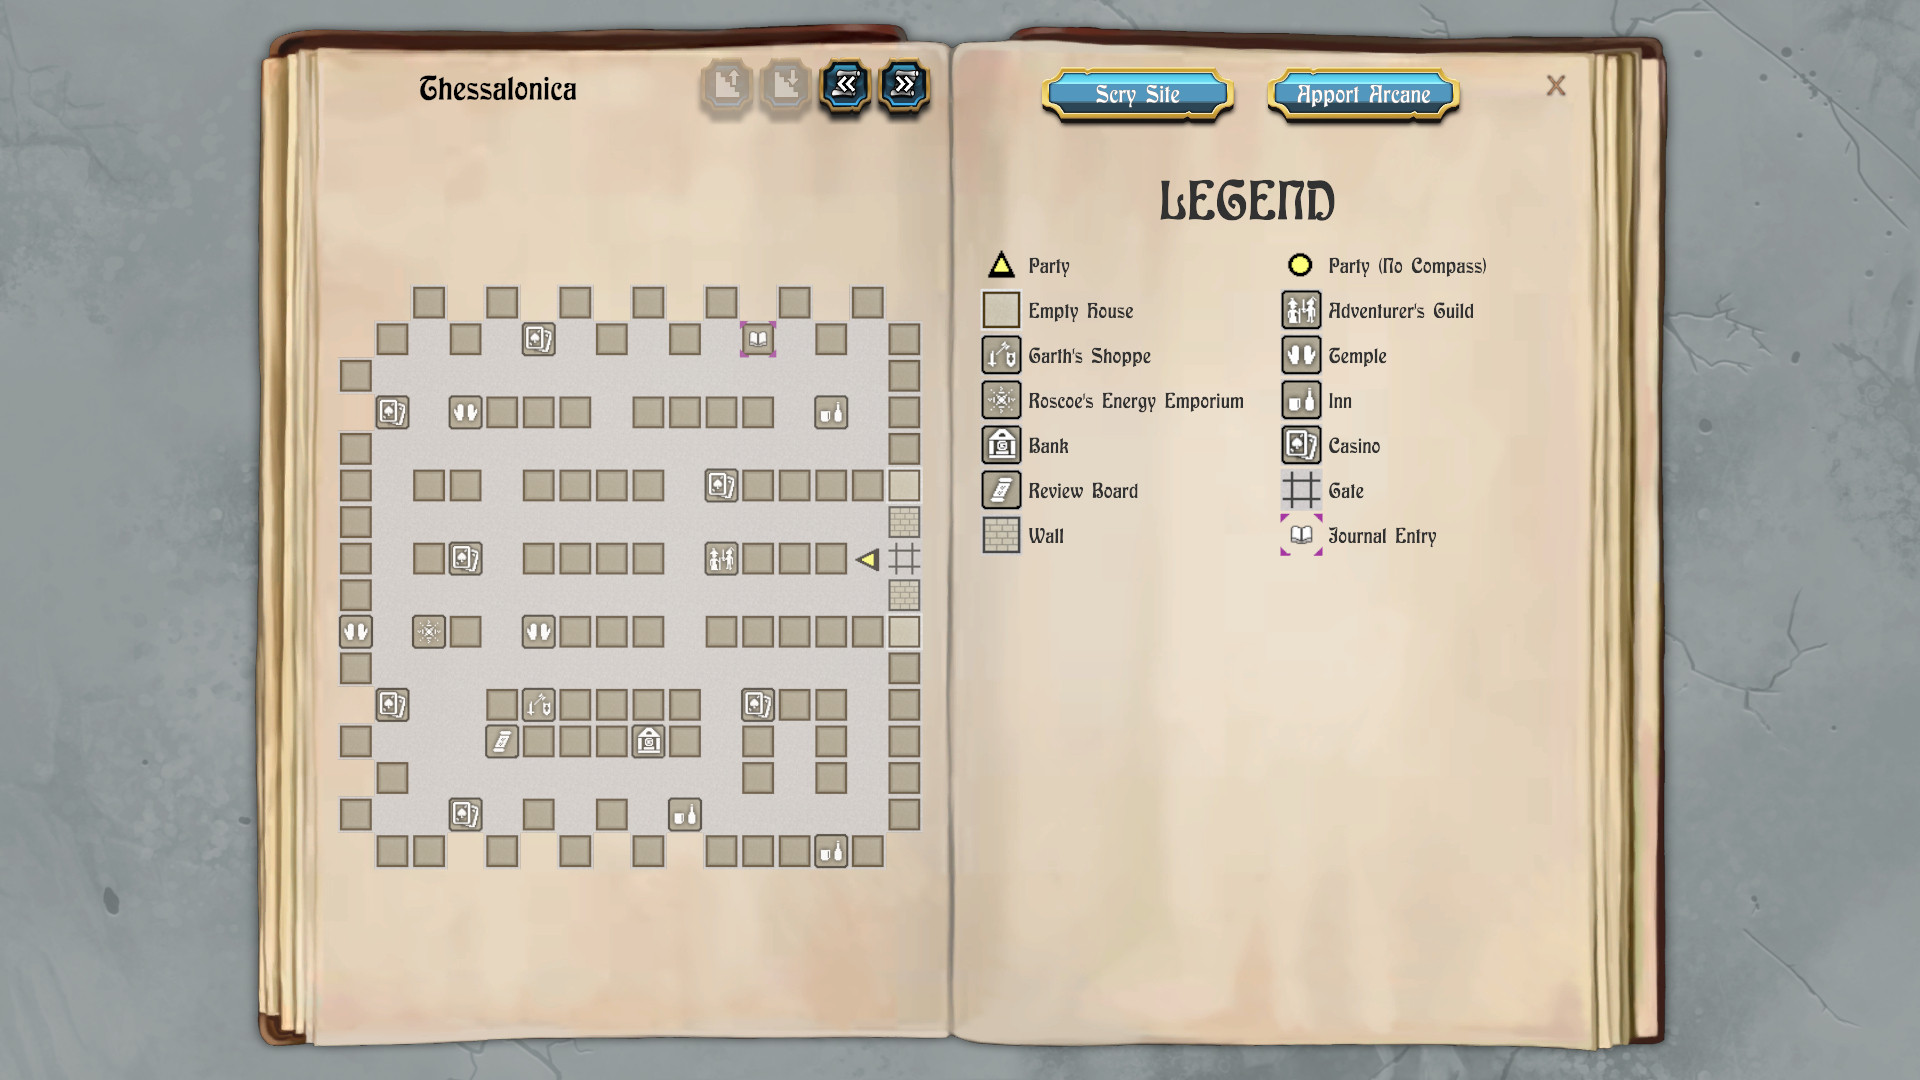
99th Level
It is night, so I enter and leave the Adventurer's Guild in Thessalonica
in order to reset the time to day.
I head over to the Review Board. Lord Stygar, Ariel, Cassandar and Gallard
advance to their 99th levels of experience. Zarathos advances to his 95th
level. Talia and Mordred advance to their 59th levels as Archmages.
Now I cast Restoration and head over to Roscoe's, who recharges my Spell
Points. I also have him identify the power on Wand Segment 4. It offers
unlimited charges of Wind Mage, which by now isn't terribly useful.
I next sell most of my spare loot to Garth's. I keep the Master Key, the
Wand Segments, and the two sets of Kato's Bracers that I had found in the
Maze. There is a specific reason for that.
I return to the Adventurer's Guild, and remove Lord Stygar, Zarathos and
Talia from the party. The reason is that the next Snare requires that I
keep three party slots open for joinable monsters.
I chose to keep Ariel because her Bard songs are valuable, especially when
they can augment the capabilities of monster summons. I keep Gallard
because his ability to insta-kill distant monsters is valuable, and he can
keep advancing his Critical Hit skill while in the party. I keep Cassandra
because she can take care of trapped chests, she can also insta-kill
distant monsters, and because I want to keep advancing her skill points at
the same time. Whereas with Lord Stygar and Zarathos, more Hit Points is
the only thing they miss out on in the grand scheme of things. And even
then, Zarathos will catch up rapidly when he starts advancing in a new
class during the third game.
I chose to keep Mordred instead of Talia. My plan is for Talia to take on
a new spellcaster class during the third game, so she'll definitely catch
up rapidly as well.
I have Mordred cast the Brothers Kringle spell to have a Kringle Brother
occupy each of the empty party slots as the most powerful summons in the
game. They can hit for massive damage as Monks, can use a breath weapon
that can damage multiple enemies, and their AC becomes -35 in conjunction
with Ariel's Traveller's Tune. Ariel takes the lead position, while
Cassandra, Gallard and Mordred stay in the back ranks.
I also have two of the Kringle Brothers equip one of the Kato's Bracers in
my inventory. I forgot to buy the third that I had sold to Garth earlier,
so now I buy it back and have the third Brother equip it. The point is
that Kato's Bracers will prevent a summoned creature from ever turning on
the party, unless one of my own party members damages them.
I have Roscoe recharge Mordred's Spell Points, and leave Thessalonica. My
next destination is Oscon's
Fort.