-

- Forums
- Chatrooms
- Gallery
- Gameplay Videos
- Upload
- Articles
- Mod Reviews
- Shop SP: Games, Movies, Books
|
|
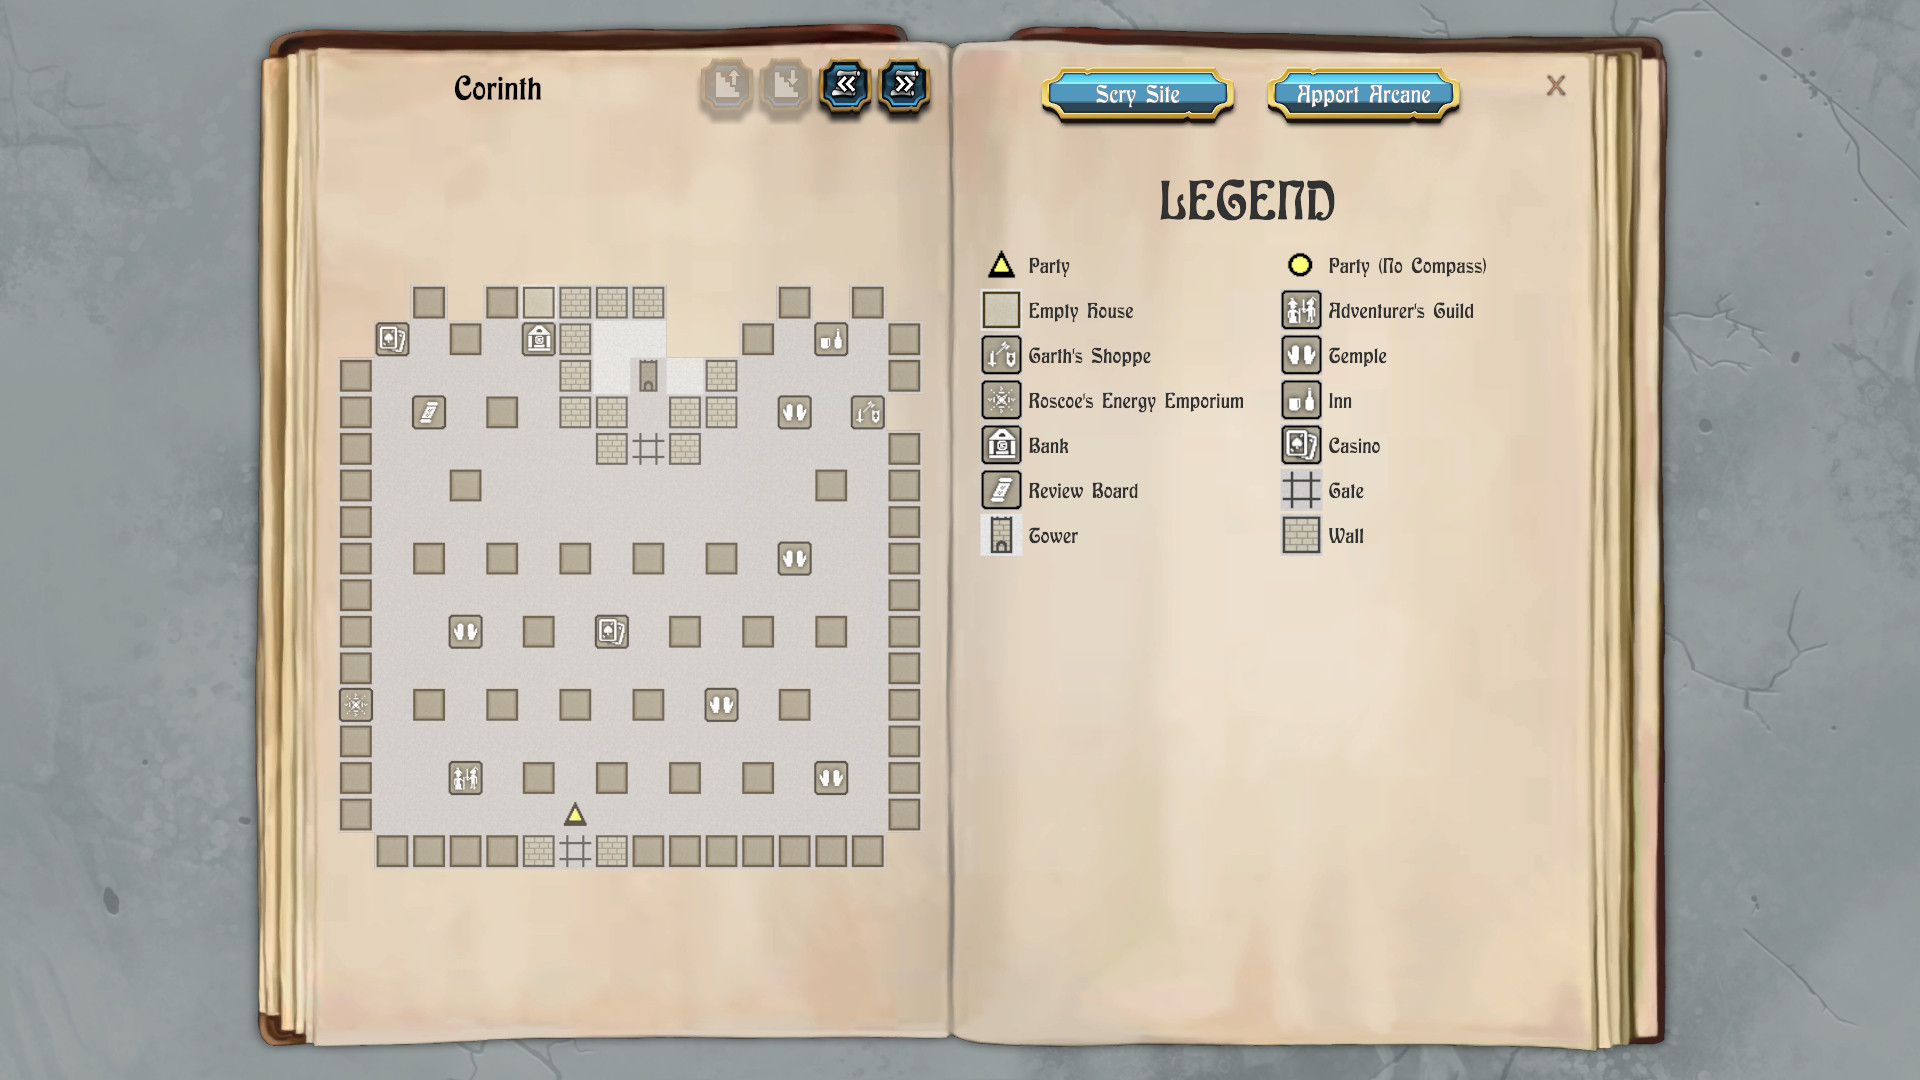
OSCON'S FORT, LEVEL 1
*NOTE* dmc also had his Kringle Brothers equip Breathrings to improve their survivability. He was also willing to cast the Brothers Kringle spell more than once for more Hit Points if needed. He also had Mordred keep a Magestaff handy in case he was running low on Spell Points.
Item of Kazdek
I go to the Sage's Hut. He charges 120,000gp to reveal that Oscon's Fort is in the city of Corinth, and that an item from somebody named Kazdek is needed to gain entrance.
He charges another 5,000gp to reveal that Kazdek is a living immortal statue who lives in a hut somewhere in between Thessalonica and Colosse.
The hut is indeed almost perfectly halfway between Thessalonica and Colosse. Kazdek himself falls asleep as soon as I enter. I choose the option to speak to him and say his name: "Kazdek". He wakes up and gives me the Item of Kazdek.
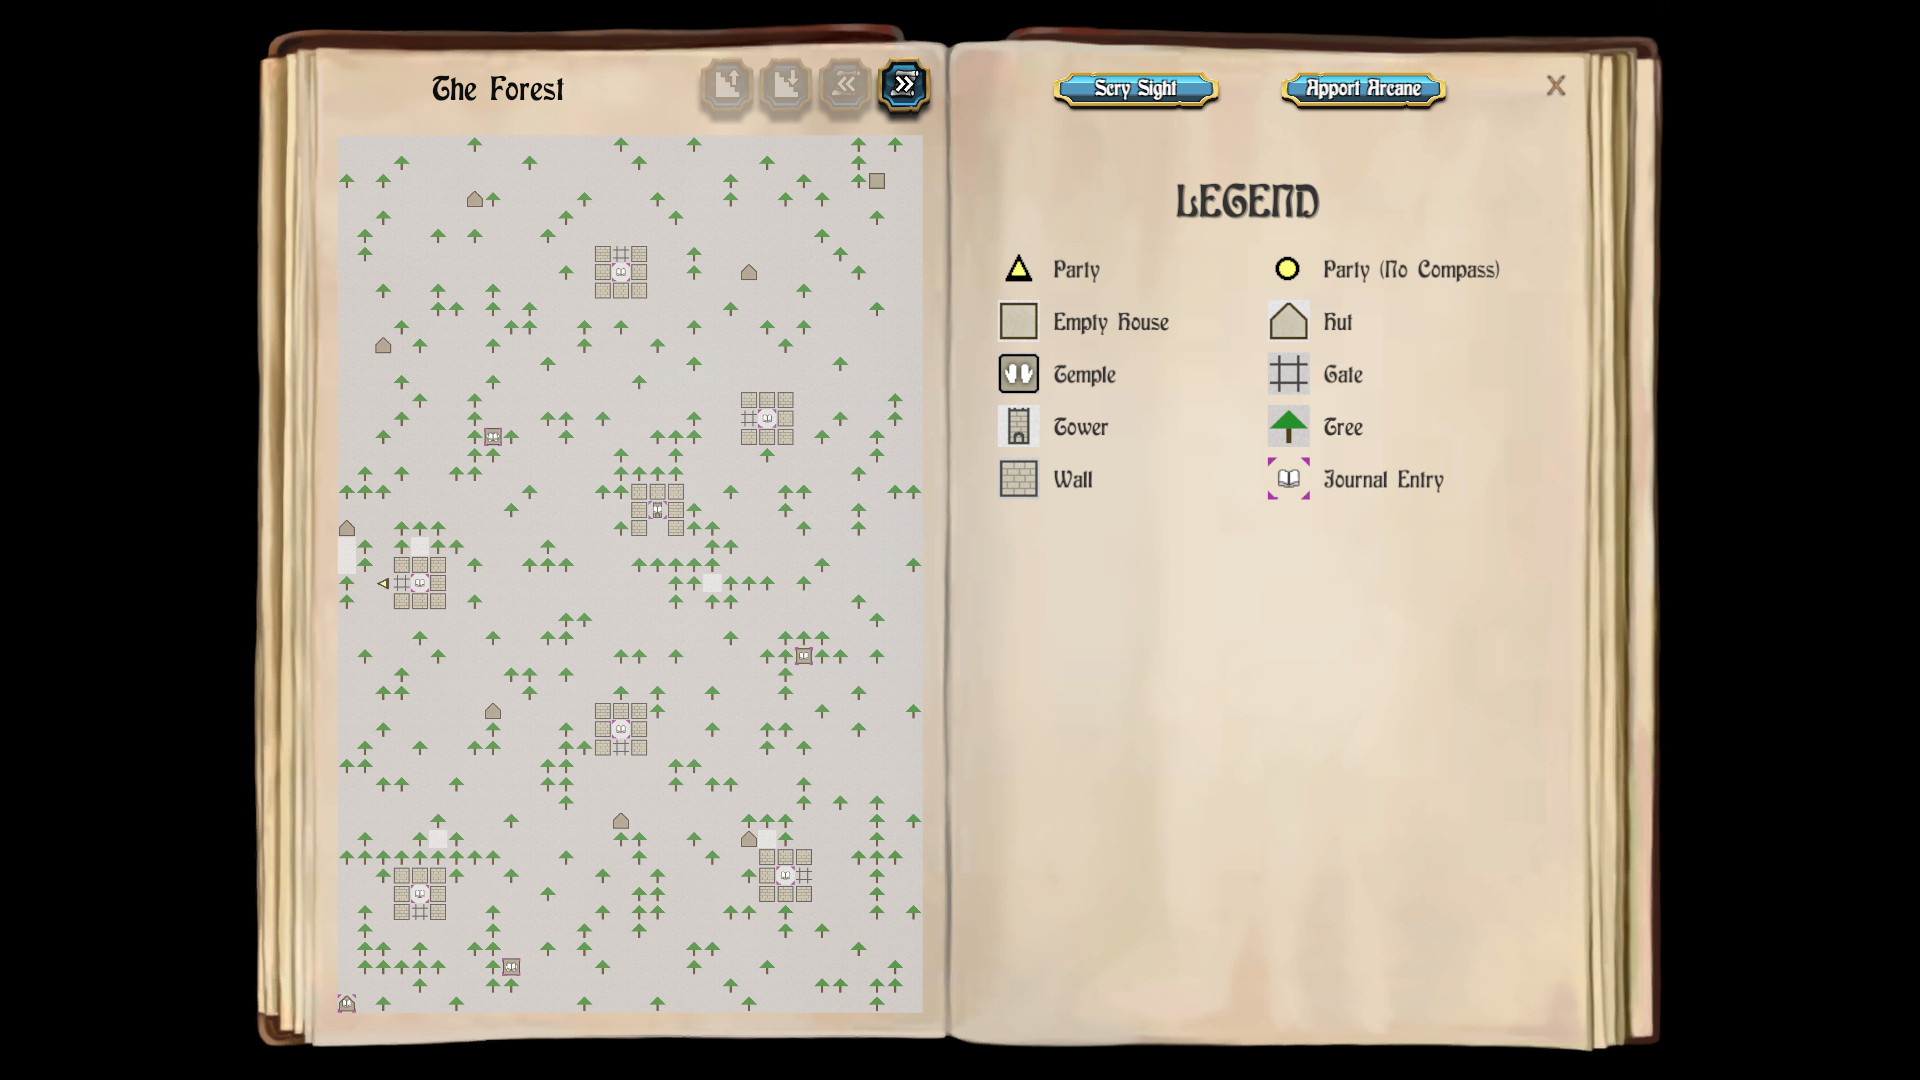
I travel back to the southwest corner of the Wilderness Map, and enter the city of Corinth.
Roscoe's Emporium is on the west side of the city. I have Mordred put up a Batchspell, and pay Roscoe to re-energize him.
The entrance to the Fort itself is on the north side of the city, behind a gate that requires a Master Key to get past.
I go in through the front door. I have the option to enter the Fort now that I have the Item of Kazdek in my inventory.
Fortress Tripwires
There are three small rooms to the east, south and west of the stairs. I start by winning fights against random monsters at 0N 2E, 20N 0E and 0N 20E.
I take on a different combat style here to account for the fact that I have three Kringle Brothers in the party for this part of the game. They are basically Monks who also pack breath weapons. Their damage is already impressive as it is. So what Ariel often does is start with Spell Song to soften up the monsters for the Brothers' breath weapons and Mordred's use of Wand Segment 3. She then follows up with a sequence of Rhyme of Duotime, Falkentyne's Fury and Seeker's Ballad. Once that is complete, the Brothers can really start to churn out insane damage with their physical attacks. However, if I'm faced with enemy spellcasters, she'll lead off with Lucklaran since there is a small chance that the Brothers could get hurt by enemy magic. If I'm faced with enemy archers, like Knifemen on this level, she'll use Sanctuary Score and Archer's Tune since there is a danger of those attacks connecting on the Brothers. That is what I did during the third fight that involved plenty of Knifemen. Cassandra and Gallard meanwhile use their insta-kill abilities on more distant enemies.
A Magic Mouth at 2N 0E warns me to keep running without looking back should I ever set off a tripwire in the Fort.
Seek the Master of Zen
I go north and reach a spinner and crossroad at 10N 0E. I next go east, using Trap Zap when necessary. At 11N 11E is a Magic Mouth that tells me: "Seek the master of Zen, whose might was caught by Zanta's men."
Now I win fights against random monsters at 12N 11E, 13N 13E, 14N 9E, 16N 8E, 18N 8E, 20N 9E, 20N 11E, 19N 13E, 17N 14E and 15N 14E. Sometimes I am faced with numerous foes like plenty of Knifemen or plenty of Brockters who summon Illusions and use Mage Maelstrom. It's often a matter of putting up protections (e.g. Lucklaran, Archer's Tune, Sanctuary Score) as I clear a path through the monsters that are within closer range. I am more or less in the clear once I can close the distance to 50' on the Knifemen or Brockters. At that point the Kringle Brothers can use their breath weapons and Mordred can use his Wand Segment 3.
I go to 16N 15E, which teleports me to 2N 16E.
Land of Krill
First I go south through the nearby door and win fights against random monsters at 0N 15E. I next go to the teleporter at 0N 14E, which takes me to 0N 16E.
I step north out the door and into a large dark zone. Now I go E N N E E E N N N N and N, avoiding Hit Point draining squares and set fights for now. That takes me to a teleporter at 8N 21E, which takes me to 20N 21E.
I go south and win fights against random monsters at 19N 20E, 15N 20E and 11N 20E. I go west to win another fight against random monsters at 11N 16E. I have a Pipes of Pan that I can now use as a limitless light source, so now I activate it.
I proceed to win fights against random monsters at 13N 18E, 14N 17E, 16N 18E, 18N 18E and 20N 17E. I step out the door to the west to enter another dark zone, and win a couple more fights against random monsters at 19N 16E and 21N 14E.
At 21N 12E is a clue in the form of a poem: "Of battles fought, in the land of Krill, Sing bards without, a ghostly will." I make my way to 11N 18E, and step south through the one-way door and into the main hallway. I put a light spell back up through the Pipes of Pan.
Pits of Fire
I go east, using Trap Zap to clear the way, and head back to the crossroad at 10N 0E. I go through the north hallway, using Trap Zaps again to clear the way, and reach the teleporter at 18N 0E.
It takes me to 18N 11E, where I find another poem that reads: "In caverns deep, near pits of fire, The Agron creep, and do conspire."
I fight some random monsters at 16N 11E, and then go to the teleporter at 18N 12E. It brings me to 4N 13E.
Sword of Silence
I go to 5N 12E, where I find another poem. This one reads: "Sword of silence, axe of hate, Death arrow's path, is always straight."
I thereafter win fights against random monsters at 0N 11E, 2N 9E, 4N 9E, 6N 10E, 6N 12E, 5N 14E and 2N 15E.
I go to the teleporter at 0N 14E to end up at 0N 16E. I then leave through the door to the north to return to the dark zone on the south side of the level.
The Zen Master Cometh!
I proceed to win fights against random monsters at 2N 20E, 4N 18E, 6N 20E, 8N 18E and 8N 14E, while avoiding Spell Point draining squares at the same time. I go west through the narrow tunnel that connects dark zones on both sides of the level. I continue with winning fights against random monsters at 8N 7E and 2N 7E.
A voice at 0N 9E tells me: "The Zen Master cometh!"
The Word is Still
I begin winning fights against random monsters at 4N 4E and 6N 3E. At 7N 3E is a Magic Mouth that asks for three words. The answers are found in the previous clues of this level, and in sequence they are: "fire", "krill" and "silence". The Magic Mouth informs me that "the word is still." That in itself is a clue that will come up later.
At 9N 2E I get into the worst possible fight with several Knifemen and several Brocksters. The Brothers get wiped out, but Mordred is able to pick them back up with a HEAL spell. I eventually manage to get the upper hand once I've closed the distance to 50' and recovered, whereby they fall under sustained breath weapons from the Brothers and Mordred's use of Wand Segment 3. The theme that manifests is that I do not want Mordred to expend any Spell Points except when truly necessary. He relies on Wand Segment 3 for offence, and other items such as Pan's Pipes for exploration spells. That is also why I avoid Spell Point draining squares whenever I can.
I go to the teleporter at 8N 1E, which takes me to 18N 1E.
Stairs to the Second Level
Now I win a prolonged series of fights against random monsters in a sequence of 15N 2E, 12N 2E, 13N 5E, 12N 5E, 14N 5E, 16N 4E, 21N 7E, 18N 6E, 15N 6E and 12N 9E.
The stairs to the next level are at 12N 10E.