-

- Forums
- Chatrooms
- Gallery
- Gameplay Videos
- Upload
- Articles
- Mod Reviews
- Shop SP: Games, Movies, Books
|
|
DARGOTH'S TOWER, LEVEL 1
Saradon's WardStone
First, I make my way to the Sage's Hut and ask him about Dargoth. He charges 10,000gp to tell me that Dargoth is death itself from another realm, and that his tower is in the city of Phillipi
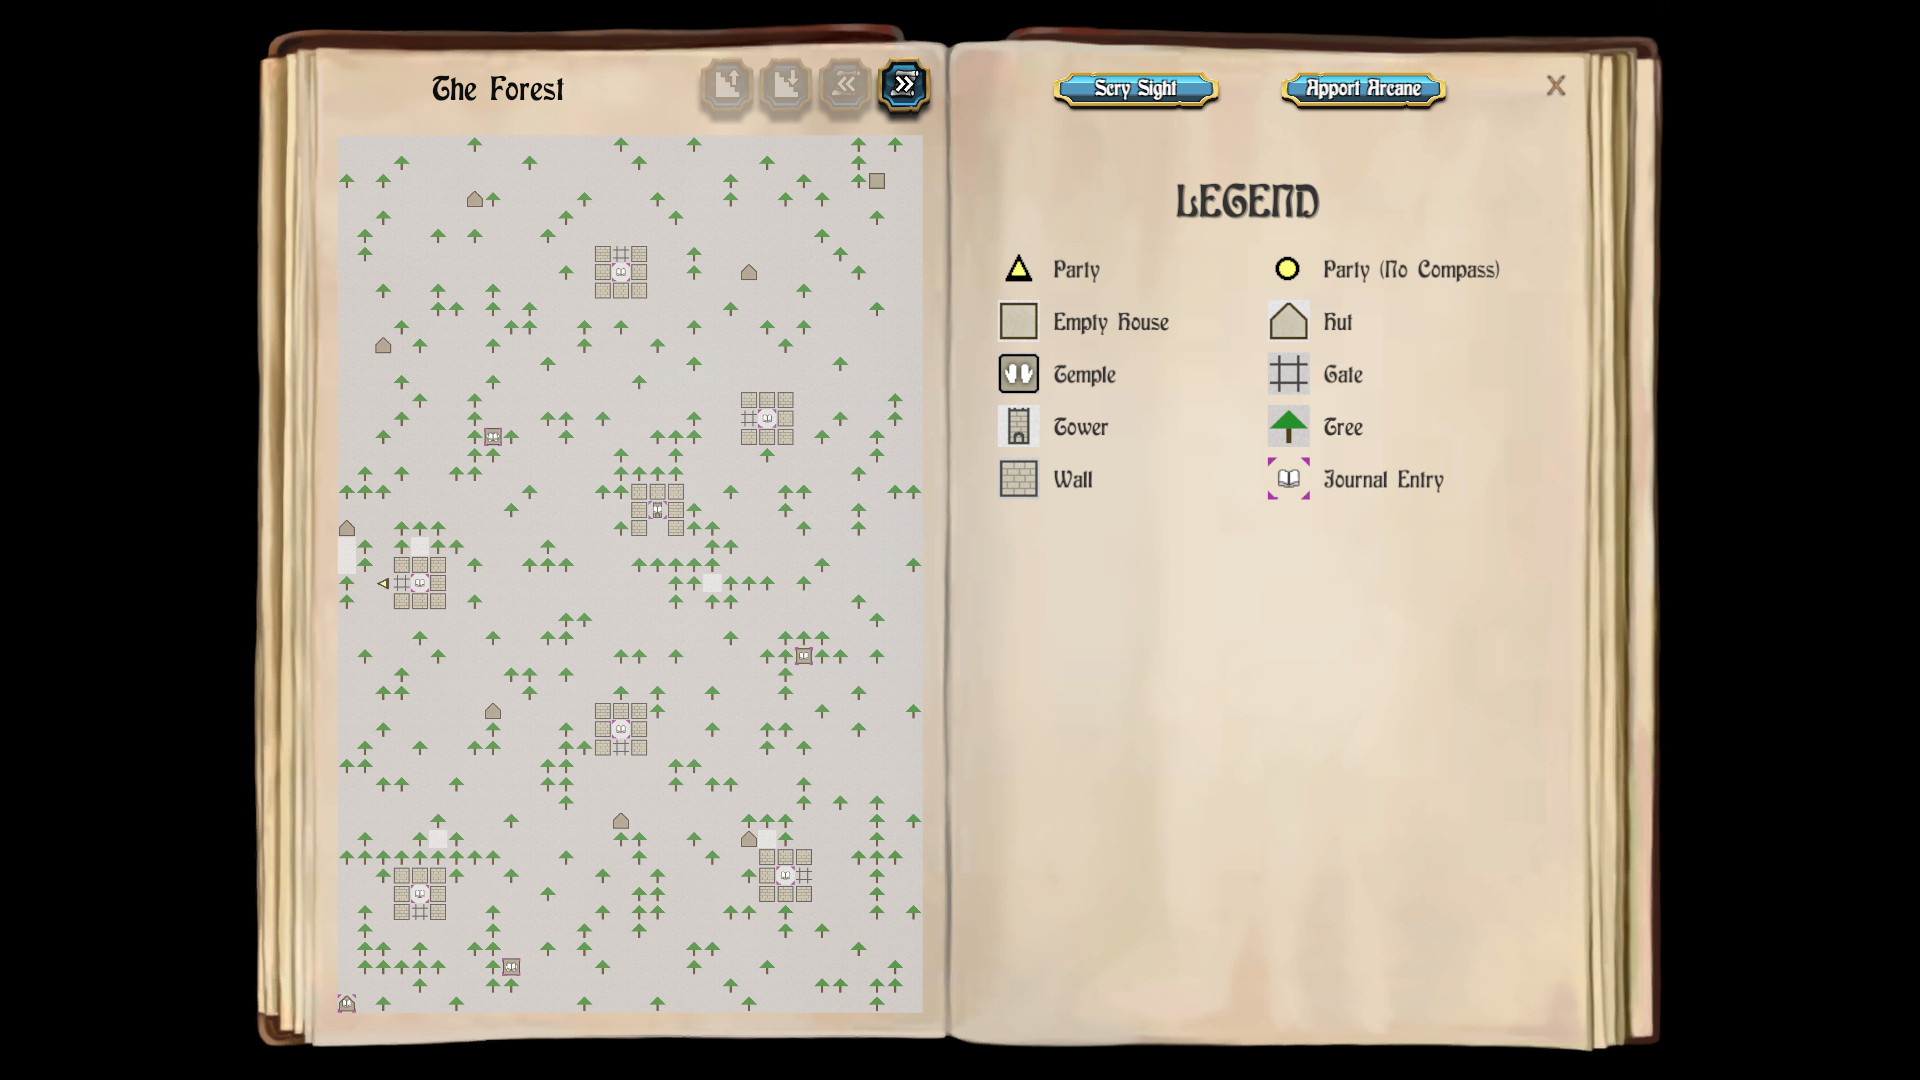
Next, however, I make my way to a hut near the northeast corner of the Wilderness Map. Singed earth around the hut indicates that a battle took place. I go inside and inspect Saradon's body to find a Wardstone, which is the first action necessary to learning the fabled Dreamspell.
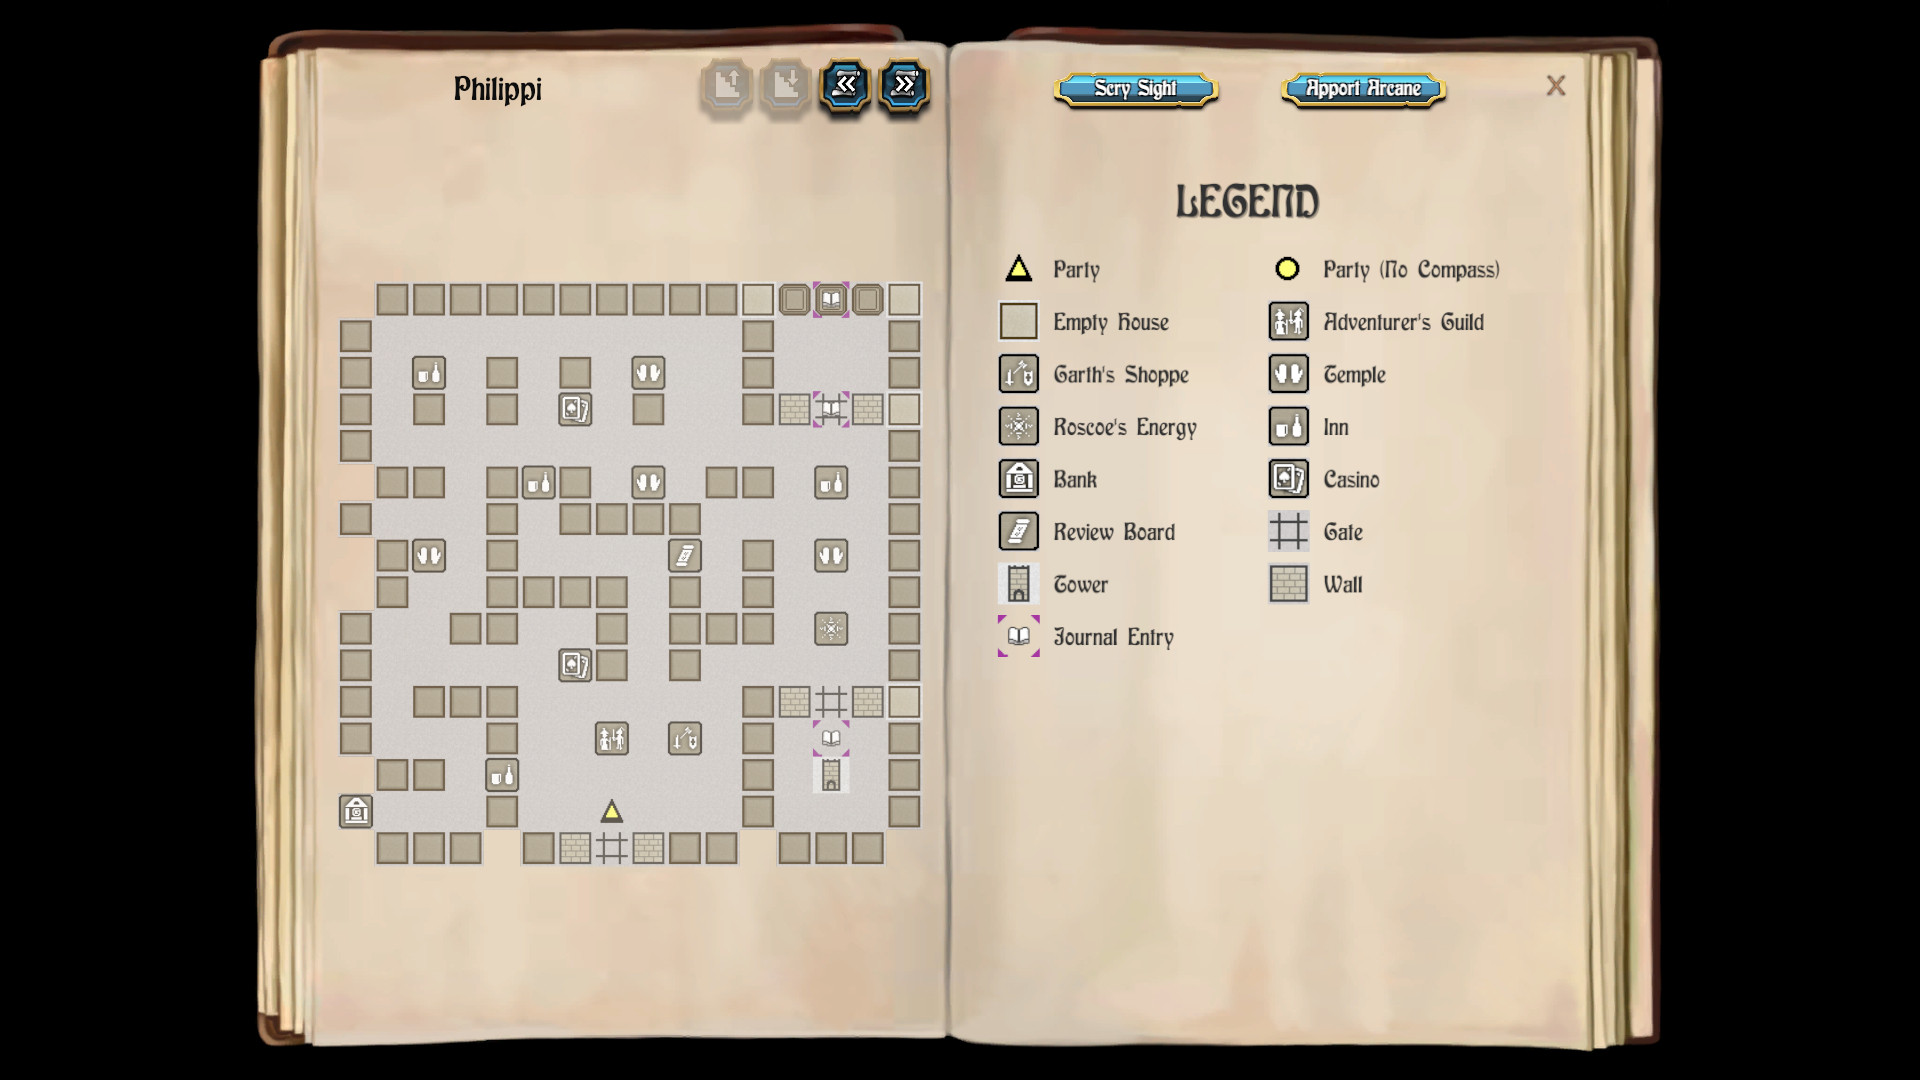
Now I go to Phillipi, which is straight south from Fanskar's Castle.
78th Level
I go to the Review Board, which is at 8N 9E on the map of Philippi. Lord Stygar, Ariel, Cassandra and Gallard advance to their 78th levels of experience. Zarathos advances to his 74th level. Talia and Mordred advance to their 30th levels as Archmages.
Saradon's Workshop
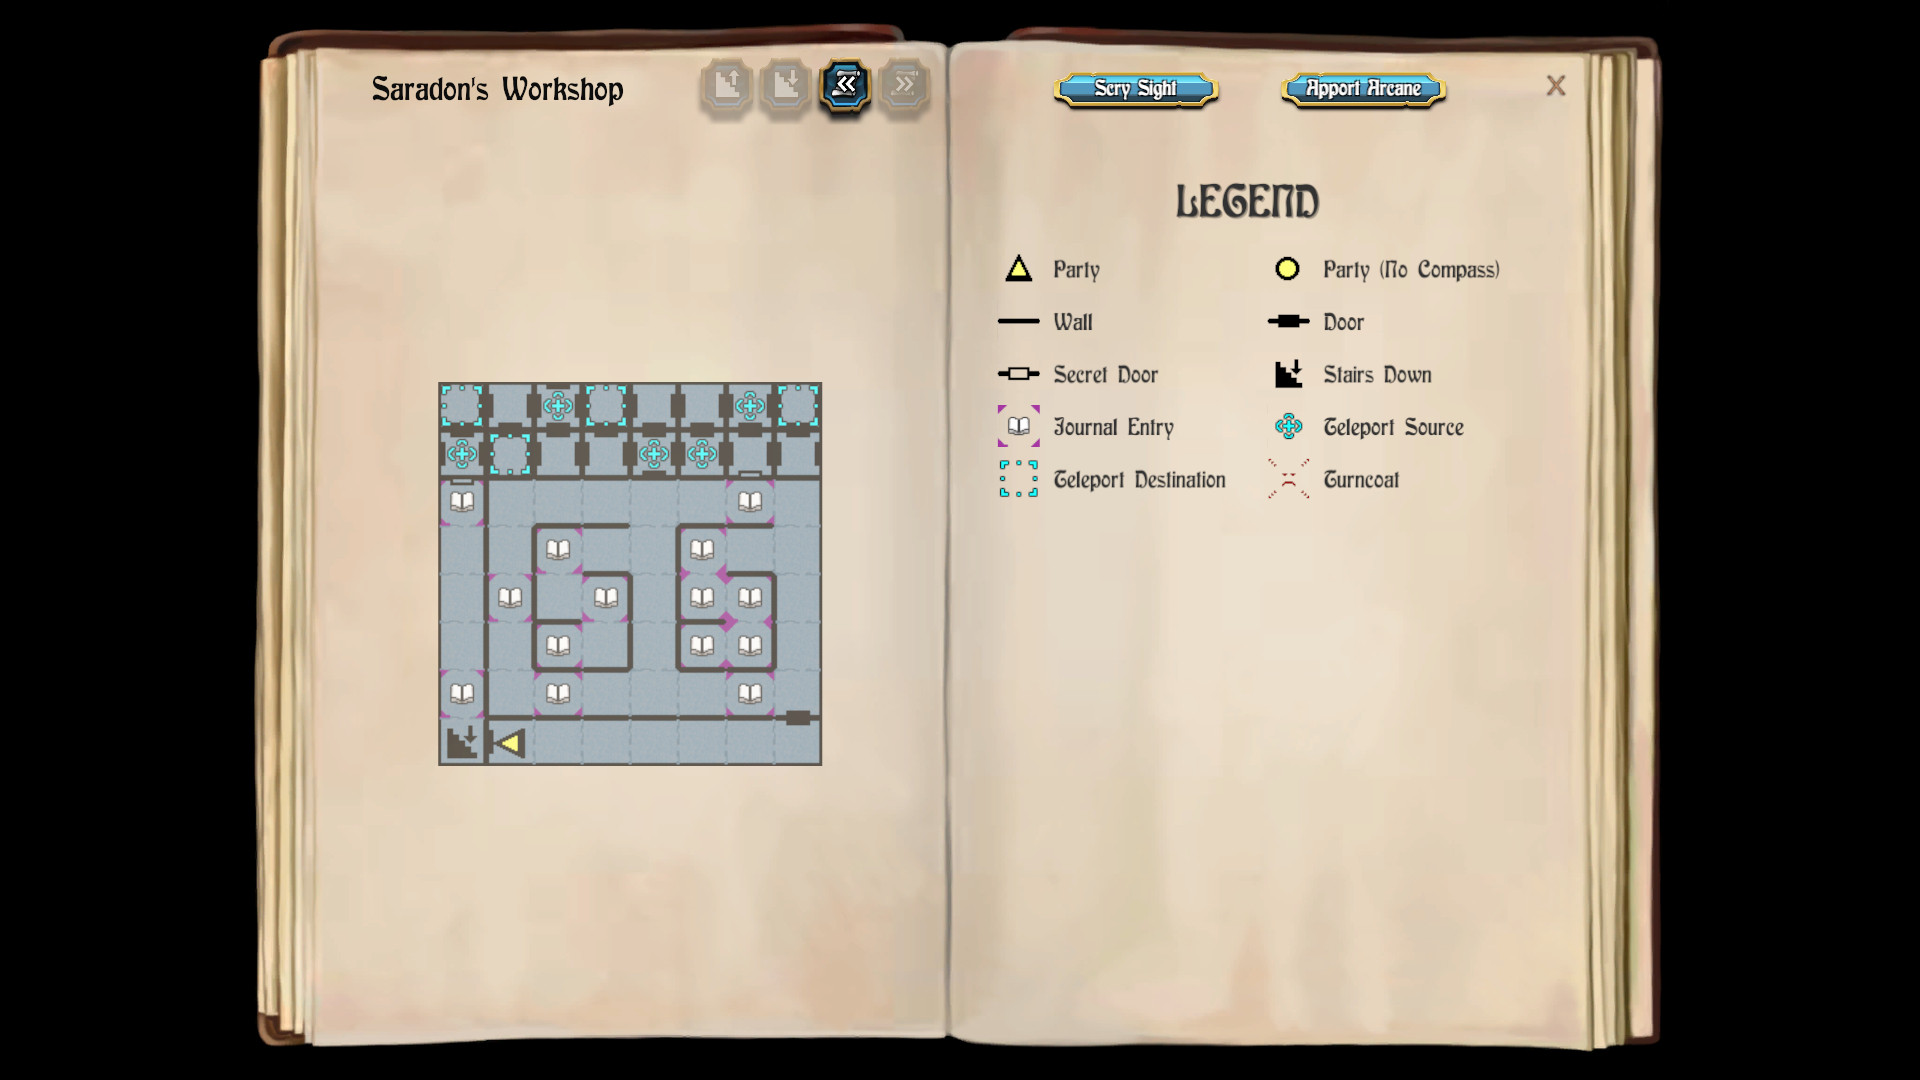
Notice that there's a gate cutting off the northeast corner. The Wardstone allows me to pass through the gate. On the other side is the entrance to Saradon's Workshop.
I cast the Batchspell and head straight north along the hallway. The teleporter at 6N 0E takes me to 6N 1E. The best route is then to go two squares east and then one square south to the teleporter to 6N 5E, which takes me to 7N 7E. From there I go S W and S to enter the Workshop proper and get past the teleporters altogether. A voice tells me I am free to take what I need as long as I respect the Workshop itself.
At 4N 2E is a clue that the Temple of Narn, near the city of Corinth, will be of some importance.
At 3N 3E is a clue that the greatest of Heroes number seven, and they will rise to the Heavens. The meaning will become apparent during the third game.
AT 1N 2E is an extended version of Saradon's letter that was viewed during the opening cutscene to the second game.
At 1N 6E is the Harmonium Staff, which has 20 charges.
At 4N 5E and 3N 5E are references to being able to learn the Dreamspell in the Destiny Stone, but one first needs to learn five words in their proper order before trying to learn the spell in the stone.
At 3N 6E is the first of the clues about the proper order of the words. A grey crypt is first and a maze is second. A clue at 2N 6E is a clue that a castle is third and a fort is fourth. The clue at 1N 6E reveals that a tall tower is fifth.
I go to 1N 7E and go south through the door. I go west along the hallway to reach the stairs and leave the Workshop.
I go to Roscoe's Emporium, which is at 6N 13E on the map of Philippi. An identification on the Harmonium Staff reveals that each charge can fully replenish a Mage's Spell Points. An identification on Wand Segment 2 reveals that it can cast Ybarra's Mystical Armor without limit.
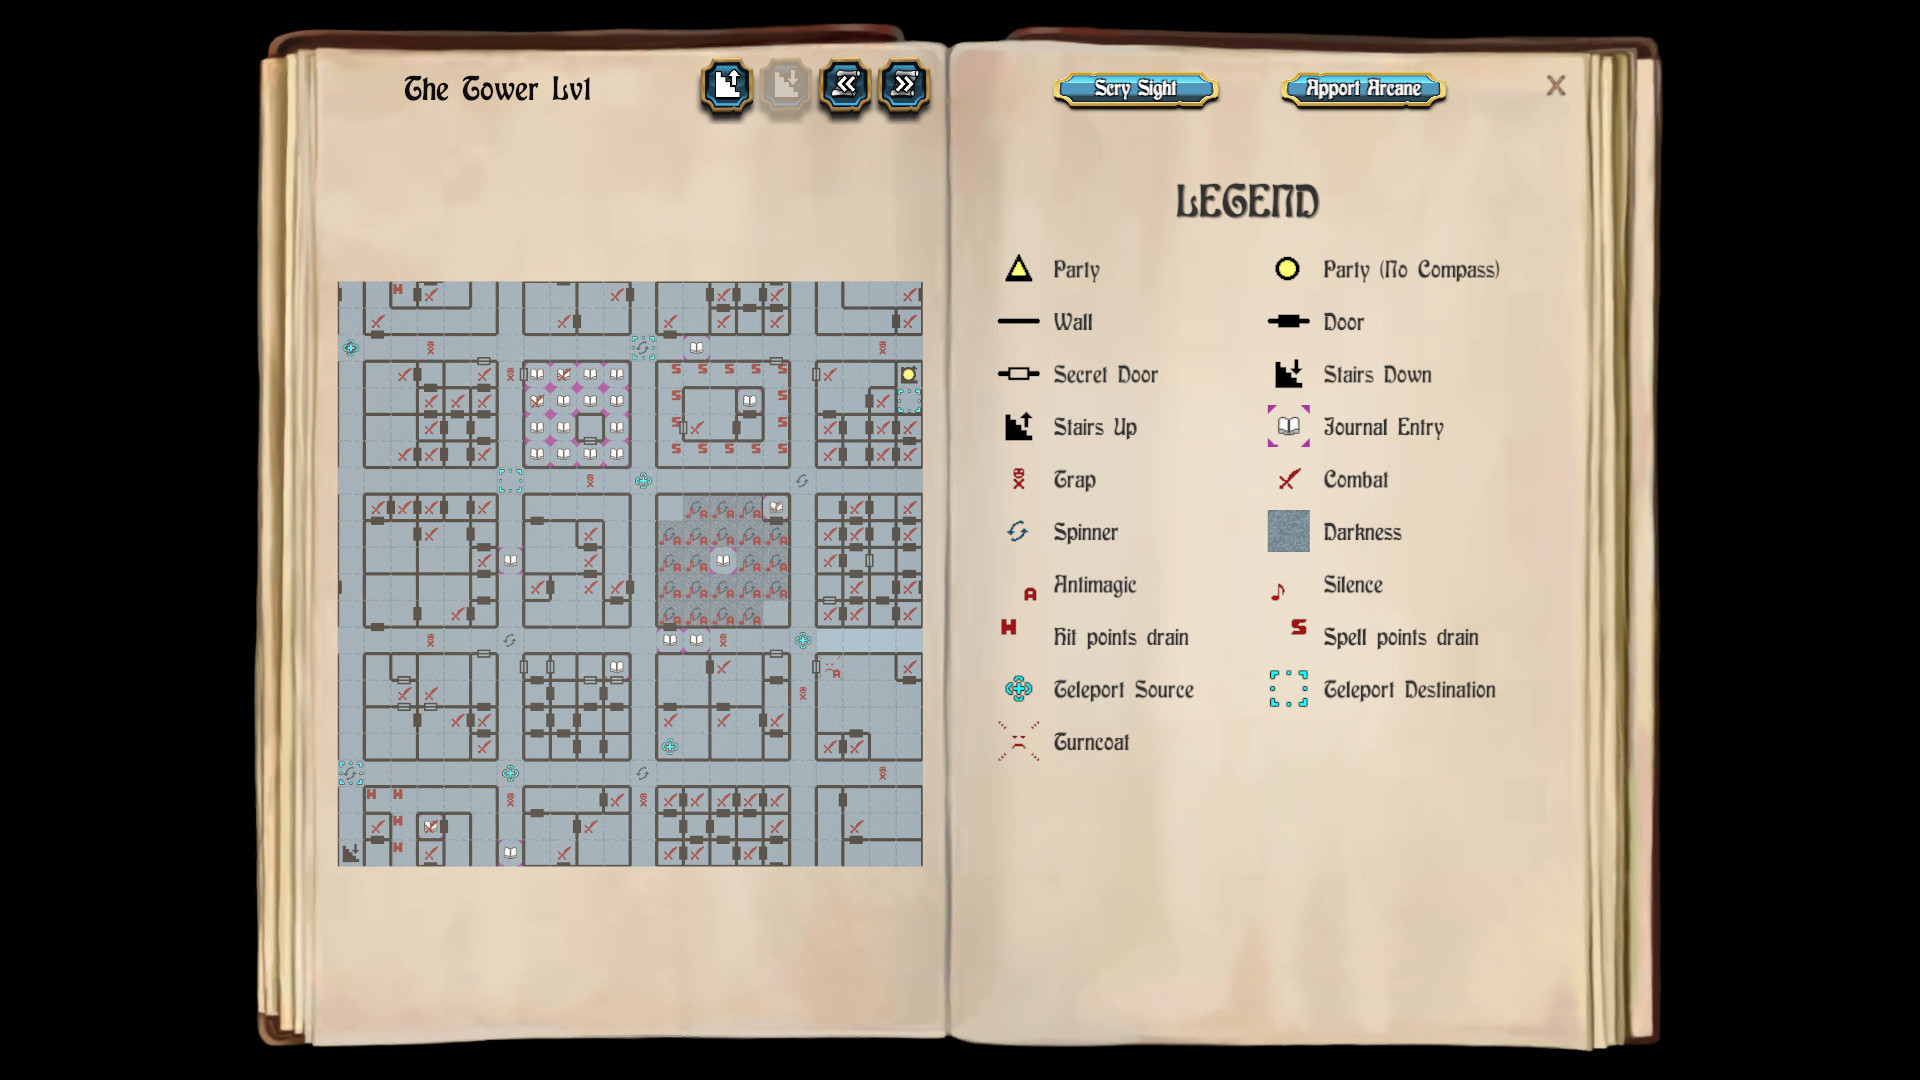
I use the Master Key to pass through the gate at 4N 13E, and then enter Dargoth's Tower at 2N 13E.
Ask the Wise of the Maze
First I go two squares south and go west through the door. I win battles against random monsters at 21N 21E, 1N 19E and 20N 21E.
I back track to return to the hallway, and then go four squares north (past the stairs), five squares west and seven squares south. The purpose is to avoid the teleporter at 19N 0E. I go east throught the door and then win fights against random monsters at 18N 18E, 16N 18E, 20N 18E, 21N 18E, 15N 21E, 15N 20E and 15N 18E.
I return to the hallway. To the west is a room filled with Spell Point-draining squares. I go past them and to the Magic Mouth at 17N 15E. It tells me: "What truly counts is rarely said; Ask the wise of the Maze of Dread." I return to the hallway afterwards.
Frequency is the Ultimate Key
I go a little westward, and win fights against random monsters at 20N 12E, 21N 14E, 20N 14E, 21N 16E, 20N 16E, 1N 16E, 0N 15E, 2N 14E, 2N 15E, 2N 16E, 0N 13E, 0N 12E, 2N 12E and 2N 13E.
I return to the hallway and go west a little more and then a little north. I win fights against random monsters at 21N 10E, 20N 8E, 0N 8E, 1N 9E and 2N 10E.
I return to the hallway and go a bit west. I win fights against random monsters at 8N 18E and 7N 17E.
I return to the hallway and go a little bit west. I win more fights against random monsters at 18N 5E, 17N 5E, 17N 4E, 16N 3E, 17N 3E, 18N 2E, 15N 5E, 15N 3E and 15N 2E.
I go back to the hallway, go west a little, and then win fights against random monsters at 20N 1E, 0N 3E and 1N 3E.
After the last fight, I read a message on the wall: "Frequency is the ultimate key."
Seek the Zen Master
I start by going to the teleporter at 19N 0E, which takes me to 19N 11E. I then go to the teleporter at 14N 11E, which brings me to 3N 0E.
After that, I go seven squares north and west through the door. I win fights against random monsters at 10N 21E, 9N 21E, 12N 21E, 13N 21E, 12N 19E, 12N 18E, 11N 18E, 10N 19E, 9N 19E and 9N 18E. I then return to the hallway.
I now avoid teleporters by going seven squares south, five squares west, four squares north and east through the door. I hit an anti-magic square. I use a Dayblade charge, since there will be another anti-magic zone fairly soon even after this one. I win fights against random monsters at 7N 21E, 4N 19E and 4N 18E.
I return to the hallway and back track to 8N 0E. I next go one square east and north through the door. I win fights against random monsters at 9N 4E, 11N 5E, 12N 3E, 13N 1E, 13N 2E, 13N 3E and 13N 5E.
I go back to the hallway, go east four squares, and then go south through the door. I win fights against random monsters at 5N 5E, 4N 5E, 5N 4E, 6N 3E and 6N 2E.
I return to the hallway and enter the cluster of rooms to the east. I make my way to 7N 10E, which has a message that reads: "Seek the Zen Master." I return to the hallway again.
Burn Out or Fade Away
I go east a bit, and then win fights against random monsters at 10N 10E, 12N 7E, 11N 9E, 12N 9E, 10N 9E and 10N 7E.
I go back to the hallway and go east a little more. I enter the room filled with dark and anti-magic squares. It also silences Bard songs. At 13N 16E is a Magic Mouth that asks me if it's better to (B)urn out for (F)ade away. Choosing the latter means the door turns into a wall behind you, and you'll have to use magic to get out. The better answer is the former, since you can fight a Burner for xp and then simply walk out of the room.
I return to the hallway, and put Traveller's Tune and other persistent spells back up.
Stairs to the 2nd Level
I use Trap Zap to the east, go east a few squares, and then win fights at 5N 16E, 5N 14E, 7N 14E and 5N 12E.
The teleporter at 4N 12E takes me to 17N 21E. The stairs to the second level are at 18N 21E.