-

- Forums
- Chatrooms
- Gallery
- Gameplay Videos
- Upload
- Articles
- Mod Reviews
- Shop SP: Games, Movies, Books
|
|
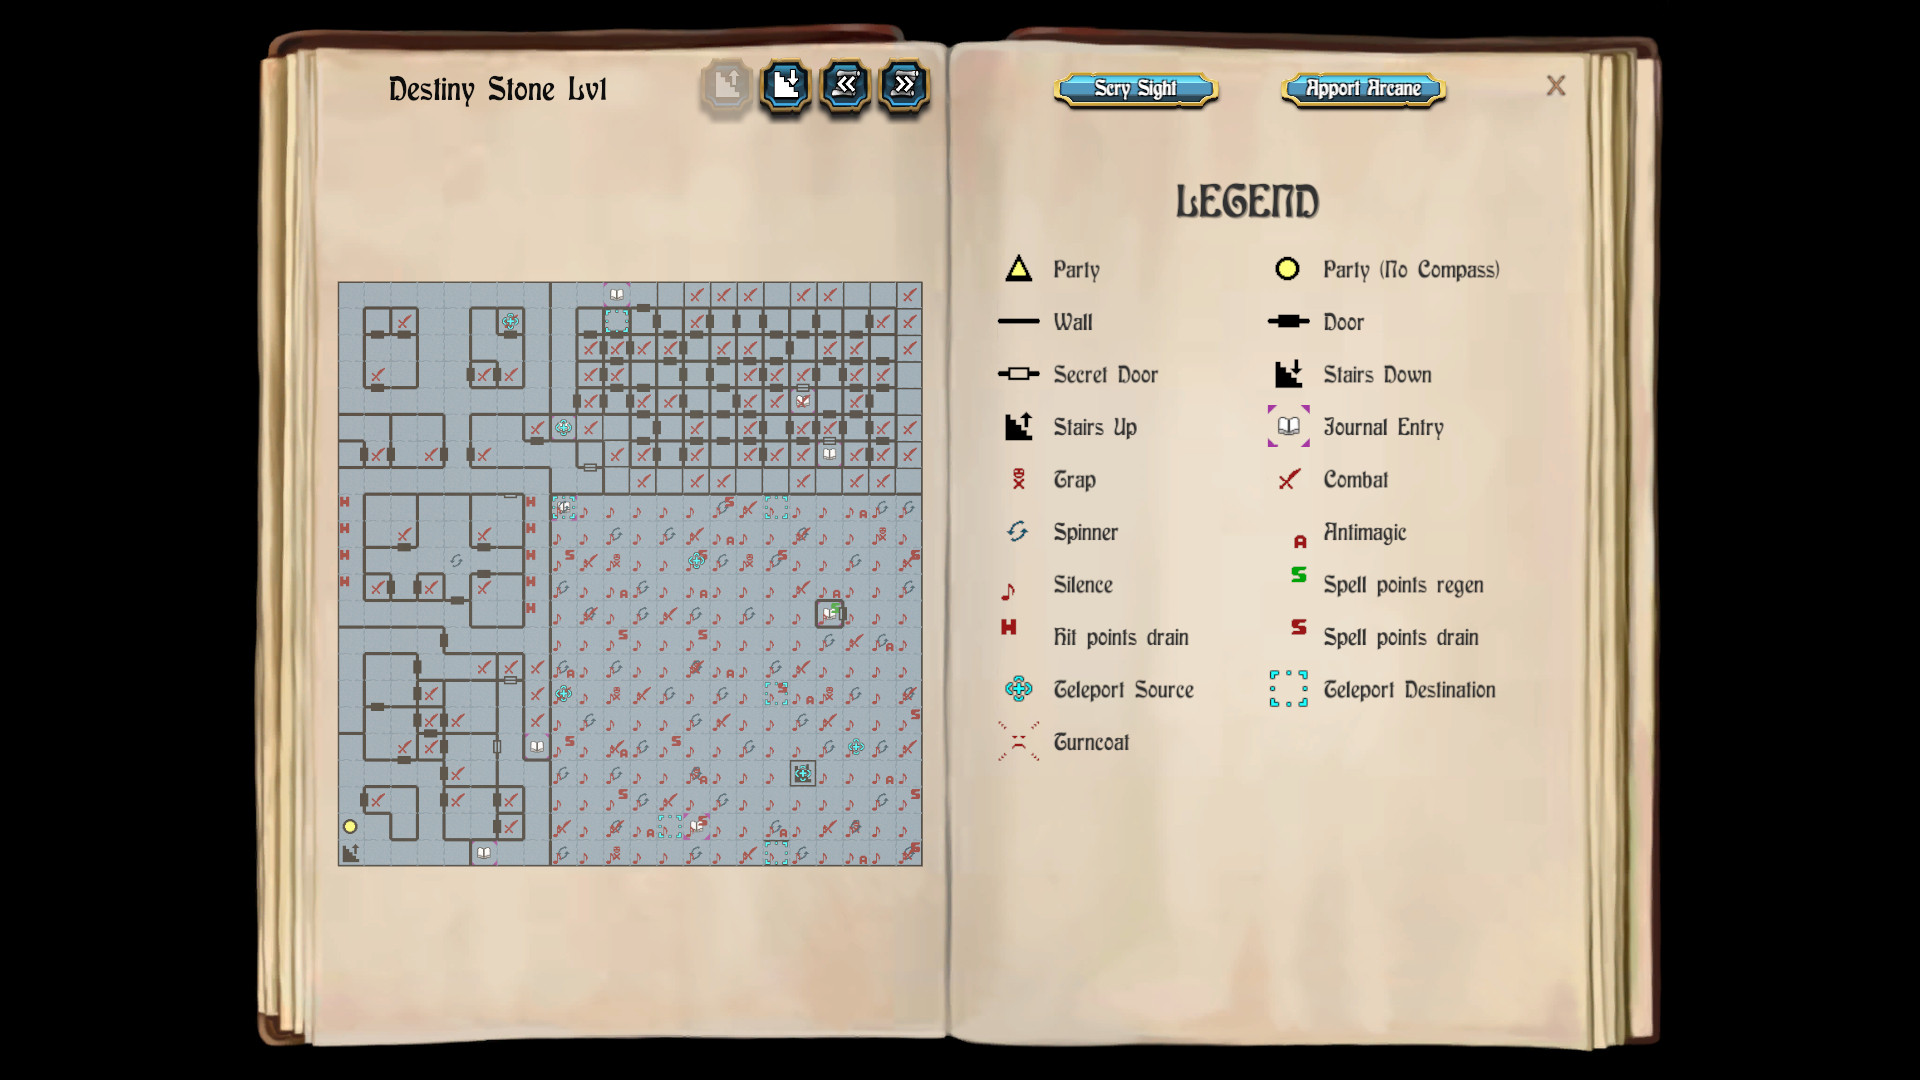
DESTINY STONE, LEVEL 1
To the Destiny Stone
I begin by asking the Sage about "destiny stone" and pay 230,000gp. He gives me rather cryptic hints, and also won't outright tell me where the rock is. However, there's only one city I haven't yet been to, Colosse.
First, I stop off at the Adventurer's Guild at 7N 9E. I need a party slot open for a summoned creature for the last Snare. This time I leave Ariel behind in the Guild. It's more a question of functionality at this point. Large portions of the Destiny Stone (more than one level of it) simply will not allow a Bard to use her songs, so Ariel becomes the logical choice.
I summon a Kringle Brother after leaving the Guild, and then buy a Kato's Bracer for it back from Garth's (at 2N 5E) to prevent it from turning on me.
The entrance to the Stone itself is at 13N 2E. A Mage stands at the entrance and will not open the way inside unless I give him two words. Remember clues involving Trachaem from the second level of the Tombs in Ephesus? They are:
Only A Master Mage Can Do The Impossible
I have a new approach to combat. Talia uses Wand Segment 6 EVERY round. I'm missing the Traveller's Tune, so it's inevitable that front-line party members will take a beating. But I compensate for it by being able to spam HEAL from the Wand Segment 6 without limit. And Talia's use of it will usually be the last action in the round, meaning she undoes almost everything the monsters do to my party members, including Hit Point damage, Death, Poison, Insanity and Possession.
There's two gaps in this strategy. If a monster can cause Draining or Stoning, neither of which HEAL can rectify, I may have to reload if they strike any of my party members. The Jack of Spades on this level can cause Draining, while Mike's Golems can cause Stoning. If I can kill them off before they close in, or if they're starting off at about 20' or so and Mordred can use Far Foes on them, great. If they start in melee range and start doing the nasty to my party members, I'll just reload and trigger the fight over again. If goes without saying that I quicksave after every fight in the Destiny Stone.
I begin by winning fights against random monsters at 2N 1E, 2N 4E, 2N 6E, 1N 6E, 3N 4E and 7N 6E.
Now I go to 0N 5E, where I get a message that reads: "Only a Master Mage can do the impossible."
After that I win fights against random monsters at 4N 3E, 5N 3E, 5N 4E, 4N 2E, 6N 3E and 7N 5E.
The Plan is Near Though Quite Uncouth
I win fights against random monsters at 10N 5E, 12N 5E, 12N 2E, 10N 1E and 10N 3E.
There's a small hallway to the east that runs a bit south. I go down it and win fights against random monsters at 7N 7E, 6N 7E and 5N 7E. A voice at 4N 7E tells me: "Hear the sphere, speak the truth, the plan is near though quite uncouth." The meaning of this clue will become apparent very soon.
I resume winning fights against random monsters at 15N 5E, 16N 7E, 15N 3E, 15N 1E, 18N 1E, 20N 2E, 18N 5E and 18N 6E. Note how in one of the fights I was faced with a few Mike's Golems at a range of 20'. I grab the opportunity to have Mordred push them back to 50' with a Far Foes spell. That allows Gallard to pick them off one by one.
There is another fight against random monsters at 20N 6E. That same square also has a teleporter that sends me to 20N 10E.
It's a One-Way Road to the Final Snare
I win fights against random monsters in a sequence of 19N 10E, 19N 11E, 19N 9E, 18N 10E, 18N 9E, 17N 11E, 15N 11E, 15N 13E, 16N 13E, 17N 12E and 17N 9E.
I afterwards make my way to 21N 10E, where a voice tells me: "It's a one-way road to the final Snare. Continue at your own risk."
The Bold One Cometh!
I now win fights against random monsters in a sequence of 19N 12E, 20N 13E, 18N 16E, 17N 16E, 18N 15E, 19N 15E, 19N 14E, 17N 15E, 16N 15E, 15N 15E, 15N 16E, 16N 17E, 15N 17E and 16N 18E.
There is a message at 15N 18E that reads: "The Bold One cometh!"
Seek the Narn Temple
I win fights against random monsters in a sequence of 16N 20E, 15N 20E, 15N 19E, 17N 19E, 18N 20E, 18N 19E, 19N 19E, 20N 20E, 18N 17E and 17N 17E.
I find a message after the last fight that reads: "Seek the Narn Temple. He who approaches the altar may restore that which was broken."
I win another fight against random monsters at 19N 18E. After that, I go N W S W N W W W S W N W and N to arrive at 21N 11E.
Tell Me What The Plan Is
I have come back to the start of a hallway that forms an outer edge around the room complex that I had just been in. Following it leads to walls forming behind you, preventing you from going back. I go along it and win fights against random monsters at 21N 13E, 21N 14E, 21N 15E, 21N 17E, 21N 18E, 21N 21E, 20N 21E, 19N 21E, 16N 21E, 15N 21E, 14N 20E, 14N 19E, 14N 17E, 14N 14E, 14N 13E, 14N 11E, 15N 10E and 16N 9E along the way.
At 16N 8E is a Mage who says: "Okay, scumbags, tell me what the plan is, or you're going nowhere." Based on the previous clue, the right answer is "near." If you had gotten it wrong, he would have teleported you deep into the complex of small rooms, but you'd have another chance to give him the right answer. Giving him the right answer results in him teleporting my party to 13N 8E.
Dreamspell
Now I'm in one of those large zones where Bard songs simply won't work. I begin by winning fights against random monsters at 11N 9E, 9N 9E, 9N 12E, 7N 13E, 6N 11E, 4N 10E, 2N 12E, 1N 10E, 1N 8E and 6N 8E. The last square is a teleporter, which takes me to 13N 16E.
I resume winning fights against random monsters at 13N 15E, 12N 13E, 12N 17E, 11N 21E and 10N 17E.
It is at 9N 18E that the Dreamspell can be learned. *NOTE* But remember, you actually need to go to the locations of the words first in their various locations:
Stairs to Level 2
Now I win fights against random monsters at 8N 19E, 7N 17E, 5N 14E, 5N 18E, 6N 21E, 4N 21E, 0N 21E, 1N 18E and 0N 15E.
The stairs to the next level are at 3N 17E. Note that the stairs are one way. Once you go up them, the Safety Spell or the Dreamspell, or completing the Snare on the third level, become your only ways out of the dungeon.