-

- Forums
- Chatrooms
- Gallery
- Gameplay Videos
- Upload
- Articles
- Mod Reviews
- Shop SP: Games, Movies, Books
|
|
Shaengarne Ford | Horde Fortress Exterior | Goblin Warrens | Horde Fortress Interior |
HORDE FORTRESS – INTERIOR
Inside the Fortress
The over riding theme of this area is to eliminate your enemies in a process of attrition. Get rid of anybody who is in immediate view, but keep a tight formation without rushing forward and without bringing more enemies into view. Another theme is Lady Elanna's effective use of her 1st-level spells against single targets. Chromatic Orb for particularly troublesome targets that are close to full health, and Magic Missiles for targets that are near death and need to be finished off.
For the first fight I simply keep tight by the door and let them come to me. Everybody switches over to their missile weapons and then go to work against the Orc Archer Elites on the wall. Lady Elanna starts off with a Skull Trap on the ramp way, knowing that it will catch some foes that come down that way. The party gets rid of one of the Orc Archer Elites just as the Verbeeg Giants close in. Lord Markus, Akutagawa, and Stygar then switch over to melee weapons. They always keep a tight formation to avoid bringing more foes into view, sometimes to the point of switching over to two-handed weapons in order to reach their targets and keep their movements to a minimum. Once a Goblin Shaman comes into view, Lady Elanna stuns him in place with a Chromatic Orb to prevent anymore spellcasting. She then follows up with Magic Missiles, while Alliria and Tithian aim their missile weapons at him to remove him from the battle as quickly as possible. Once the Shaman is gone everybody switches over to melee weapons to finish off the Verbeeg Giants and Orog Commander. Once they're cleared the last remaining Orc Archer Elite is shot down at a distance.
One of the key benefits of the attrition approach is the opportunity to rest up in between fights. There are a few enemies to the left in the courtyard, but first I take out a couple of Orc Archer Elites who are at the southeast corner of the walls. This way, the enemies in the courtyard will have less support.
I then have Akutagawa lead the Hobgoblins and Half-Goblins in the courtyard towards me. The warriors are able to take care of the Half-Goblins, while Elanna blasts away at the Hobgoblin Archers with a Skulltrap and a Fireball or two.
After this it becomes a routine, inching forward slowly, dealing with my enemies piecemeal, and resting when it's needed. This includes the Orc Archer Elites towards the southwest corner, the Orc force that's just up the west ramp way, and the monsters at the north walls.
Once everything is clear I open the door to the Fortress headquarters themselves.
The Old Orc
Now I go in through the front door. I immediately get attacked by a couple of Bugbears as well as the Old Orc. The latter is quite tough, because he has a LOT of hit points, and is no slouch when it comes to dishing it out himself. I got rid of the Bugbears first, because they're decent hitters as well, and I want to minimize the number of attacks and damage against myself. I then try to stun the Old Orc, whether it's with Akutagawa's Stunning Fist or Lady Elanna's Chromatic Orb. Sometimes I have to try more than once before I get him, like in this playthrough. Although I didn't need to do it this time around, Alicorn's Lance and Faerie Fire were other possibilities. Once the Old Orc is stunned I show a new tactical theme. My warriors activate their Power Attack ability. A stunned enemy will have lower armor class and I want to take down the Old Orc before he snaps out of his stunned state.
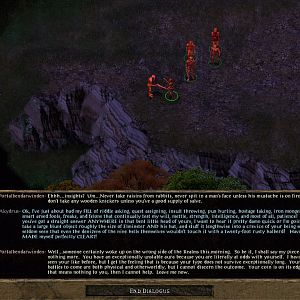
He leaves behind a key after dying. I then open the next door, and eavesdrop on a conversation between the leader of the Horde, Guthma, and a Half-Dragon named Sherincal.
High Chieftains
The narrow hallways provide opportunities for crowd-control. I have Akutagawa scout ahead towards the northwest corner. He then hits a Shaman he sees with his throwing dagger, and run back to regroup with the rest of the party. He swerves a little to the right to get the attention of the Orogs that are just to the right of the party. Just as he makes it back, Alliria and Elanna let out their double shot of Spike Growth + Web. A large force, including a Goblin High Chieftain and an Orc High Chieftain, makes towards me but most of them get caught in the crowd control. Elanna obliterates them with repeated castings of Fireball.
I then loot the rooms they came from, with most of the treasure consisting of scrolls and potions. The northwest corner did, however, also have Glacial Resilience (+1 Splintmail, +5 cold resistance, 15% chance of 1d6 cold damage against a monster that strikes the wielder).
Orc High Shaman
Now I begin to make my way through the north side of the building. A drawer in the first room I search has some Bullets of Disruption +1. Lady Elanna saves these for a particular part of the game that has a LOT of undead.
I have to fight a Goblin Shaman and an Orc Witch Doctor in the next room. Since it's just the two of them, it's a routine matter to gang up on them and kill them. Note how Lord Markus switches over to his greatsword so that he can reach his target in a small and tightly packed room. I then loot the chests for gems and potions and such.
I then open the south door and the Orc High Shaman comes through. He's easily surrounded and ganged up on. The chest in this room has spell scrolls for Ghost Armor and Non-Detection.
I then open the north door and then kill a Goblin Sorcerer. He leaves behind a scroll of Fire Shield: Blue, which Tithian will scribe as a useful spell. The chest in this room has spell scrolls for Haste, Slow, and Invisibility Sphere. Slow in particular will be a very useful spell for Tithian. It is party-friendly. It will impose penalties on movement speed, number of attacks, armor class, and attack bonus, for the creatures caught in its area of effect. The saving throw penalty from the spell itself will stack with Tithian's Greater Spell Focus: Transmutation feat when he gets it. It's a great spell for tipping physical combat decidedly in your favor.
Ogre Cooks
Now I tread carefully around Guthma's room in the middle, since I don't want to start that fight just yet. I then explore the rooms on the east side scoring various treasures. In the northeast room are 2 Ogre Cooks. Note how effective Akutagawa's use of Stunning Fist can be, stunning each of them in turn for their respective take downs.
Braston
Now I explore the series of rooms in the southeast corner, the prison cells. The one to the left has the Bugbear Jail Keeper, whom I easily kill.
The one down and to the right has Braston, who basically tells me the Goblinoid Hordes will fall apart if I can kill Guthma. Normally I cannot sleep inside this building, but I can if I ask Braston to watch over me.
Guthma
This battle is much tougher than in vanilla IWD2. First, make sure you clear out everybody in the perimeter of the base. Otherwise they'll join in when you fight Guthma.
Guthma will be helped out by a Goblin High Chieftain, an Orc High Chieftain, a Goblin Sorcerer, and an Orc Witch Doctor. Two more Orc High Shamans will also approach from the southwest.
I first put up my buff spells in preparation. Alliria casts Barkskin and Bull's Strength on Lord Markus instead of herself, since I am relying on the Paladin to go head to head with Guthma. Lady Elanna casts Stoneskin on herself, and on the 3 front warriors in order to help them with their fight.
When I'm ready I don't send the whole party into Guthma's room. I have a divide and conquer strategy in mind.
First, I have Alliria and Lady Elanna start off with their crowd-control spells, and it works perfectly. His helpers are caught in 'the zone', and Guthma is obliged to come out by himself. Elanna of course starts blasting away with Fireballs once this is set up.
Next, I send Akutagawa south in order to stay on top of the Orc Shamans.
Now my warriors must take out Guthma first and foremost because he can hit hard and often, and with lingering poison damage with each hit to boot. I reduce his armor class with abilities like Alicorn Lance and Faerie Fire. I then at least try to immobilize him with abilities like Chromatic Orb and Stunning Fist, but it is difficult since he has good saving throws.
While the warriors are going to work on Guthma, Alliria trains her Arrows of Fire and Tithian trains his Sparkling Bolts on the Orc Shamans that Akutagawa is contending with. The idea is to help Akutagawa get rid of them as quickly as possible, so that he can regroup and then join in on the attack against Guthma.
Once the Shamans are out of the way, Akutagawa heads straight for Guthma, while Alliria and Tithian open fire on him as well. He soon falls. The remaining foes inside the crowd-control zone are soon easily mopped up.
Guthma leaves behind:
Ennelia and Braston
Now I speak to Braston again and offer to escort him out of the Fortress. I get an xp reward for bringing him and Ennelia back together again. Ennelia will give the party a random bow and a random leather armor as a reward.
Now it's on to Chapter 2.