-

- Forums
- Chatrooms
- Gallery
- Gameplay Videos
- Upload
- Articles
- Mod Reviews
- Shop SP: Games, Movies, Books
|
|
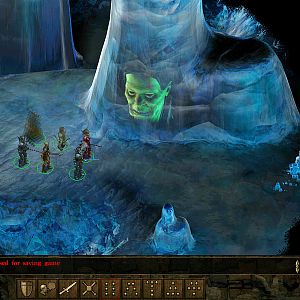
I still feel the dead cold of the dragons breath in my bones. As we neared the entrance to these caves, a host of wyrms appeared, followed by a dragon, its scales a flat, icy white. It was a powerful beast, and having surprised us as it did, we were not fully prepared for such a battle. But with the aid of Tempus, I brought down a pillar of roiling fire and burned it to the ground. Another, possibly its mate, awaited us within the cave, but we were prepared this time and it fell to our blades much more quickly.
With such beasts roaming this area, I am amazed that those barbarians manage to thrive the way they do. They even seemed to think that their ingenious gate of rocks could prevent us from passing! Hah! How could such tiny stones block the passage of a dwarf?
Alia Shield-Maiden, the Annals of Halgren
 In the underground caves, you will find yourself in a long cavern with many small doors on all sides. You may detect tracks made by heavy, bipedal shelled creatures as well as more prosaic dwarf-boot marks. There are also signs of "scoured" stone where plant matter has been lifted away or something acidic has eaten at the stone surface. As soon as you advance at all, you will be besieged from both sides by Hook Horrors. Once you've taken them out, you may want to use your rogue to scout out the area for other groups of the Hook Horrors. You won't see them all; for any given group that you attack frontally, an equal or greater number of Hook Horrors will spawn behind your party. It's advisable therefore to corner your weaker party members, equipped with range weapons, before starting an attack. They are very susceptible to spells such as Confusion and Chaos which helps to slow them down a little.
Move north up the corridor until you find the place where it curves around to the right. On your left-hand side, you will see a large boulder. Click on it to get into a new corridor to the left. It's quite short, and at the end of it you will find some beautiful torchlit gates that are, unfortunately, locked. Head back down the corridor until you find a small crawl-hole in the central part of the map. Go through it, and you will find yourself in a secondary cavern with seven ice trolls. Once you've taken care of them, head south-west to a large empty chamber in which you will find a small pile of loot. Watch out for traps.
To the south-east, you will find a cavern in which two ochre jellies and a shambler lurk near the corpse of a duergar. The shambler is highly resistant to magic, and can cast entangle on party members it strikes. The jellies, which resist piercing damage, multiply at an incredible rate everytime they are hit; unless your entire party is hasted, it will be extremely difficult or even impossible to take them out one at a time. The best way to get rid of them is to repeatedly bomb them with fireballs and potions of explosions until they are all gone. The Shambler has quite a nice throwing dagger, Lamia's Tongue. Search the duergar corpse to find a key. Head back to those locked gates, which you can now open.
 Enter the gates, to find a wide array of duergar and orcs in full battle-gear. The first character through the door will be greeted with some amazement by the duergar, particularly if he is a duergar himself. Be prepared to explain your intent, unless you want to fight the entire stronghold. When you tell them you are trying to get to the Eastern Pass, however, you'll find the welcome surprisingly warm. You will be warned to stay away from the dungeons during your visit, and instructed to speak with Barud Barzam about some mining equipment that you will need. You can confront the Slave-Master, condeming him and the duergar for keeping slaves, which he doesn't find too impressive; if you're not careful, you could even provoke them all into a fight! A paladin talking to the Slave-Master will almost certainly do so. It's not a serious problem if you find yourself in a fight at this stage. The main disadvantages are that you will miss out on two quests the duergar could have given you, and that you lose the one way to rest on this map.
Barud is only too happy to let you take mining equipment from his store-room, since you will be saving him the trouble of clearing the eastern exit. He asks you to make an additional deal with him. In exchange for agreeing to clear the surrounding caves of monsters, he will watch over your party while you rest and will reward you well when you are finished. You'd be well advised to accept this quest even if you don't intend to complete it, as there is no other way on this map to rest between battles. The store-room is down the corridor on your left, just north of a small temple that offers healing services but no store. You can't check out the items on the altar without provoking a fight with the entire outpost, but you aren't missing anything- it's a small amount of gold and a handful of minor gems. The mining equipment is in a case near the centre of the store-room.
In a back room in the right-hand side of the stronghold, you'll find an inventor named Dragu Ironbreaker working on a complex crossbow. However, he seems to have encountered some difficulty with it. A character with high intelligence (at least 15), upon demonstrating that she understands the loading mechanism, might be able to help him finish his designs in exchange for either a monetary reward or a copy of the completed Doom Bolter (1725 xp for helping Dragu). If you were able to help him, you will be able to trade with Dragu, although his inventory is very limited. If you end up fighting the duergar during this chapter, you will get the even more powerful Hell Bolter from his corpse.
Finally, if you ignore the prohibition against visiting the stronghold's dungeon (in the far east end of the complex), you will find a mad spectre near the rack. He speaks to you briefly, mistaking you for the comrades that abandoned him here to his doom, and will attack the nearest party member. Before you can resume your conversation with him, you must successfully use Turn Undead on him. Once he has been turned, he will become coherent again and you will be able to persuade him to leave (3000 xp).
When you've finished touring the duergar stronghold, talk to Barud again to rest and then head back out to the caves below.
 A group of five Hook Horrors and two Hook Horror Guardians block a large doorway at the far end of the eastern tunnel. As soon as they see you, more Hook Horrors will spawn behind you. If you are finding this fight difficult, line up your party inside the narrow passageway that leads to the duergar gates with your tanks facing out, and your magic-users and range-weapon fighters safely behind them. Then send a fast-moving party member with good stealth or invisibility to appear in the midst of the Hook Horrors to trigger the fight, and have him return as quickly as possible (preferably invisible to avoid distracting the Hook Horrors that now surround him) to the rest of the party. Now instead of coming up behind you, the monsters will come at you head-on, but at least your weaker party members are better protected. When you're finished with them, go back to the doorway the Hook Horrors were guarding and go through the doorway, where you'll find a cave-in has blocked the exit. If you have the mining equipment from the duergar stronghold, click on the cave-in to clear it. Now you can proceed through to the next map, although you probably want to clear out the rest of the monsters in the caves first to get the reward from Barud Barzam.
All of the remaining monsters are in the rooms between this area and the duergar stronghold. The rooms all contain Hook Horrors, with the exception of the second room from the right on the south side, which contains a large number of fire beetles. The toughest fight is in the far right-hand chamber, which at first glace appears empty but for some large stone-shelled eggs and a corpse. As soon as any of your party members gets within a few feet of the corpse, Hook Horrors, Hook Horror Guardians, and a Hook Horror Matriarch will suddenly appear on all sides of the room. They will shortly be joined by another small horde of Hook Horrors from outside the room. To thin the ranks of this second wave, you may want to trap the hallway with Skull Trap and Cloudkill. Again, your best tactic for fighting the Hook Horrors is to find a way to corner your weaker party members where the monsters can't spawn behind them. There is a small 'nook' on the south-west side of the room between two outcrops of the eggs. Another such place in this area of the map is the doorway to the cave-in. You will still need to send someone in to trigger the attack, and he will probably be surrounded and killed immediately if he doesn't have potions of invisibility or the ability to turn invisible (a duergar's special ability to turn invisible is quite handy here).
With all of the rooms emptied, go back to Barud tell him that you cleared the caves of monsters; in addition to the quest points, you will get gold, gems, a Shield of Fortitude, a Duergar-Forged Axe, and some other treasure (1725 xp for clearing the caves). Barud will also ask you to complete one last quest for him - he would like you to kill all of the monks at the monastery (2300 xp for killing the monks). This is the evil path for Chapter Four, so accept it if you have an evil or netural party and wish to take that route.
It is not too late to pick a fight with the duergar before you leave. You will have to fight them eventually - if not now, at the end of Chapter Four - and doing it now not only saves you a lot of trouble later but gives you some useful equipment. The best way to fight them without being overwhelmed is to head out the front gates as if you are leaving, and then send someone back to talk to the Slave-Master about the ethics of slavery. When this results in them attacking you, you will only have to fight the duergar in this front entrance at this point. The rest of the duergar don't show up until much later in the fight, when you have thinned the first wave considerably. You can also use the bridge to strategic advantage. The material rewards for fighting the duergar are described in more detail at the end of Chapter 4, but you will only get the Hell Bolter from Dragu Ironbreaker by fighting them at this point in the game. You will probably also get more experience points from killing them now than you would later when your party will be at a higher level.
 Go through the caved-in area and cross to the next map. As you make your way through the tunnels, Umber Hulks will come crashing through the walls to attack your party. Scouting out this area can be quite useful; this will keep your party from being surprised too often. Head towards the north-east corner of this map by any of the three available paths. As you get close to the area, your party will be transported into the lair of the Beastlord Harshom from Luskan. You may recognise the name if you managed to trick Phaen into identifying his master. You will have to fight the Beastlord, several rangers, mages, and his war-bears. Loot several decent items from them, including the key that opens the Black Raven Gates and exit the tunnels to start Chapter Four.