-

- Forums
- Chatrooms
- Gallery
- Gameplay Videos
- Upload
- Articles
- Mod Reviews
- Shop SP: Games, Movies, Books
|
|
As we move further into these darkened woods, we must place our full trust to Bastinados woodcraft - without it, we would surely be lost. To myself and the rest of our band, the twisted trees and shifting paths of this place are an unsolvable mystery, but to Bastinados they are like old friends. He seems to be truly at ease here, though he sometimes speaks quietly about a lingering evil; a taint upon these woods.
I cannot help thinking that the woman who lives at the edge of these woods knows more about the missing children than she would say. Aside from the beast-man she called her son, everything about her seems... wrong. The others seem to be of the same mind, but Halgren insists that we cannot act on her strangeness alone; I would say that his familys past is once again holding sway over his own judgement, but I will not question his leadership. Aside from being my beloved, he has led us out of danger time and time again, and our faith in him is without question.
Alia Shield-Maiden, the Annals of Halgren
 When first enter the Fell Wood, you will be greeted by the Hunter's Ghost, who warns you of the dangers of the wood. He will also tell you that you can always leave the woods if you get lost by heading to the west. The Fell Wood is a dark and eerie place, where even the roots of trees are a danger; the roots can reach up from the ground and strike at your party. Use your Search skill continuously as you pass through the Fell Woods, to eliminate the root-traps.
It is very easy to get lost in the Fell Wood, but Wilderness Lore will help immeasurably. Check each map you enter using Wilderness Lore, even if you are certain you have seen it before! Most of the maps in the Fell Wood look identical to one another, so move carefully from one to the next. Some maps will even tell you which direction to go in! If you do not have Wilderness Lore, mark each map carefully using the Area Note feature of the map screen as you pass through. This way you will know which exits you have already tried, as well as being able to quickly determine whether you have already been to this map. If you haven't spoke to them already, you can go back (by taking any exit to the west) and talk to Tahvo and Pairi in the village, and they will give you helpful hints to get you a little further in to the woods. Take care as you move from map to map in the Fell Wood; the Restless Dead the ghost warned you about will appear from time to time. Whether you use Wilderness Lore, Pairi's advice, or just painstaking map-marking, here is the path you need to follow:
From the map with the Hunter's Ghost, take the north-east exit. In the centre of the next map is a stump containing a beehive. If you raid the beehive (setting off the spell Insect Plague if you have not disabled the trap) you will find some minor treasure items. From this map, go north. You will think you have come to the same map, except for a subtle difference- no beehive! From this map, go east. Again, the map looks exactly the same except that there is no beehive, and if you use Wilderness Lore you will hear a woman singing to the east. Go east again and you will find a clearing with two Restless Undead, and the dryad Carynara. You will also get experience points for finding your way deeper into the Fell Wood (3150 xp).
 Carynara seems surprised to see you here, and warns you that these woods are dangerous - in case you haven't noticed just yet. If you have not already solved the problem of the missing children, ask Carynara about them. She will tell you she has seen a woman who lives to the west of the woods taking children into her tent. Although she doesn't know her name, it should be obvious to your party who the woman is. Now you can go back and confront Limha, triggering the same sequence of events as if a paladin had addressed her the first time. (Refer to the Missing Children section on the Wandering Village page).
If you have already resolved the Lihma quest and are now looking for the golden drinking horn, you may want to speak to Carynara about getting further into the woods. If you have a ranger in your party, have them ask Carynara about a path deeper into the woods. If you mention that there is evil in the woods and you need to get deeper into the woods to root it out, she will give you some instructions on how to do so. If you don't have a ranger, this dialogue option will not appear and you unfortunately have to resort again to trial-and-error, taking detailed notes on your map to avoid getting lost in the Fell Wood. Finally, Carynara can also provide healing services and watch over you while you rest.
 To find the horn, you will need to go even further into the Fell Wood. Head back to the Fell Wood map where you met Carynara, and go south-east to find a map with four exits. Wilderness Lore will detect undead footprints and strange marks that look like trees have been dragged over the snow. It will also indicate that the north-west and south-east exits go nowhere. You can guess that the south-west exit will take you right back out of the woods, so take the north-east exit. The next map looks exactly the same as the last one but now both northern paths go nowhere, so go south-east. The next one also looks the same, but this time the eastern paths go nowhere, so head north-west to yet another identical map. Listening carefully, a character with Wilderness Lore can hear the wind to the south-east, so go that way. The next map features four monoliths in a circle patter, against one of which a corpse is propped-up in a sitting position (3150 xp for finding your way deeper into the Fell Wood). Raid the corpse to find a gem, Sulo's Hook - a fairly useless weapon that you can sell for a tidy sum- and the golden drinking horn. Now go west to exit the Fell Woods and report the good news to Sordirskin.
 After speaking with Hunter's Ghost, head back to the map where you found Sordirsin's drinking horn - the map with the little stone circle. There are now four exits from this map. Take the south-east exit to find a pond. If your ranger got advice from Carynara, this is the pond she told you to use as a jumping-off point to get deeper into the woods. With Wilderness Lore you can detect that the northern paths are dead-ends so go south-east. The next map looks exactly the same, but now the north-west and south-east paths go nowhere, so take the north-east exit to find yet another pond. Head north-west from here to find a creek with three log bridges running east to west. There are ostensibly exits to the north-east, north-west, south-east and south-west, but your Wilderness Lore will tell you the eastern paths are dead ends so go north-west. The next map looks the same except that now the north-west and south-east maps go nowhere, so head north-east. The next map, too, looks just the same but now the northern paths go nowhere. Rest and heal if you need to before taking the south-east exit.
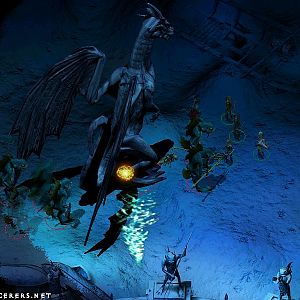
You now find yourself in a clearing which features some eerie-looking trees, a Will O'Wisp, a Death's Candle, and a Witch Light (3150 xp for finding your way to heart of the Fell Wood). They all deal substantial electrical damage and are immune to magic, though one of our readers reports that Dispel Magic apparently works on them to send them away and give you a bit of space to deal with them. In any event, they are very hard to hit, so have your healing potions ready. They will also periodically disappear and reappear elsewhere on the map. When you have killed them, loot the cache in the central tree and take the west exit to get back to the Hunter's Ghost.
There are now many ghosts clustered around the Hunter's Ghost, their souls freed by the death of the Ghost Lights. The Hunter's Ghost will give you their remains for burial, and will tell you that there is a shallow grave to the west over which a ghost, probably Kyosti, hovers. Now head back, passed Lihma's tent; you'll find the grave north-west of Lihma's tent.
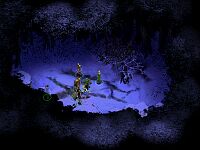
Head back to the area recently vacated by the Hunter's Ghost. A Dark Treant will be waiting for you. As soon as it sees you it will try to slink off to the south-east exit of the map. If you can, kill it before it leaves to reduce the scope of the fight on the next map. Then take the south-east exit to find the rest of the Treants waiting for you: three Dark Treants, one Elder Dark Treant and one Greater Dark Treant. They're fairly tough, but are very vulnerable to fire damage. As soon as you have destroyed the last of them, the Fell Wood opens up to the north (2100 xp for slaying the Dark Treants and ending their warping influence). You can now exit the wood directly from this map.