-

- Forums
- Chatrooms
- Gallery
- Gameplay Videos
- Upload
- Articles
- Mod Reviews
- Shop SP: Games, Movies, Books
|
|
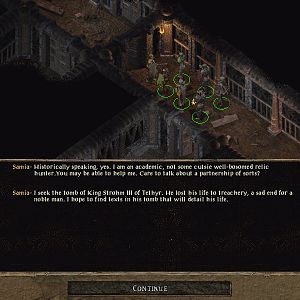
After our abrupt and heavy grounding, we find ourselves once again in the heart of events in the Dale. No sooner do we remove the nest of vermin from the area where we settled, than we discover that the nearest merchant is the leader of a cult of lycanthropes! And, of course, the closest town is a den of Aurilites, who also happen to have struck a bargain with the wyrmling woman, Sherincal. Of good tidings, we are decidedly short.
We discovered the broken shell of Captain Yurst, out of Neverwinter. The poor devils body was so broken and devastated there was naught I could do but to ease his passage into the realms of the dead. The information he passed on to us, however, may soon turn the tides in our favour. Leaving Oswald to the mending of his ship, we have set out for the great ice wall, and the mysterious temple carved in the ice.
Alia Shield-Maiden, the Annals of Halgren
 Upon entering this area, you will be jumped by a couple of Barbarian warriors and a few Aurilite Postulants (this follows a brief and entertaining exchange between the barbarians). You'll also meet the Master of Locks - a prisoner who was being held here until his recent escape. He doesn't have much to say, except that someone named 'Nathaniel' has been anticipating your arrival. The Master of Locks tells you that Nathaniel is on the first floor of the Ice Temple, and then he flees, leaving you to face the Barbarians and Aurilites.
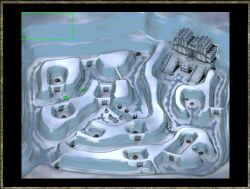
This map is a virtual labyrinth of ice, with tunnels and doorways everywhere you look. Characters with the Wilderness Lore skill will note an ongoing excavation of this section of the glacier, along with Remorhaz tracks and burrow-holes. There has been heavy traffic along the southern passage to the north-east, and several battles took place near the centre.
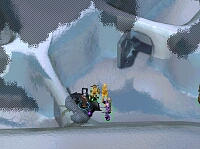
The doors are all marked with Auril's symbol. They are also all locked and will require a specific key to open them. You'll also notice a number of Doom Guards hanging around. For now, they will completely ignore you, so don't pay them much attention. However, there are other enemies lurking through the corridors that won't ignore you. Down each of the tunnels facing you (one to the north and one to the north-east) is a Remorhaz - a nasty type of ice worm. These guys wander about the tunnels, so you should be on your guard while exploring. Finally, you'll also come across various offerings in the snow which look like little pots surrounded by a pile of stones. Inside them you'll find various items such as a potion or two and some treasure. However, they are trapped, and you can't disarm them. If you want the goodies, you'll have to 'pay' for them by taking some damage.
 For now, take the tunnel to your left (the north tunnel). Very shortly you will come to another branch, this one leading slightly east. Follow this second branch, ignoring the doors for now since you can't open them. It will eventually come to a dead end, in which you'll find another Aurilite Postulant. If you haven't already encountered the Remorhaz in this side of the maze, then keep your eyes open - it will find you soon enough. Go back to the north tunnel, and keep going up. You'll find two notes and the remains of a body on the ground. The first note is of the simple 'please rescue me' variety, and is signed by someone named Zack. The second note, signed by 'Oria', is more detailed. It talks about a 'queen' who has been acting strangely, and commands that the 'males' be kept away from her. It also describes some Crystal Golems, and says that the Aurilites must stop throwing stones at them because they are not only expensive, but very fragile.
Follow the tunnel up and around, now heading east. Keep going until it turns south. Here you need to be careful. Just beyond you is one of the Crystal Golems mentioned in Oria's note. However, they aren't quite as delicate as the message would lead you to believe. In fact, they're completely indestructible except for one Achille's heel: bludgeoning damage. Hence the reference to stones in Oria's note. To deal with the Crystal Golem, you'll need to load one or two of your tougher warriors with bludgeoning melee weapons (maces, morningstars, flails, or even just plain fists), and back them up with slings and bullets. When you've finally dealt with the Golem (and taken care of whatever healing you need), cautiously continue south. The tunnel ends in a platform, on which you'll find two Frost Touches. You will also notice at least one other Frost Touch or Aurilite below the platform, and possibly the second Remorhaz. Because you're on the platform, only distance weapons work here. The Remorhaz is likely to leave the area and will come at you through the tunnel behind you.
There are three levers on the platform. Pulling them releases a load of stones to the floor below (if you were lucky, you might have been able to use this during your battle). You will also notice three ice blocks on the floor below that contain frozen Neverwinter Soldiers. Releasing the stones breaks one of the ice blocks, allowing something to fall to the ground. When you're ready, follow the tunnel back and around to where you came in. At some point as you move along the tunnel you will encounter the second Remorhaz, so be careful.
 When you reach the point where you entered the map, take the north-east tunnel. This leads to the area beneath the platform, where you'll find the frozen Neverwinter soldiers. You might also find another Aurilite or two that you need to deal with. At the foot of the central ice block is a necklace - this necklace is very important. It is a symbol of Auril made out of ice and snow, like a snowflake. This is the 'key' to all of the doors you couldn't open earlier. It will also attract the attention of the Doom Guards.
Any Doom Guard that sees you now will go hostile immediately. For the most part, they aren't all that tough, although they have pretty good magic resistance. You will encounter one named Vrassillus, who is a little more tricky than the others, mainly because he inflicts fire damage when he hits you. Vrassillus is also immune to bludgeoning damage, and has some resistance to most other forms of damage. Don't forget to loot his remains when you're finished with him. You will also find a pretty good mace (Flaming Star +1).
Now that you have the means to open all the doors in this part of the map, head back to the ones you by-passed earlier in the tunnel on the west side of the map. Find the door on the north side of the east branch of this tunnel and open it. Inside you'll find a rather bizarre group of creatures: a tame large spider and a collection of deer. Try to speak to the spider to obtain a little more information about it (no, it doesn't talk, but you'll learn about its tack and harness). If you want, you can open all of the doors and raid the offerings to Auril. Use a monk or cleric and give them some cold resistant equipment. Their high saving throws will keep them from being stunned, and the cold resistance should help stave off some of the damage.
Return again to the place where you entered the map. On the east wall are two doors: one north, and one just south of it. If you take the one to the south (where the Master of Locks came from), you'll encounter another Aurilite or two. There're also two more doors you can open here. The one to the north opens into a small room with more offerings. If you try to open the one at the eastern end of this tunnel, you'll receive a message saying that it is blocked from the other side.
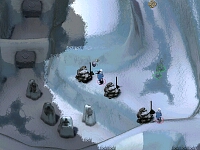
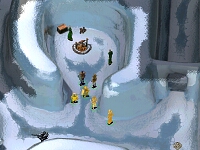
 Open the second door to find yet another tunnel. Be very cautious moving along this tunnel. You'll first come across a single Aurilite Postulant, which shouldn't pose much of a problem. At the end of the tunnel, however, is a nasty surprise. Remember the 'queen' mentioned in that note you found? Well, here she is: the Queen Remorhaz. Just as the letter indicated, she's in a foul mood! Accompanying her are two Frost Touches. The Queen Remorhaz is your main problem here: she is immune or at least resistant to many forms of damage, including fire damage. And she will periodically shoot glowing magical balls at you that can cause a fair amount of damage. She is, however, very susceptible to spells such as Chromatic Orb which will stun her almost every time. Whatever your tactic, be sure to keep a fair distance from her. When she dies, she will explode in a large ball of flame, destroying the blockade of ice behind her (3150 xp for destroying the blockade of ice and snow).
Of course, just when you think it's over, another bad guy has to show up and join the fray. When the blockage of ice and snow is destroyed, Lord Rengar immediately appears. Whatever Rengar's story is, he's not happy to see you and proceeds to demonstrate that. (Depending on how your battle with the queen went, you might want to back away for a moment to heal up; Rengar doesn't follow you). Rengar isn't too much of a problem, as long as you focus on melee and range weapons - he has very good spell resistance. When you're finished with him, don't forget to check his body for loot; you should find a Longsword +2 that also does 1 point of cold damage.
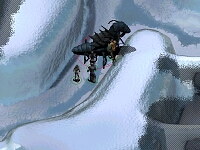
With the way now clear, walk through the rubble and turn right. Follow this tunnel east then south. You'll come across another offering in the snow, and a group of six Ice Trolls. They shouldn't prove too difficult, as long as they don't get a chance to surround one of your party members. With the trolls out of the way, continue on to the end of the tunnel. Now, if you look at your map you'll notice that you are coming to the door that was blocked from this side. Well, you're about to find out what was blocking the door: a sleeping Remorhaz. At first it seems this Remorhaz is talking to you, but the voice you hear calling out for "B-W" is coming from inside the Remorhaz. The worm will wake up when you start to attack it. When you kill it, you'll see a little gnome standing there; he's still a little shaky on his feet so give him a few moments to compose himself. You'll receive 3150 xp for rescuing him.
 This is Zack Boosenburry, the same Zack that left the note you found earlier (go ahead, ask him how he got the note out). He was investigating this place when he was swallowed whole by the Remorhaz. Zack is a pretty useful fellow to know. At first, he asks concernedly about someone or something named 'Aocha'; this isn't a sneeze, but, as it turns out, the name of his pet spider. If you found the spider in the room to the west, go ahead and tell him (4725 xp for finding Aocha). If not, he'll give you a quest to find her for him. In addition to the experience points, he'll also present you with the Gauntlets of Weapon Skill and the Chameleon Ring of Dexterity. Keep talking to him and Zack will also ask you to share whatever knowledge you have or will gain about the Ice Temple.
In addition to giving you some good experience, Zack sells a decent selection of spell scrolls, along with a few decent items, potions and ammunition. If you haven't found any Belladonna yet, you can ask Zack for some. Zack is also handy for identifying items and clearing your inventory of unwanted items. Finally, Zack offers a limited selection of temple services. (Note: If you killed Beodaewn already, there are no temple services in this chapter for Raise Dead and Resurrection, so be sure to use any such scrolls you have wisely).
There are a couple of things you may have noticed on your way to free Zack. At the north end of the tunnel where you found Zack is a locked door that you can't open; it can only be opened by a mechanism. Don't bother looking for the 'mechanism' - you won't be able to find it at this point.
 The other thing you will notice is the open room across from where you killed the queen. In here you'll meet two rather unpleasant individuals; both are Cult of the Dragon necromancers. At the moment they don't really care much what you do (you can even pick the lock on the chest in their room and loot it right under their noses). If you talk to them, they'll ask you if you are seeking to serve in the realms of the dead. Saying "yes" leads them both to attack you. A paladin in your party can also force a confrontation with the necromancers by threatening them. Either way, it's a good idea to make them angry now - doing so will prevent them joining in on another difficult fight in a short while. If you do wish to take them on now, then be prepared: the necromancers aren't exactly pushovers, and they will have some big help soon enough. They have a rather impressive arsenal of spells at their disposal, including Horror and Vampiric Touch. Given the chance, they can also summon in some nasty creatures, including an Elite Bone Golem. But if you can get to them quickly they won't prove too difficult. The most difficult part is that a Crystal Golem will soon join the battle. The golem comes from that locked door you couldn't open, just down the hall. Again, if you don't attack the necromancers now, you'll still have to deal with the Crystal Golem - just not at a time or place of your choosing.
If the Crystal Golem has left its lair, the locked door in the north-east tunnel will be open. This leads to the side of the Ice Temple, where you will find a very small entrance. A small member of your party might be able to squeeze inside and force the door open, allowing the rest of the party through. It leads to the Abishai Den on the first level of the Ice Temple - just be sure to fully heal everyone before you enter!
Now, leaving the Cult of the Dragon Necromancers behind, you'll be following the left extension of this tunnel, west and then north. But don't rush on ahead just yet. When you near the end of this tunnel you'll be in for one tough fight, so prepare yourself. Aside from the usual battle spells, you'll want to include a Remove Fear spell as well.
 When you reach the end of this tunnel you will be confronted by none other than Sherincal, the dragon-woman. You can have quite a lengthy conversation with her and learn a good deal about what's going on, including what the Legion of the Chimera is, and what its goals are. Try to find out as much as you can from her before ending the conversation - you'll notice a lot of entries being made in your journal. You'll notice that Sherincal refers to the Legion as an army of "outcasts". You may even have some in your party: half-orc, drow, aasimar, tiefling, svirfneblin, or duergar. If a character of one of these races speak with Sherincal, she will mention that they should be part of the Legion, but it's too late for that now. A half-orc, tiefling or aasimar can delve a little deeper, asking about her human heritage. At the end of the conversation, Sherincal will attack you (although she might initiate dialogue and offer a chance for "honorable surrender", even though you can't say yes).
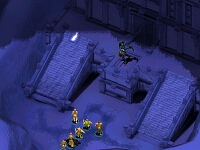
This is a tough fight. It's best if you don't rush into the open area ahead of you, but let them come to you instead. Alongside Sherincal are a Barbarian shaman, an Aurilite postulant, a Soarsman, and two Frost Touches (these last two are a little further back). Sherincal, the Soarsman and the Aurilite will come face off with you in melee, while the others stay further back and cast spells and use missile weapons (you may not even see them just yet). Sherincal is at least partially resistant to most forms of damage, and can do quite a lot of damage in a short period of time. She also emanates an aura of fear that can cause your party members to panic - that's what the Remove Fear spell is for. However, she is quite susceptible to Melf's Acid Arrow, as well as to Magic Missile; a good dose of each will go a long way.
If you didn't deal with the Cult of the Dragon Necromancers already, here's your chance. When the battle has progressed a fair bit she will call them into battle, and they'll appear behind you. A short while later, she'll also call on the Crystal Golem to come to her aid. When these three are added into the mix, this fight will start to get really messy. If you can, try to lead some of them away and back down the tunnel. Sherincal will eventually move back to and on top of the stairs that lead to the Ice Temple, so you might be able to leave her for the moment. After you've dealt with the other, more immediate threats, make your way back to Sherincal and the temple.
Sherincal will be waiting for you atop the stairs, alongside the two Frost Touches. If you try to go up the stairs, you'll quickly 'fall' back down; the Frost Touches have activated two switches that turn the stairs into icy ramps. Eventually you'll want to take care of this, but your priority should be to take care of the Frost Touches and Sherincal with missile weapons and heavy offensive magic. Bullets of Corrosive Acid and Sparking Bolts are useful to inflict some additional damage. When these three have finally been dealt with, take a deep breath, and return the stairs by shooting one of the levers on the platform. Clearing up the loot should make you feel better about the battle; among Sherincal's things you should find a Chromatic Orb Wand, an Everlast Arrow, and the greatsword Winged Blight.
Spend some time clearing up and healing your party. Don't forget that you can go back to Zack for some healing, and he'll also watch over you while you rest. When you're ready, head inside the Ice Temple.