-

- Forums
- Chatrooms
- Gallery
- Gameplay Videos
- Upload
- Articles
- Mod Reviews
- Shop SP: Games, Movies, Books
|
|
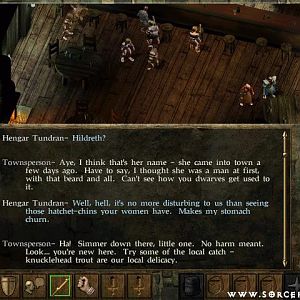
Never trust the drow
Not only did we remove the drider threat for Malavon, but we also returned his sister, Ginafae, to his side. They appeared gracious enough, presenting us with the gifts of their house, but his assistance in seeing us back to the surface world seems lacking. Could he not have said from the beginning that the passage lay through the mind flayers citadel? Instead, when all was said and done, he had only this advice to give: "Harass the mind flayers". Indeed!
Alia Shield-Maiden, the Annals of Halgren
 When you enter the citadel, you will immediately be confronted by another Mind Flayer and its thralls. As with your previous encounter outside, take out the Mind Flayer first to prevent it from dominating your party members, then deal with the thralls. When the battle is over, take a few moments to check out your surroundings.
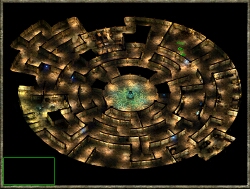
The inside of the citadel is a large, circular maze, with numerous wrong turns and dead ends. The two main features you have to worry about are the Lightning Generators and the Mind Golems. The Mind Golems walk set patrols through the maze and you can quickly figure out what the pattern for each golem is. They wont attack your party, but when they see you the golem emits a gaseous cloud in its wake; the cloud causes characters to be overcome by a mind fog which can temporarily reduce a characters wisdom score. The reduction is quite drastic and will last for quite a while. Although this doesnt seem like a big problem, it will make characters very susceptible to a Mind Flayers ability to dominate them.
The other thing you need to worry about are the Lightning Generators. These nasty things are essentially very dangerous traps; when you are spotted, they repeatedly fire bolts of lightning at you. You can destroy them, although they are completely resistant to all forms of magical damage, and have very high damage resistance. However, a rogue can disarm them just like a trap! Behind each Lightning Generator is a round hole, like an outlet in the wall. A rogue can sneak up to it, unlock the outlet, and then disarm it to shut off the Lightning Generator. Your rogue will become visible as he or she reaches to disarm it, allowing the Lightning Generator to strike them, but a rogues ability to evade such attacks should make them relatively impervious to any damage. You can also find a diamond inside each of the holes.
 The passage to the left is a dead end, so you have to go to the right. It is possible to get through the citadel without another fight, but for most partys minimising the number of battles is the most feasible tactic. Send one or two of your most stealthy characters along the right passage, keeping your eye out for Mind Golems and Lightning Generators. First chance you get, head west through the maze of tunnels. Keeping as much as possible to the outside of the circle, you will eventually come to the citadels smithy, inside which you will find a few thralls. Dont worry, these dont attack you. Just be careful of the golem that wanders through here periodically.
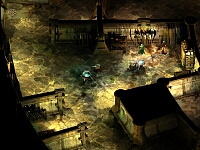
This is the only place in the citadel that boasts any useful treasure at all. The cabinets can all be raided, although only one of the offers anything worth while - thats the one behind the thrall. Inside you will find a Greataxe +1, the Studded Leather of Luck, the Stunning Frost Hammer, a Wand of Alicorn Lance, and various bits of magical ammunition. You will notice two anvils in the room, one of which you can use to create a masterwork battle axe. Raid the room, and head back to your party. You can continue around the circle until you find the sleeping quarters of the thralls, but there isnt much to find. If you look carefully amongst the beds (the Alt key helps a lot) you will find a small stash of treasure.
Return to where the rest of your party awaits. This time, head east around the circle. Again, keep a look out for Mind Golems and Lightning Generators. First youll come to the kitchens, where you will find a few Svirfneblin cooks. Check the tables for iron rations before you move on. Continuing west you will come to the quarters of four Mind Flayers - when they see you a somewhat amusing conversation takes place between them and the Elder Brain. These Mind Flayers arent accompanied by any thralls so they really dont put up much of a fight. You can raid the eastern most bed chamber for a few goodies if you like.
When youre ready, continue following the outer circle around on the eastern side until you come to what looks like an exit. Here you will be confronted by another Mind Flayer and several of its thralls, including a formorian giant. The Mind Flayer will speak briefly to you. For the most part, its the usual Mind Flayer blather about human cattle. However, if the character speaking with it has good Intimidate skills you can scare it away (225 xp). The thralls stick around, but they wont harm you. When you try to use the doors, you find out that they are sealed and you cant open them.
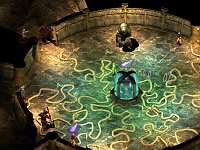 If you havent guessed already, the Elder Brain is responsible for keeping the doors sealed shut; in order to get out, you will have to deal with the brain. The Elder Brain can be found in the very centre of the Citadel, along with a ton of guards. As you make your way to the centre, you may notice a higher concentration of thralls. At this point, you should decide whether you want to try to make a deal with the Elder Brain, or fight your way out.
Fighting your way out is pretty straight forward. When you reach the central chamber, the Elder Brain will speak with you briefly. When the conversation is done, the fight begins. In addition to the thralls that surround the brain, any thralls in the outlying areas will make their way towards the centre to defend the brain. Focus your efforts on the brain first - it can dominate most of your party very quickly if youre not careful. And dont forget the Mind Golems wandering around the fringes of the chamber if you need to keep people on the perimeter.
You can also try to make a deal with the Elder Brain. For this you will need a character with good Intimidate skills. Again, make your way to the central chamber. The best way to do this, in order to avoid any unnecessary fights, is to have a character with both good Intimidate and good stealth skills sneak into the chamber, then speak with the brain. Otherwise, make your way to the centre. As soon as you enter the chamber, the Elder Brain will begin speaking to the first character it sees! (Note: You do not receive any experience points for Intimidating the Elder Brain - only for killing it). Its also important to note that although the Elder Brain and the thralls around you remain non-hostile, other thralls will not.
When you have either killed the brain, or Intimidated it into letting you leave, the door to the Citadel is unlocked. If you have not already managed to get the Mind Flayer at the exit to leave, it will do so now.
 Before you leave the citadel, you might want to spend some time resting and healing if you need to. The moment you leave, you find yourself outside in the open air once again. You are also surrounded by a large group of Earth Elementals and Harpies, as well as two mages: Mirabel and Majrash. These two Red Wizards do quite a bit of threatening before they attack you. The battle can be pretty tough if youre not prepared for it. The wail of the harpies can cause panic amongst your troops, while the earth elementals do a fair amount of damage when they hit. Both Mirabel and Majrash will also throw in some spells, although for the most part they cast defensive spells.
When the battle is over, you will find a sizable collection of treasure on both Mirabel and Majrash, including: Bracers of Defense +3, Bracers of Defense +4, Adventurers Robe, Cloak of Mystra, Ice Pick +1, Staff of the Defender +1, Mirabels Pendant, and a Ring of Acid Resistance.
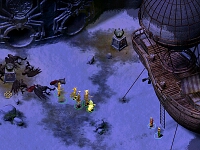
Moving away from the Citadel, you can see the Oswald has landed here with his airship. It would seem that he was expecting you to come back to the surface around here. Speak with Oswald to learn whats been happening back in the Ten-Towns and, more importantly, Kuldahar. It seems youll be making a stop there first, before assaulting the Severed Hand. You can look through Oswalds inventory, as well as rest in preparation for the next stage of your journey. When you tell Oswald that youre ready to go, youll begin Chapter 5.