Baldur's Gate 2 Online Walkthrough by Montresor


CREATING A CHARACTER  |  GENERAL TIPS AND TRICKS  |  NPCs  |  ITEM LISTS  |   SHOPS   
Throne of Bhaal: Chapter 8  |  Chapter 9  |  Chapter 10
Shadows of Amn  |  Watcher's Keep  
About the Walkthrough  |  Organization of the Walkthrough  |  About the Maps  |  About the Author  |  Where to Begin
Disable all ads!

Overview of Chapter 9  |  Quests in Chapter 9 
Areas in Chapter 9
The Hellish Pocket Plane  |  Amkethran  |  Abazigal's Lair  |  Sendai's Enclave  

Sendai's Enclave
The Outside Area  |  The Entrance  |  The Barracks  |  The North Tunnels  |  The South Tunnels  |  The Crossroads  |  Odamaron's Lair  |  Diaytha's Room  |  The Arena  |  The Mind Flayer Area  |  Sendai's Room  

DIAYTHA'S ROOM

This room is guarded by Sendai's high priestess Diaytha and several of her friends. When you first enter, Diaytha issues a challenge: Kill Ogremoch in the room to your right, and she herself will meet you in the room to the left.
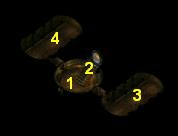
  1. Here is where you arrive from the Crossroads area.

  2. This door leads to the Arena. You need to kill Diaytha first before you can enter here.

  3. Here is Ogremoch, Prince of Earth, and two Greater Earth Elementals. Ogremoch can cast Earthquake and do a lot of damage with his fists.

  4. Here are Diaytha and her allies: a Vampire, a Hive Mother, a Demon Knight, and an Abishai. Diaytha will try to cast Creeping Doom, so try to get rid of her as soon as possible.

    Diaytha drops Drow Full Plate +5 and the large shield Darksteel Shield +4. The Demon Knight drops a Two-handed Sword +1.


Amazon.com
Amazon.ca
Amazon.co.uk
Sorcerer's Place is a project run entirely by fans and for fans. Maintaining Sorcerer's Place and a stable environment for all our hosted sites requires a substantial amount of our time and funds on a regular basis, so please consider supporting us to keep the site up & running smoothly. Thank you!

Disable all ads!