-

- Forums
- Chatrooms
- Gallery
- Gameplay Videos
- Upload
- Articles
- Mod Reviews
- Shop SP: Games, Movies, Books
|
|
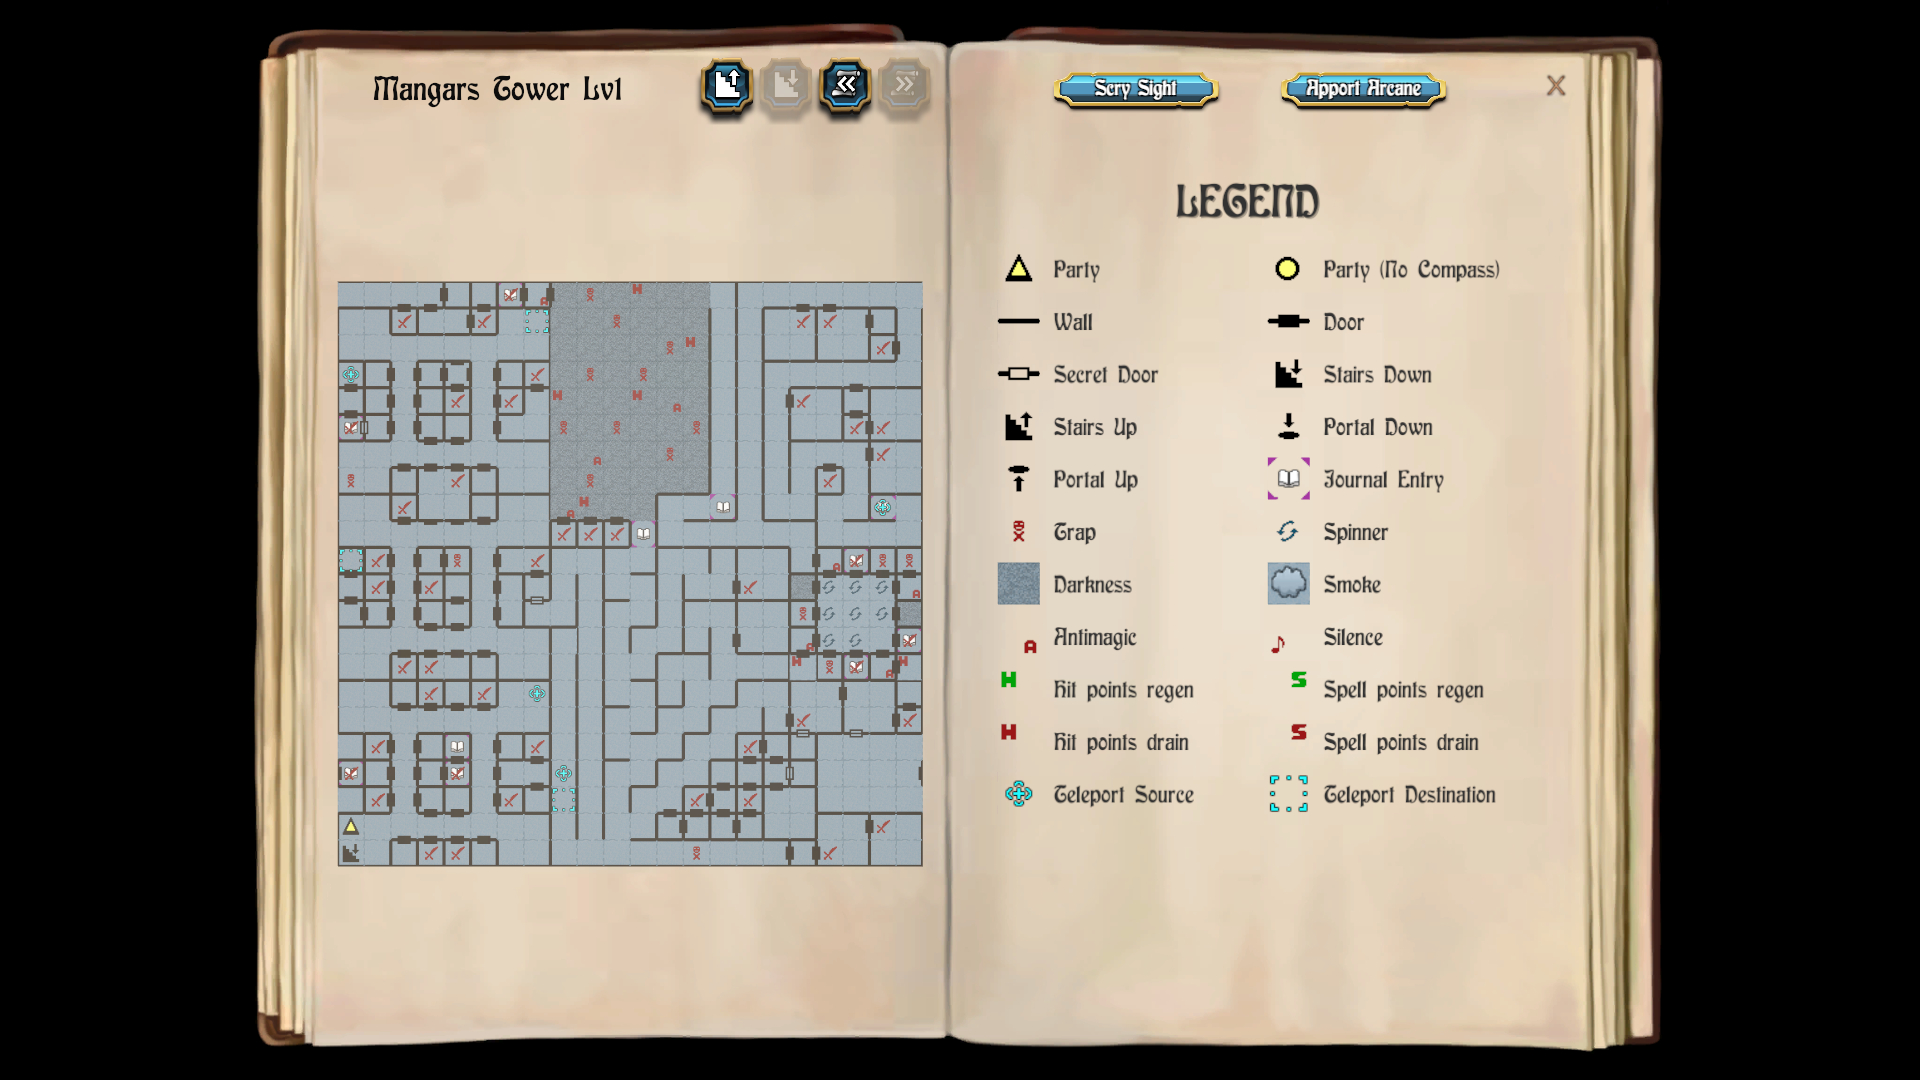
MANGAR'S TOWER, LEVEL 1
New monsters join the menagerie. Samurai Lords, Ogre Lords, Dwarf Kings, Fire Giants, Seekers and Berserkers show up as monsters capable of doing more physical damage. White Dragons are a little more powerful than the Copper and Green Dragons seen previously.
There will also be new monsters that can inflict nasty afflictions on contact. Phantoms can drain levels, Body Snatchers can cause Possession, Lesser Demons can cause Aging, while Shadows can cause Insanity. Kill them off very quickly (with spells if need be) or push them back with Far Foes in order to avoid as much as possible getting struck by them. However, a good enough AC assisted by an ongoing Traveller's Tune from the Bard can pretty much negate the dangers as well.
I fully explore the level, showing how to manually get to the next level without using Apport Arcane or Phase Door. I happen to get a few of the items I was on the lookout for, which included:
68 Mercenaries
First I win the fights against random monsters at 0N 3E, 0N 4E, 2N 1E and 4N 1E.
At 3N 4E is a fight against 68 Mercenaries. Talia blows them away with a Shock Sphere spell. At 4N 4E is a rather cryptic message, the meaning of which I have no idea.
Sword of Pak
I win the fight against random monsters at 6N 3E, and get a Sword of Pak as a random drop. I have Zarathos equips it. It provides the same +2 bonus to hit, but with better maximum damage. It also has limited charges of the Lesser Summoning spell, but I never use that.
I continue with fights against random monsters at 6N 5E, 2N 6E and 4N 7E.
I go to the teleporter at 6N 7E, which brings me to 20N 7E.
Pure Shield and 1st Adamant Bracers
I do the fights against random monsters at 17N 6E and 18N 7E.
The fight against random monsters at 14N 4E yields two items that I want. One is a Paladin-only Pure Shield, which Lord Stygar equips for the rest of the game, and it provides a 1 point improvement to AC. The other is a pair of Adamant Bracers, which Cassandra equips for a 2 point improvement to AC.
56 Dwarves
I finish one fight against random monsters at 17N 4E. At 16N 0E is a fight against 56 Dwarves. Talia blows them away with a Shock Sphere spell. Going two squares north leads to a teleporter that takes me to 11N 0E.
Now I do the fights against random monsters at 7N 2E, 7N 3E, 10N 3E, 10N 1E, 11N 1E, 13N 2E and 11N 7E. I go south a couple squares and find myself at the start of a long hallway.
2nd Adamant Bracers
I cast Locate Traps and then follow the long hallway to its end, to reach the south-central edge of the level. I continue east, using Trap Zap on the trap at 0N 13E, and then winning a fight against random monsters at 0N18E.
I get a second pair of Adamant Bracers after winning the fight against random monsters at 1N 20E. I have Talia equip them for a 2 point improvement to AC. I then make my way back to 0N 10E, where an extended network of maze-like corridors is to the north.
96 Samurai
First I win the fights against random monsters at 2N 13E, 2N 15E, and 4N 15E. I then make my way back to the hallway.
Now I do the fights against random monsters at 5N 17E and 5N 21E. I next go through a door to end up at 3N 0E, and fight 96 Samurai. A Shock Sphere spell pretty much wipes them out.
The fight also yields a third pair of Adamant Bracers, which Mordred equips for a 2 point improvement to AC.
I make my way back to the hallway, win the fight against random monsters at 10N 15E, and then yet again back to the hallway.
Death Field
Now I make my way north along the hallway. At 13N 14E I get a warning that the "Death Field" lies ahead. It's the darkened portion of the north-central part of the level, and it's a large room where light gets snuffed out and is filled with Hit Point-draining squares and traps.
I win the fights at 12N 10E, 12N 9E and 12N 8E, although I had to go through an anti-magic square at 13N 8E for the last fight.
I now leave two squares north to get past the anti-magic square, and then use Trap Zap on the trap at 16N 8E. I continue straight north afterwards until I hit the wall.
I go through the anti-magic square at 21N 7E and to a fight with 3 Maze Masters at 21N 6E. Maze Masters can both use Shock Sphere spells and hit for heavy damage with their melee attacks, but I kill them all the same.
I go east two squares past the anti-magic square and use Trap Zap on the trap at 21N 9E. I thereafter continue straight east and out the death field.
34 Evil Eyes
I make my way to the end of the hallway, and come to the anti-magic square at 11N 18E. I go south through the door and put up Cat's Eyes and Kiel's Magic Compass once I'm past the anti-magic square.
I am now in a room filled with spinners. I navigate my way to the room at 11N 19E, where I have to fight 34 Evil Eyes. Talia blows them away with a Wizard War spell.
2 Master Magicians
I navigate my way to the room at 8N 21E where I have to fight two Master Magicians. They can be dangerous, since they can cast the Death Strike spell if they are within melee range. I nonetheless manage to kill them off before they can try that.
20 Ghosts
I make my way to the room at 7N 19E, whereupon I fight 20 Ghosts. Keep in mind that Ghosts can Wither their targets. A double shot of Repel Dead blows them away.
Now I make my way out of the spinner room, and past the anti-magic square. I put Cat's Eye and Kiel's Magic Compass back up once I'm back in the hallway.
2nd Mage Staff
Now I make my way towards the way up to the next level around the northeast corner. I win the fights against random monsters at 20N 17E, 20N 18E, 20N 2E, 20N 5E, 19N 20E and 16N 19E.
The fight at 16N 20E yields a second Mage Staff. Mordred equips it.
Perseverance in All Things
I do the fights against random monsters at 17N 17E, 14N 18E and 15N 20E.
At 13N 20E is a Magic Mouth that says "Perseverance in All Things" before teleporting me to the second level. However, I use Apport Arcane with the coordinates -13 2 -1 in order to reach the stairs leaving the Tower. I still have some grinding and item hunting to do on this level.
2nd Diamond Shield
The grind cycle here simply involves doing the fights in the series of small rooms gathered near the southwest corner, excepting the one against 68 Mercenaries.
One of the grind cycles leads to getting one of the last remaining items that I want, a second Diamond Shield. Gallard equips it for a 1 point improvement to AC.
3rd Diamond Shield
I repeat the grind cycle a few more times. I get a third Diamond Shield during one of them, which Ariel equips for a 1 point improvement to AC.
42nd Level
I grind it out until I get enough xp to advance everyone another level, since I was getting pretty close as it was. I then return to the Review Board. Talia and Modred advance to their 37th levels as Wizards, while everyone else reaches their 42nd levels.
I return to Mangar's Tower and cast Apport Arcane with the coordinates 13 -2 0 to reach the Magic Mouth that takes the Heroes up to the second level.