-

- Forums
- Chatrooms
- Gallery
- Gameplay Videos
- Upload
- Articles
- Mod Reviews
- Shop SP: Games, Movies, Books
|
|
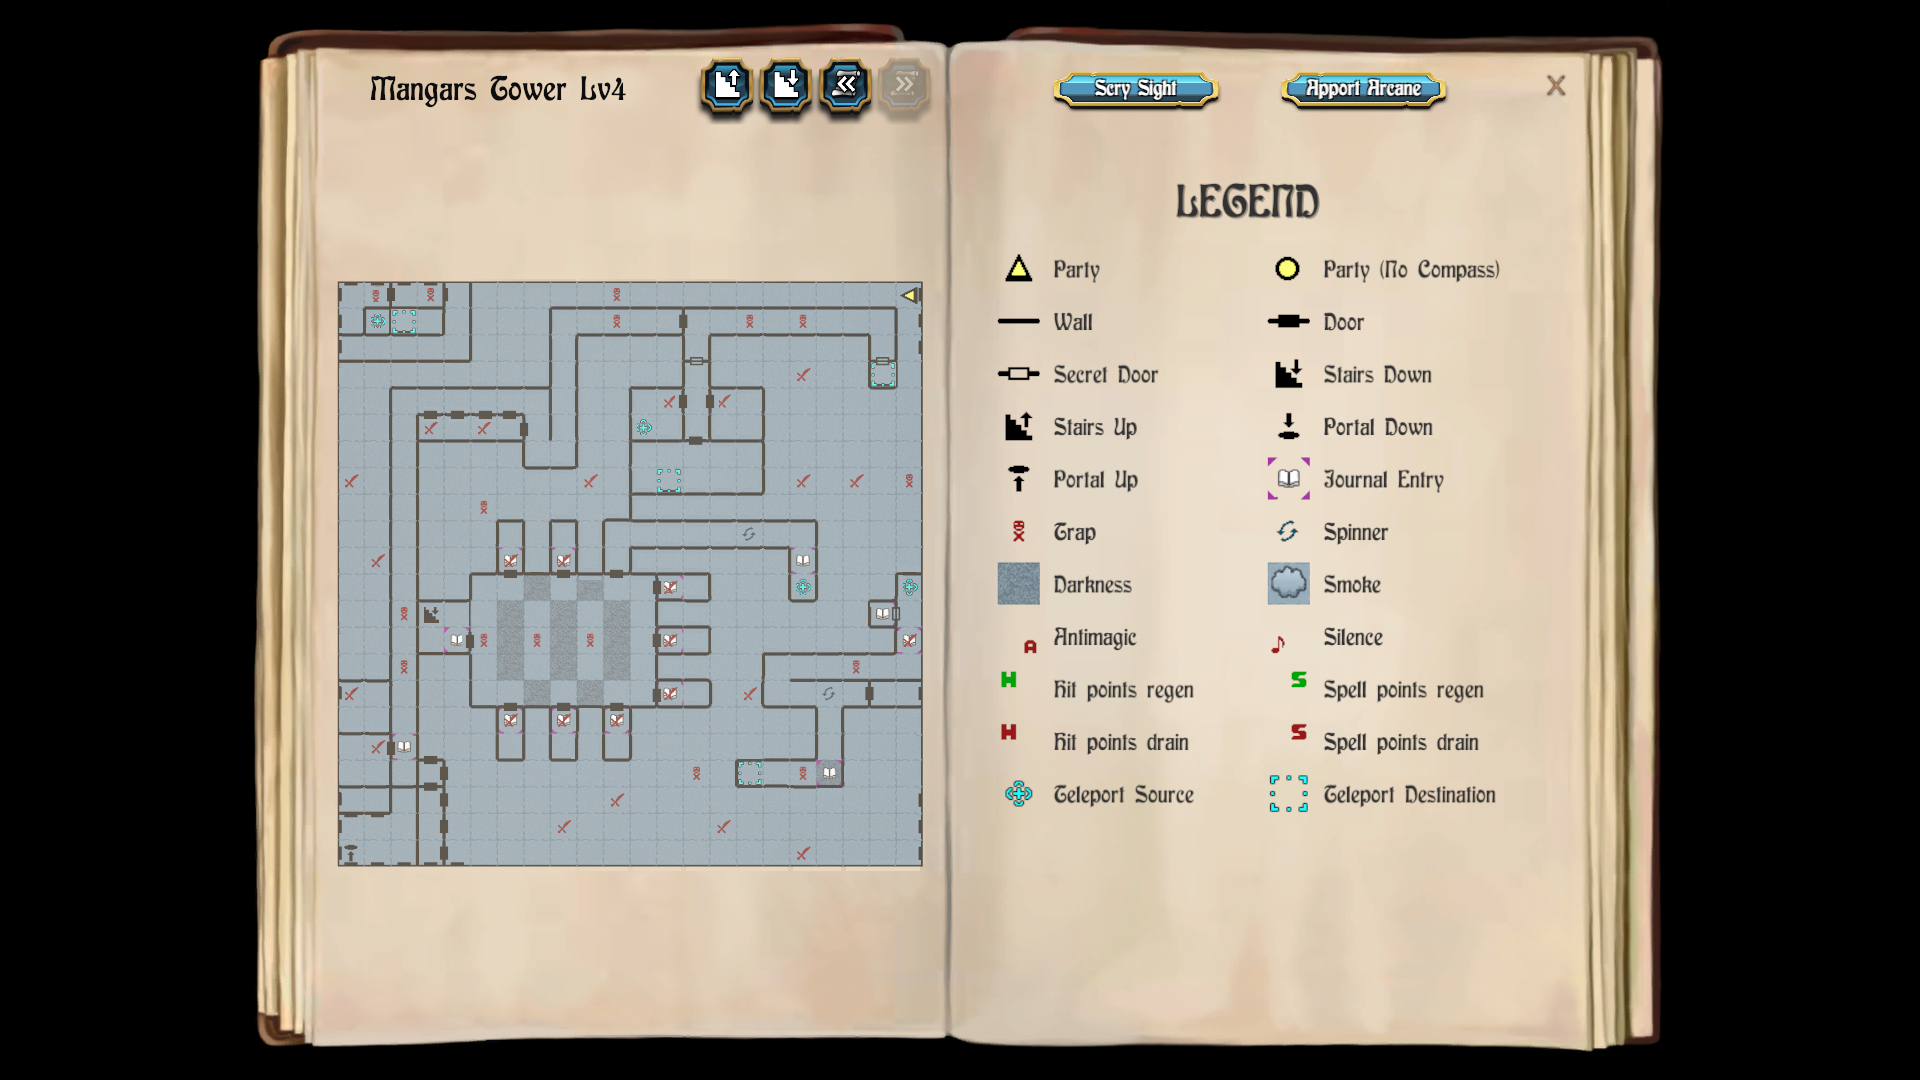
MANGAR'S TOWER, LEVEL 4
I have now committed myself to finishing the game and doing the last two levels in one swoop. *Note* dmc prefers to grind for the best items available in the fourth and fifth levels before starting the search for Mangar in earnest. It is based on using a grind cycle that involves only the smaller rooms surrounding the larger room just down to the east, and going back down and up the stairs to reset.
The toughest monsters yet appear on these last two levels. Cloud Giants, Mind Shadows, and Storm Giants show up as monsters capable of doing enormous physical damage. Bandersnatches (the most powerful of the Werewolf-type creatures) and Mangar Guards can be found here, and they can show up in groups of up to 64 instead of just the usual 8. Gimps can show up in groups numbering up to 128.
Master Conjurers are not particularly dangerous. Master Magicians and Beholders can become dangerous if they get close enough to the party, since they can insta-kill party members with the Death Strike spell. Master Sorcerers and Master Wizards can be dangerous, because they can uses the highest-level summons to bring in things like Red Dragons, Greater Demons, Demon Lords and Storm Giants.
Red Dragons can now be found as one of the most powerful types of Dragons in the game.
Greater Demons are also frequent, and can either cause Possession with their physical attacks, or breathe fire for about as much damage as Red Dragons.
For the rest of the game, I am going to insist (reloading the quicksave if I have to) set fights against random monsters being against LOTS of enemies, like multiple groups of 30+ Mangar Guards or Maze Dwellers or a group of 100+ Gimps. I want to milk as much xp from this sweep as I can, in anticipation of the sequels.
There are also some items that I am on the lookout for along the way. They are:
Spectre
I start off at 9N 3E on the map of the fourth level. *NOTE* You cannot you use Apport Arcane or Phase Door on either this or the next level. You need to make progress on foot or through the teleporters that are part of the levels themselves.
I go one square south and one square east, and then use Trap Zap while facing east to get rid of the trap at 8N 5E.
At 5N 6E is a fight against a single Spectre. Zarathos kills it right away. I go north back out the door.
50 Ghouls
I head straight north to 11N 6E for a fight against 50 Ghouls. A Repel Dead spell blows most of them away outright.
9 Wraiths
A little east at 11N 8E will be a set fight against 9 Wraiths. And again a Repel Dead spell is sufficient.
6 Vampires
I go straight south to 5N 8E for a set encounter against 6 Vampires. They start off at 20' distant, so I wipe them out with a couple of Repel Dead spells.
5 Vampires
A little east at 5N 10E is another fight against 5 Vampires. And again a double shot of Repel Dead spells ends them quickly.
8 Ghosts
A little east at 6N 12E is a fight against 8 Ghosts. Physical attacks and a Repel Dead spell make short work of them.
Vampire Lord
A little north at 8N 12E is a black coffin. Opening it leads to a fight with a Vampire Lord. Keep in mind that, in addition to their Draining physical attacks, Vampire Lords can also use Death Strike on party members when they are within melee range.
He starts off at a range of 20', so I simply have Cassandra go into Hiding and then backstab him.
7 Lesser Demons
A little north at 10N 12E will be a fight against 7 Lesser Demons. Physical attacks suffice to take them out.
Now I go two squares west, two squares north and another five squares east to get to a spinner at 12N 15E. I make sure I am facing east before stepping off the spinner.
I make my way to the teleporter at 10N 17E, which brings me to 3N 15E.
Gust of Wind
I cast Trap Zap to get rid of the trap ahead of me. I then go three squares east, where I get a message about a gust of wind, which would have snuffed out any light I had on. I go north a square, and only then do I cast a Cat Eyes spell now that any dark zones are behind me for a while.
I continue to the spinner at 6N 18E, and make sure I am facing east before stepping off. I go east for several squares until I get a set encounter against random monsters on the other side of the second door at 6N 0E. In this instance, it's two groups of plenty of Maze Dwellers. And everyone is within 30', so I have my Wizards slap out a double shot of Mangar's Mind Blade.
I get a Stoneblade as loot afterwards. I may find it useful during the sequels, since it can instantly kill an enemy on contact by Petrifying it. However, note that the Petrification power won't kill monsters that are already made of stone (e.g. Golems), at least during the sequels.
Now I wait and recoup my Spell Points, when I get a random monster encounter. If I get a random encounter while exploring or waiting for my Spell Points to recoup, I'll fight those too, even if the enemies are few in number. It's the fights against random monsters at set locations that I insist on milking for lots of enemies and xp.
2 Hungry Dragons
First, I have Ariel stop her Traveller's Tune. There's a specific reason why.
Now I return to the spinner, and make sure I step one square west. I continue W N E E and then use Trap Zap to get rid of the trap at 6N 18E.
I continue to follow the hallway. There will be two Red Dragons at 8N 21E. They would have stayed asleep had my Bard song remained active, but now they attack me. Their flaming breath can do plenty of damage to multiple party members, but I'm able to kill them unscathed after Ariel plays her Lucklaran song.
I put my Traveller's Tune back up after the battle.
Thor Figurine
At 9N 20E is a Magic Mouth that asks me for the name of Odin's greatest son. I get a Thor Figurine after giving the obvious answer. For those of you interested in summoned monsters as help, Thor almost always strikes first, always connects and always Critically Hits on connecting, so that is something to consider, especially during the final battle. I continue to the teleporter at 10N 21E, which takes me to 18N 20E.
I follow the hallway westwards, using Trap Zap on the traps along the way. I continue west through the door, and Trap Zap another trap on the other side of the door.
I do fights against random monsters at 16N 5E and 16N 3E, insisting on massive numbers of Gimps each time for the xp. A Wizard War spell is great for blowing away a single group of numerous Gimps.
I continue south along the extended hallway, using Trap Zap on more traps, and also defeating a random group of monsters that includes numerous Mangar Guards and Maze Dwellers.
I then win another fight against random monsters (i.e. LOTS of Gimps) at 4N 1E.
Walls to Doors
I back track north and east along the way. I now win fights encounters against random monsters (i.e. more Gimps) at 17N 14E and 17N 12E.
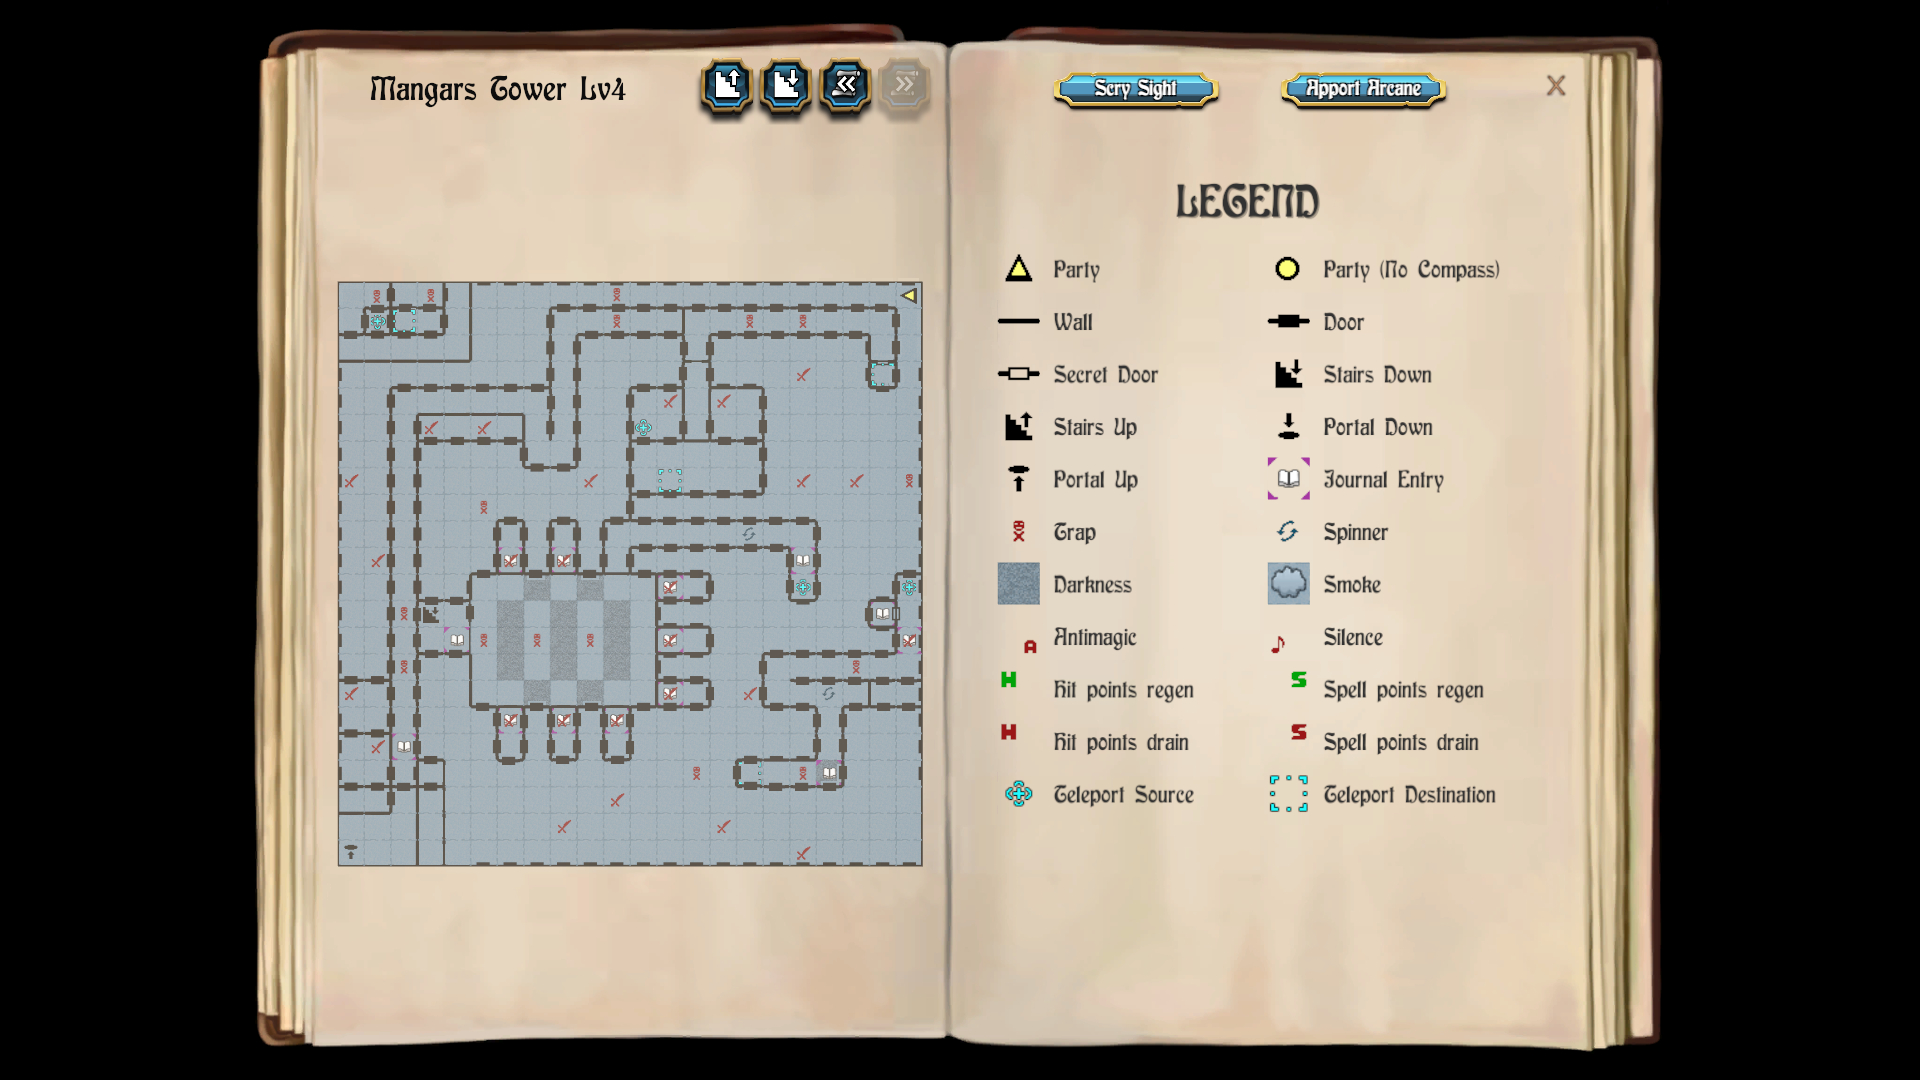
I continue to the teleporter at 16N 11E, which takes me to 20N 2E. At 20N 3E is a square that, once you set foot on it, turns all the walls into doors, and all the doors into walls. The map of the fourth level should now look like this ...
West Side
Now I go to the teleporter at 20N 1E, which takes me to 14N 12E.
After that, win fights against lots of monsters at 14N 9E, 11N 1E and 14N 0E. I also use Trap Zap on the trap at 14N 21E along the way.
Spectre Mace
I go straight ahead west and loop around to the east side of the level. I win the fights against lots of random monsters at 14N 19E, 14N 17E and 18N 17E.
The last fight results in getting a Spectre Mace as a random drop. It has two key benefits. One is that it has a +5 bonus to hit, and that is a significant benefit at this point in the game where the highest level monsters have very good AC and even my dedicated fighters are now sometimes missing their attacks. The other is that it will Drain its target of a level should it happen to survive the damage. Zarathos equips it for the rest of the game (Paladins can't use it).
Portal to the Fifth Level
I proceed to win fights against lots of monsters at 0N 17E, 6N 15E, 1N 14E, 2N 10E and 1N 8E.
The portal to the fifth level is in the southwest corner at 0N 0E.