-

- Forums
- Chatrooms
- Gallery
- Gameplay Videos
- Upload
- Articles
- Mod Reviews
- Shop SP: Games, Movies, Books
|
|
| Pillars of Eternity 2 Video-Based Walkthrough by David Milward |
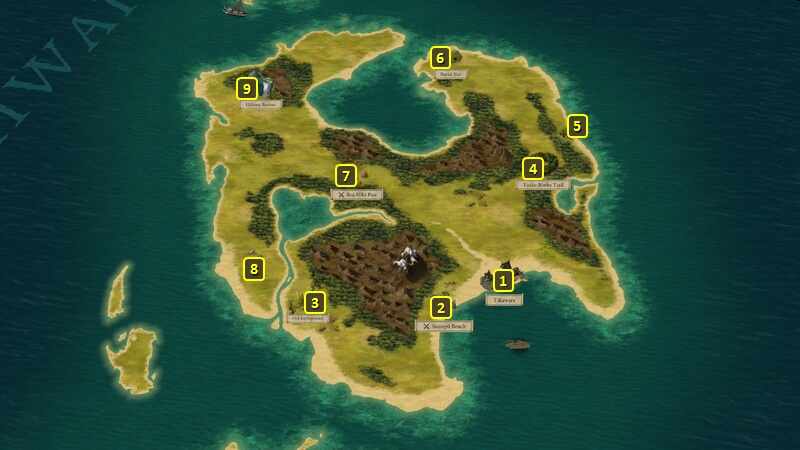
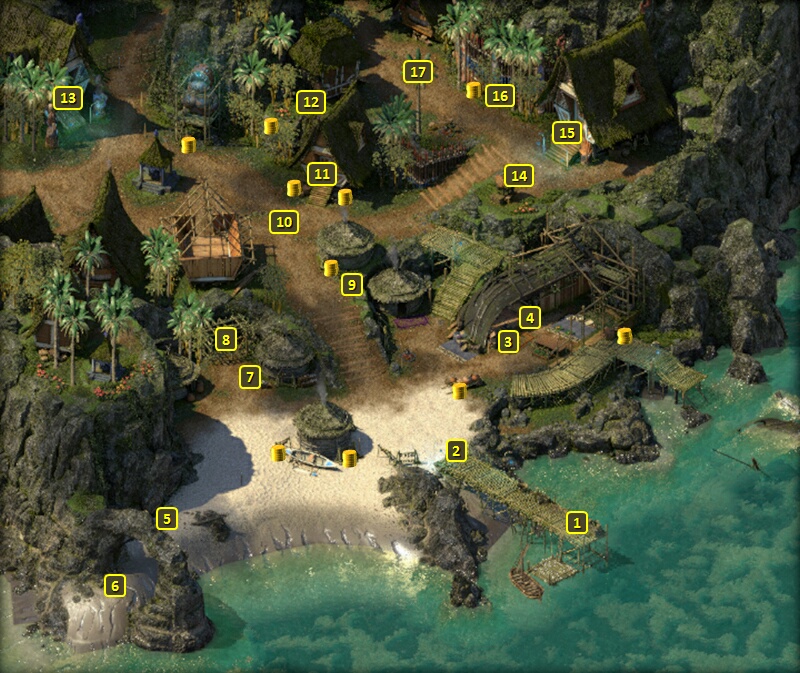
Tikawara Island
*Evil* Toaku Bihwa Trail
The Toaku Bihwa Trail is at #4, which is inhabited by a Delemgan and a Dank Spore, along with a few Sporelings and Lesser Earth Blights.
The evil party begins with a Stealth check of 5 to get closer and observe. Tekehu then makes a combined Intellect check of 15 and a Survival check of 6 to verify that a Delemgan and a Dank Spore are in the glade ahead. Those checks also notice that the Dank Spore is feeding on a dead corpse and yet is still emitting its luring odor, and that there's a tome at the base of the Spore.
The evil party then approaches them in stealth mode, with a view towards getting closer to them before combat starts. Konstanten unleashes Seven Nights She Waited right away, and then attacks the nearest Sporeling. Zarathos buffs up in a sequence of Swift Flurry, Frenzy and then Enlightened Agony. He and Konstanten take out a Sporeling, and that gives them enough of a pathway to make the Dank Spores their priority targets.
Xoti casts Devotions of the Faithful on everything, and then Holy Meditation on the party. She then attacks the nearest enemy, occasionally stopping to use a healing spell.
Tekehu starts with a Chill Fog that covers as many enemies as possible. He then follows up with Nature's Balm, Moonwell, and a Nature's Mark that hits all the enemies. He also summons an Ondra's Whip that's close to as many enemies as possible.
Ydwin starts with an opening volley from her Rod that hits multiple enemies and maxes out her Focus. She next uses Phantom Foes on as many enemies as possible. She then uses Borrowed Instinct on a nearby Sporeling to boost both her Accuracy and her Defenses. She next uses Tactical Meld on Zarathos. She thereafter uses offensive powers like Silent Scream. She also renews Phantom Foes and Borrowed Instinct at one point.
I eventually wear everything down. The distinctive item that gets left behind is the Spore-Coated Grimoire, which the evil party doesn't have any use for.
I get some random items from the Burial Site at #6, and some Fresh Fruit from the grove at #5.
Toaku Bihwa Trail
The good party approaches openly, which leads to several options. Some of them won't be available if the Watcher had a combined 1 point of Cruel disposition and 2 points of Aggressive disposition.
*Evil* Sunepu Beach
I travel to Sunepu Beach at #2. Zarathos makes a combined Survival 8 and Perception 12 check to notice a giant Lagufaeth wearing a skull for a helmet. Not making both checks would have meant not noticing anything in particular, but still having the Athletics option described below available.
Ydwin makes an assisted Stealth check of 8. Missing the check would have meant the Lagufaeth attacking the party on the beach, and near a Sigil of Atrophy. Making the check makes a few options available:
Sunepu Beach
An alternative pathway is to use the Athletics option to go forward cautiously. The problem in normal circumstances is that it is likely to lead to the character with the lowest Athletics rank getting hit with a dart, and that character also getting the Acute Rash (-5 Fortitude, -3 Corrosive Armor Rating). That can, however, be averted by having a Ranger in the party. The Ranger's pet will tug at the Ranger's sleeve, giving an alert to the danger and allowing a dodging of the dart.
But the good party makes the Athletics approach but after having rescued the captive Lagufaeth hatchlings in Tikawara. I then wait, and Skulking-Terror offers fish. An Insight check of 3 reveals that it's probably gratitude for setting the hatchlings free. I still have the option to attack it. But Alliria accepts the Hagfish it offers.
I thereafter grab some random items from a nearby Burial Ground.
*Evil* Boa Hika Pass
Now I go to the Boa Hika Pass at #7. There are three ways to start, and all of them reveal that several Boar have been wounded while being hunted.
One way, shown for the evil party, is to make a Stealth check of 5 to sneak forward and observe.
I next grab the Baby Boar. I could sneak away without fighting the Lagufaeth, but I prefer not to.
Ydwin makes a Perception check of 13 before grabbing the Baby Boar, but that means I'll have to fight the Lagufaeth if I try to get away.
I now make another Stealth check of 7, which can be done either before or after getting the Baby Boar. Doing so allows you to go into Stealth mode and close in on the Lagufaeth before starting combat with them. If I had made the second Stealth check before grabbing the Baby Boar I would have lost out on it.
Another way to start is to wait and observe, which earns Stoic disposition. Your options become limited to drawing weapons and attacking them openly, or making the Stealth check of 7 to sneak up on them before attacking. You won't get the Baby Boar.
Ambushing them from Stealth lets the evil party sneak up on the Lagufaeth Mages and attack them first. Zarathos takes one of them out rather quickly. The rest of the party soon follows suit with the other, while Tekehu was putting up buffs at the same time.
The Lagufaeth were led by Chief Echoing-Strike. The distinctive item he leaves behind upon dying is a Ring of Overseeing. Konstanten gets the Ring of Overseeing in the evil party. The obvious reason being that it will expand the radius of his Chanter Phrases and the area-of-effect of his Offensive Invocations.
Boa Hika Pass
The good party approaches openly, which reveals the little piglet. I could:
*Evil* Hohina Ravine
The evil party starts at #1 on the map of Hohina Ravine. Groups of Lafugaeth will be at points marked #2.
I send the whole party into Stealth mode whenever I get near one of them. Ydwin goes ahead, and finds the tripwire trap that will be in front of a group. The whole party then sneaks in to get as close as possible before combat starts. I otherwise slaughter them with the usual methods.
*Evil* Vion-ceth
The evil party goes into stealth mode and heads south towards #3. They are able to get up close to a Delemgan and cut her down quickly. Then it becomes a matter of outlasting the Jungle Lurkers and the Assassin Vine.
The sarcophagus at #4 is kept shut by vines that hold the lid fast. Zarathos makes a Might check of 16 to pry it open. I obtain a Hatchet called Vion-ceth, but neither party really has any use for it.
*Evil* Broodmother's Fury
I go north to #6, where I first see the Broodmother jump out of the pool. I continue west and attack her at #7.
It takes a little bit for the Lagufaeth to close in on me, so I grab the opportunity to buff up. Zarathos does his sequence of Swift Flurry, Frenzy and Enlightened Agony. Tekehu gets in Nature's Balm and then Moonwell.
Xoti waits until the enemies close in before she uses Devotions of the Faithful and Holy Meditation. The party sometimes also takes significant damage from the spells of the Lagufaeth Mages, so she will sometimes have to use Restore to bring everyone back up.
Ydwin makes a Rod Blast attack to max out her Focus. She uses Borrowed Instinct on a Lagufaeth that's attacking her, then uses Phantom Foes, and then uses Tactical Meld on Zarathos. Tekehu puts a Chill Fog once the Lagufaeth crowd around the party, and follows up with Nature's Mark.
I manage to wipe out the Sidewinders and Redfins. After that, I make a point of taking out the Mages, as they're squishier than the Broodmother herself. The Broodmother is now much easier to gang up on.
She leaves behind the Tikawara Broodmother's Head, as well as an Amulet called the Baubles of the Fin. Tekehu wears the Baubles of the Fin for the rest of the game. The +1 bonuses to both Constitution and Intellect benefit him personally. The other perk is that the whole party enjoys a +3% bonus to Damage.
I return to Tikawara. I switch out Xoti and Tekehu for Aloth and Rekke.
Zarathos takes Duality of Mortal Presence on his 11th level up. I activate the mode that adds +1 Intellect for each Wound. It will increase the area-of-effect of Carnage, as well as the duration of his buffs. Although his buffs will be extended by Salvation of Time later in the game, there is value in maximizing the opportunity for his buffs to be in place until Xoti can get set up. It will also extend the duration of debuffs that he applies through his own attacks, such as through Enervating Blows and Spirit Frenzy. It is also done with a view towards the Turning Wheel Upgrade, which adds +2% Burning Damage for each Wound.
I speak to Himuihi again at #3. She rewards the party with 6,000+xp and a belt called Nature's Embrace. I have no use for the belt though. I thereafter put the core party back together and return to my ship.
Broodmother's Fury
The good party starts at #1 on the map of the Hohina Ravine. The Lagufaeth allow them free run due to the earlier decision to free the Hatchlings in Tikawara. But I still have to be careful to disarm any traps along the way.
I continue to the southeast and defeat the Lurkers and Jungle Vine and Delemgan at #3. Alliria uses a Fireball spell to burn away the vines before taking Vion-ceth.
The Broodmother at #7 is willing to negotiate, whether or not you previously freed the hatchlings and even if you killed the other Lagufaeth at points marked #2. If you hear her out with patience, she indicates that all she wants is the hatchlings to be freed. There's more than one way to play it.
You can agree to her request to secure the release of the hatchlings, and then return to Himuihi in Tikawara. A Diplomacy check of 4 combined with Insight, an Intimidate check of 7, or a dialogue option based on the Watcher being an Orlan won't convince her to willingly release the hatchlings. What you need is the dialogue option based on assuring her that the Lagufaeth will leave the village alone if the hatchlings are released, followed by one of a Survival check of 4, a dialogue option based on the Watcher being an Orlan, or a dialogue option based on the Watcher being a Ranger. If you convince her, she'll give you the Lagufaeth Cage Key to free them from their cage at #8.
The hatchlings will flee south to the beach after opening the door to their cage. The Broodmother will appear at the beach shore towards the southwest corner, and give the xp reward as well as the Baubles of the Fin.
However, Alliria's previously freed the hatchlings while she was still in Tikawara. All she has to do is indicate that to the Broodmother, followed by obtaining a promise from the Lagufaeth to stay away from the village. That ends the quest then and there, with rewards of 6,000+xp and the Baubles of the Fin. Eder wears it for the rest of the game. I regard this as one of the must have Amulets, as it gives the whole party a +3% bonus to Damage. Eder gets it by default since I have other amulets in mind for other characters. The +1 bonus to Intellect will extend his buffs a little more, while the +1 bonus to Constitution improves his resiliency.
I also want to loot the two chests, but they're surrounded by Lagufaeth such that approaching them in Stealth is impossible. I use Sparklecrackers to lure them away from the chests. That allows Mirke a pathway to loot them for an Amber and several other random items.
I return to Tikawara. I have two sidekicks in need of level advancement. Konstanten gains two abilities on his 10th level-up.
One of them is Spirit Frenzy. Attacks made while Frenzied now also inflict Staggered (-5 Might, cannot Engage). That includes Carnage, and it also includes any other attack, even spells. That makes Spirit Frenzy a popular choice for many multi-class builds that combine Barbarian with a spellcaster class. In Konstanten's case it will also add Staggered to his Offensive Invocations. There's the additional point that Staggered will also reduce the targets' Fortitude by -10, and that will help with the Brute Force passive when he gets it.
He also gets The Long Night's Drink Birthed the Revenge of Morning. His phrases will now alternate between Come, Come Soft Winds of Death and this one. It imposes the Weakened (-5 Constitution, Healing Received reduced by 50%) Affliction on all enemies within its area-of-effect. The Constitution penalty from Weakened and the Might penalty from Staggered will both reduce a target's Fortitude by -20. Add to that the -25 Fortitude penalty when using the Body Blows modal for a Morning Star, and all three penalties together act as a great primer again for the Brute Force passive when he gets it.
Rekke gets Tough on his 10th level-up. More Health is always good, especially for a two-handed warrior who himself is going to get hit a lot.
I thereafter return to my ship, to sail to northeast Tehiwai.