-

- Forums
- Chatrooms
- Gallery
- Gameplay Videos
- Upload
- Articles
- Mod Reviews
- Shop SP: Games, Movies, Books
|
|
| Pillars of Eternity 2 Video-Based Walkthrough by David Milward |
Neketaka
Bounty on the Steel Preacher
I sell off my excess gear at the Supply Store of Neketaka. I then switch in Serafen, Ydwin, Rekke and Konstanten. And I travel to Serpent's Crown after that.
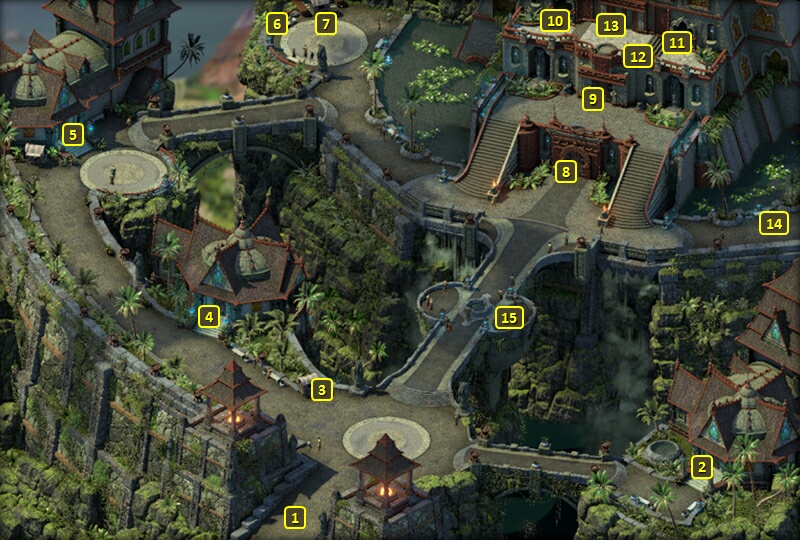
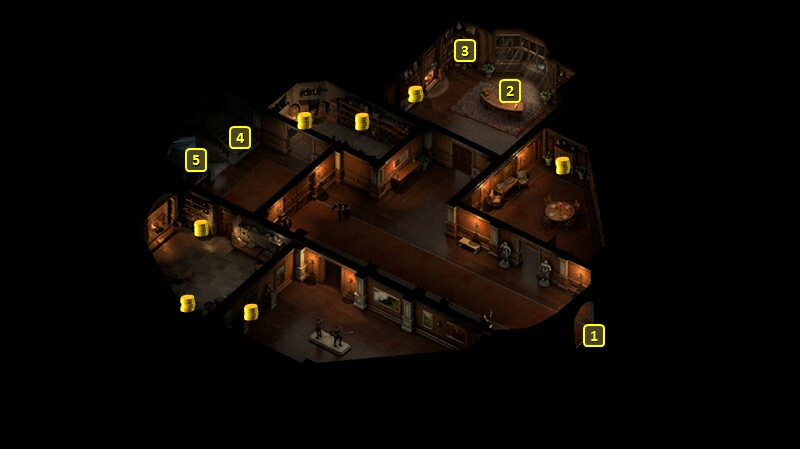
I arrive at #1 on the map of Serpent's Crown. I buy gems from Una at #3.
I continue northwest and speak to Nungata at #6, and receive 19,000+ xp, 6,000cp and a minor gain in reputation with Neketaka was rewards for the bounty on The Steel Preacher.
Konstanten takes Interrupting Blows on his 15th level-up. Critical Hits will now have a 50% chance of Interrupting any active abilities being used by the target. It's also a natural choice for a build that emphasizes scoring Critical Hits as often as possible.
I thereafter go to the front door of the Kahanga Palace at #8.
Trade Secrets
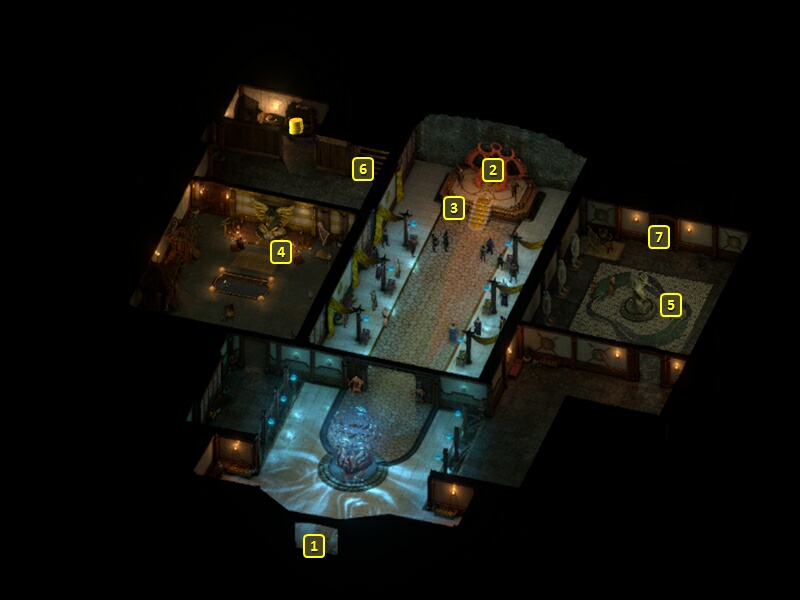
I am now at #1 on the map of the main floor of the Kahanga Palace.
I speak to Prince Aruihi at #3, and report my discovery of Delver's Row and the Undercroft to him. I get 1,350xp and a major gain of reputation with the Huana to complete the Trade Secrets Quest.
Alliria makes a Diplomacy check of 3 to convince him to leave Delver's Row alone, as it will benefit the Roparu and by extension Neketaka itself. She follows up with a Streetwise check of 6 to convince him to increase the wages of the members of the Guild of Watershapers. *Evil* Zarathos uses the Shady option to conceal the presence of Delver's Row from Aruihi, which results in a loss of reputation with the Huana.
Aruihi now wants me to investigate a Huana expedition that went to Motare O Kozi, but is now missing. That request triggers the Last Sanctuary Quest.
I leave back out the door at #1. I then go east to the exit at #14 on the map of Serpent's Crown.
Bounty on Ikorno
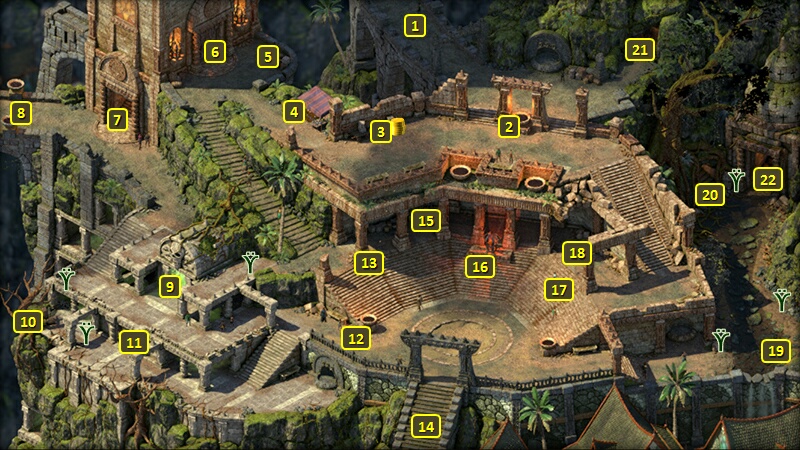
I arrive at #1 on the map of The Sacred Stair. I speak to Okauro at #3 and get 3,500cp, 6,800+ xp and a minor gain in reputation with Neketaka for the bounty on Ikorno.
I also accept the bounty on Urnox the Rathun and return to the exit at #1.
A Cordial Invitation
I switch Aloth and Fassina in for Serafen and Ydwin. The reason being that the former two will enjoy some distinctive dialogue during the next encounter. Now I head for Periki's Overlook.
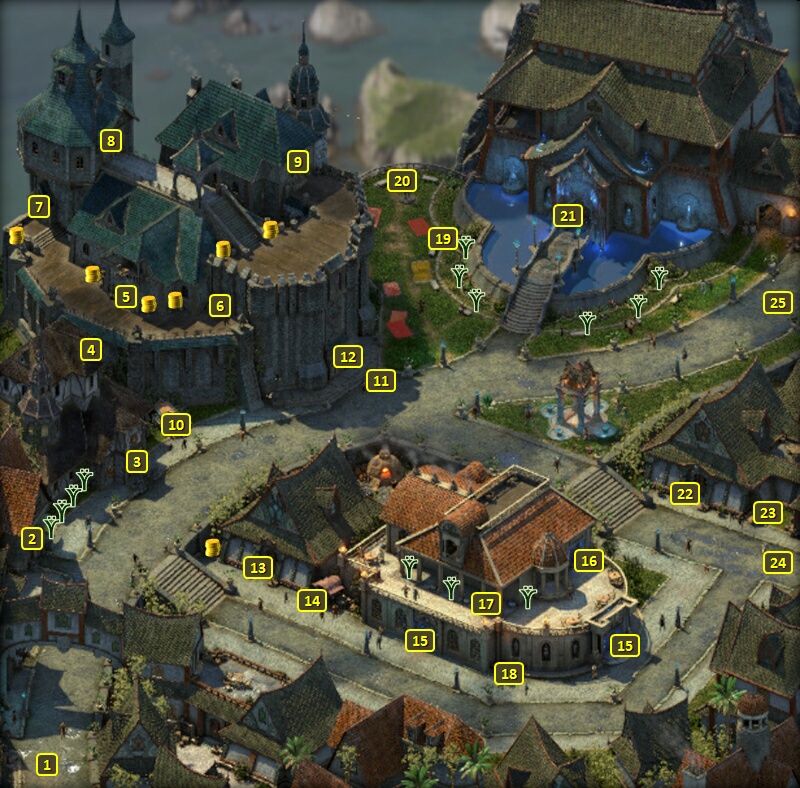
I buy crafting ingredients from The Dark Cupboard at #3 and then Cuitztli's at #2.
I then go in through the door at #12.
That brings me to #1 on the map of the main floor of Arkemyr's Manor. I now speak to Arkemyr himself at #2 to complete the Task called A Cordial Invitation, with 1,000+ xp as a reward.
Arkemyr now requests, on behalf of the Circle of Archmagi, that I find the research of a Wizard named Bekarna from her observatory. That request triggers the Quest called Bekarna's Folly.
I leave and make for the exit at #1 on the map of Periki's Overlook, and reassemble my core party. Mirke takes two abilities on her 16th level-up.
One of them is Improved Critical, which is a natural choice for a Monk / Thief build that wants to maximize the probabilities of Critical Hits to the greatest extent possible.
She also takes Slippery Mind. She'll enjoy complete immunity to any Intellect, Perception or Resolve Afflictions should she go below 50% Health. I thereafter return to my ship.
The Goat's Horn
I sail east and board a Vailian Galleon called The Goat's Horn, and captained by Rock-Stomper Rodul. I win the boarding fight rather handily.
Boarding this vessel is another opportunity to acquire a Vailian Hullbreaker if you want one.
*Evil* Gornlod
The evil party sails northward, and boards a Crookspur Captain along the way.
They continue north and board a Rathun Longship called the Gornlod. It is captained by a Rathun Wizard named Adurix. I have little trouble slaughtering the Rathun crew.
*Good* The Good party attacks this ship on the way north as well.
*Evil* Urnox the Rathun
The evil party docks at the island at #60, and enters the domain of Urnox the Rathun.
Mirke takes two abilities on her 16th level-up. One is Refreshing Defense. It adds a few seconds duration to her Vigorous Defense each time she takes any amount of Damage from an enemy.
She also takes Iron Wheel. It upgrades her use of Duality of Mortal Presence so that she'll have a +3 bonus to Armor Rating upon reaching 10 Wounds.
I begin my battle against Urnox the Rathun. Now I start to show the kind of process the evil party uses for its battles.
Zarathos activates Swift Flurry, Spirit Frenzy and then Enlightened Agony. Enlightened Agony both provides a buff that shortens the duration of any hostile effects, and the Smart Inspiration cancels out the Confusion Affliction of the Berserker's version of Frenzy.
Mirke activates all of Swift Flurry, Enduring Dance, Disciplined Strikes and Refreshing Defense.
Tekehu casts Nature's Balm followed by Moonwell.
Ydwin hits a Rathun with her bow, and then casts Ancestor's Memory on Xoti.
Xoti first activates Swift Flurry, Enduring Dance and Thunderous Blows. She in turn casts Holy Meditation on the party, and then Barring Death's Door on Zarathos.
And once she gets Ancestor's Memory on her, she immediately thereafter casts Salvation of Time on the party. Salvation of Time adds duration to Ancestor's Memory, thus beginning the self-regenerating loop.
And she thereafter casts Salvation of Time on the party every chance she gets. It increases the duration of all the buffs the party members have put on themselves, and that includes the buffs provided by Tekehu's Chanter Phrases.
Zarathos' build is an inherently risky one. Helwalker gives him a +10 stackable bonus to Might on reaching 10 Wounds. But it also increases the amount of Damage he takes. And the sky high Might also increases the Raw Damage he takes over time from using the Berserker's version of Frenzy. An infinitely extended Barring Death's Door allows him to use the full power of both subclasses, and without any worry for the risks. And being brought to less than 25% Health as a Death Godlike awakens the +3 bonus Power Levels. And that in turn raises the power of both his Barbarian Carnage and his Monk Unarmed Strikes.
A Rathun at one point goes after Tekehu, so he uses his Shark Spiritshift form. That will get extended endlessly by Salvation of Time too.
I eventually wear the Rathun down. Urnox leaves behind Gauntlets of Discipline and a Large Shield called Bronlar's Phalanx. I did consider it as a candidate for Mirke instead of her Akola's Apex Ward. Bronlar's Phalanx provides similar benefits, increased Deflection and Armor Rating as the wielder loses Health. I still ended up preferring Akola's Apex Ward as its benefits are always in place without having to be reduced in Health. Also, Mirke's Rapid Recovery will now also get extended endlessly by Salvation of Time, and that means she usually won't even reach that less than 25% Health threshold to begin with.
I return to ship after the battle's over.
Urnox the Rathun
Aloth takes two abilities on his 16th level-up when the party arrives in Urnox's domain.
One of them is Refreshing Defense. Any Damage, even from Grazes, will add duration to his Vigorous Defense.
He also takes Spell Resistance. It provides a 10% chance of avoiding the effects of any spell outright.
The good party likewise manages to outlast Urnox and his minions. The party takes some heavy hits. But multiple uses of Pallegina's Greater Lay on Hands and Alliria's White Flames are up to the task even when Pallegina's passive heals aren't enough on their own.
At some point I have Eder lock down Urnox himself when the crowd starts to thin a little bit, and with little fear for himself.
Notice also how Mirke was spamming Stunning Surge, enhanced by Lightning Strikes and Thunderous Blows, with Scordeo's Trophy and Fire in the Hole while she's dealing with a crowd. But then she switches over to her secondary gun set when the crowd thins out and she's aiming at individual targets.
I return to the ship and then sail to the island at #42 on the World Map. I switch in Fassina for Eder for the time being.
It is now time to explore Bekarna's Observatory.