-

- Forums
- Chatrooms
- Gallery
- Gameplay Videos
- Upload
- Articles
- Mod Reviews
- Shop SP: Games, Movies, Books
|
|
| Pillars of Eternity 2 Video-Based Walkthrough by David Milward |
Dorudugan
*Evil* Magranite Fanatics
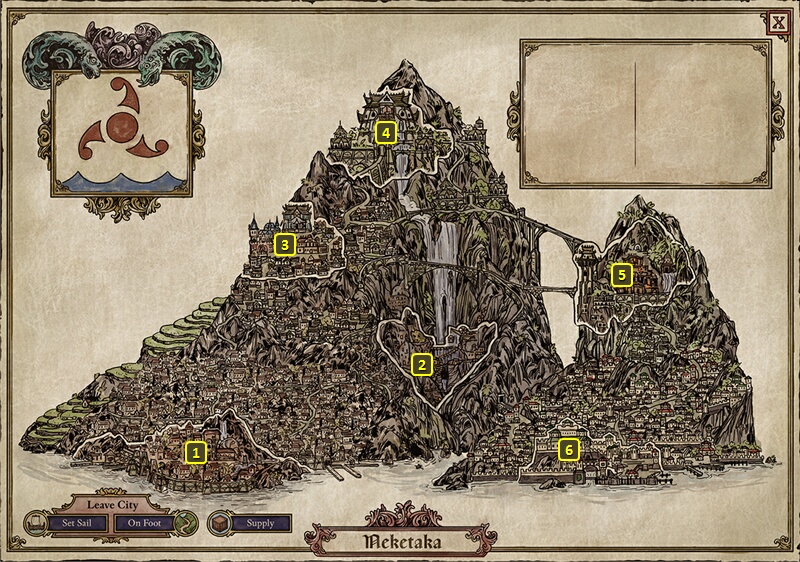
The evil party sails back to Neketaka at #17 on the World Map.
I head for Serpent's Crown. But I am accosted on the way by fanatics of Magran. I choose to fight them straightaway and win with standard methods.
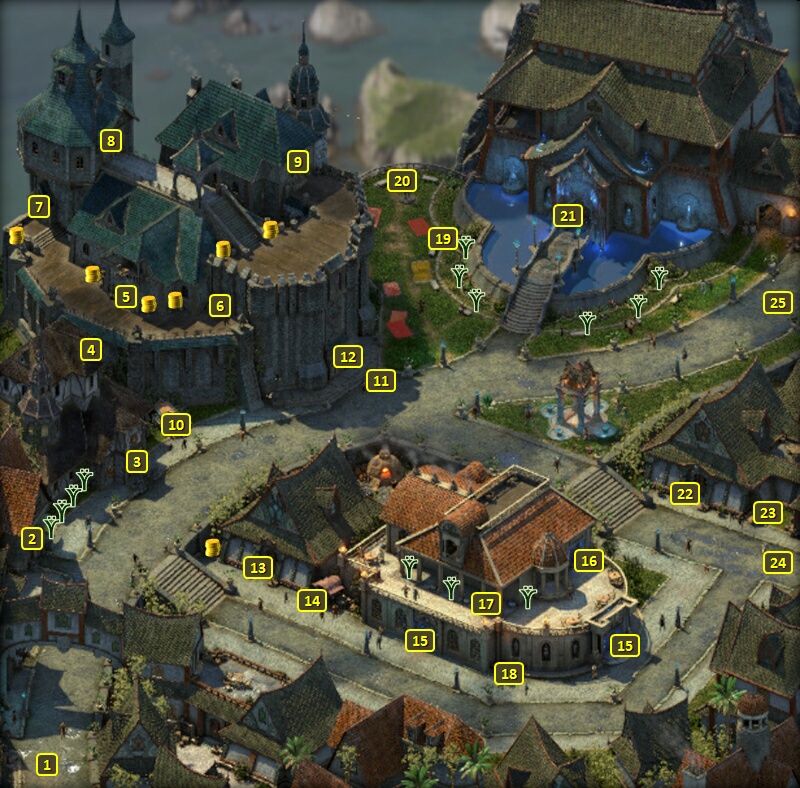
I arrive at #1 on the map of Serpent's Crown. I buy some gems from Una at #2 and then leave.
*Evil* Grave Hound Pup
I briefly switch out Ydwin for Eder. I then travel directly to The Dark Cupboard in Periki's Overlook.
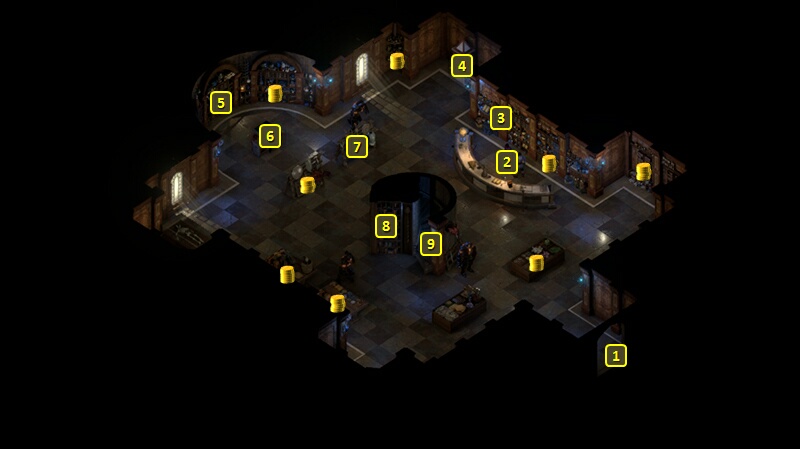
That brings me to #1 on the map of The Dark Cupboard. I buy crafting ingredients from Fassina at #2.
Then I sacrifice both the Grave Hound Pup and Hati to the Creature Critter at #6. I assemble them together into the same pet that I name "Caranthir", with the Grave Hound Pup providing the Sleeve, and Hati providing the +1 bonus to Might. The point was for Eder's Pet to keep the same bonuses, but with an appearance more befitting an evil-themed party. I leave out the door at #1.
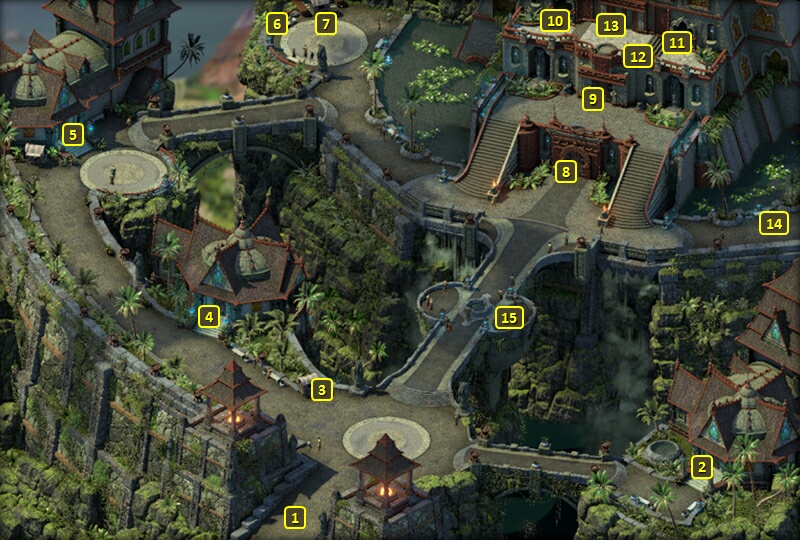
I emerge at the door at #3 in Periki's Overlook. I buy more crafting ingredients from Cuitztli's at #2.
I switch Eder back out for Ydwin and then return to ship.
Crown of the Exiled Queen
The good party sails back to Neketaka at #17 on the World Map. I attack two Vailian Master Captains and a Deadfire Merchant Ship along the way.
I sell off my excess gear and travel directly to Marihi's Metalworks.
There will now be somebody named Izzia in the shop. I have her assemble all of the Neriscyrlas' Hope, the Tooth of Toamowhai and the Weight of Revelation together into an amulet called the Crown of the Exiled Queen.
A key point for any of these elements is that they can only be worn by the Watcher, and all of them can give +1 Might and +1 Resolve that stacks with each party member knocked unconscious. The stacking cap maxes out at +4 Might and +4 Resolve. It is possible for some summons to trigger at least one instance of +1 Might and +1 Resolve. Have a look at this thread, which is based on a distinction between party members and team members for summons:
https://forums.obsidian.net/topic/114591-mechanics-the-summoners-tables/
A summon that is a party member will trigger +1 Might and +1 Resolve, but only once. That includes most Chanter and Druid summons, the Priest's Spiritual Ally, and Conjurer Familiars. It won't include team summons brought in by most Monk, Priest and Wizard summons. Sounds cool, but given that fully realizing its power tends to be based on reviving companions after getting knocked unconscious during very long battles, it seems awfully situational and not really a fit for a No Rest run.
The point of fusing them together is that the Crown of the Exiled Queen provides a once per Rest power that can Dominate a single enemy for at least 20 seconds. But it doesn't really matter to me. I only did the assembly as demonstration for interest's sake.
An alternative is to fuse two of the base items into the Chain of Rightful Authority, and keep the third. But again, doesn't make a difference to me.
I return to my ship, sail southwest and attack a Vailian Master Captain.
Dorudugan
The good party makes some preparations in anticipation of its first Mega Boss fight. I kick Aloth and Eder out of the party. And I bring in Xoti.
Alliria readies her Iron-Clasped Grimoire. But for this fight she pulls the little Troll called Grog out of Stash, and equips him as her Pet. The Mega Boss I'm about to fight is one that I want to keep my distance from, and is capable of really devastating Disengagement Attacks. Grog immunizes everyone in the party against Engagment. And the risk of party members dying will be avoided as long as nobody falls below 0 Health.
Mirke has been holding onto Acina's Tricorn in her personal stash even after she stopped wearing it. She now loans it to Xoti. She also lends her Ring of the Marksman to Xoti. Xoti also changes cloaks to Rekvu's Scorched Cloak so as to be healed from Burning Damage so long as she has her Serious Burns Injury.
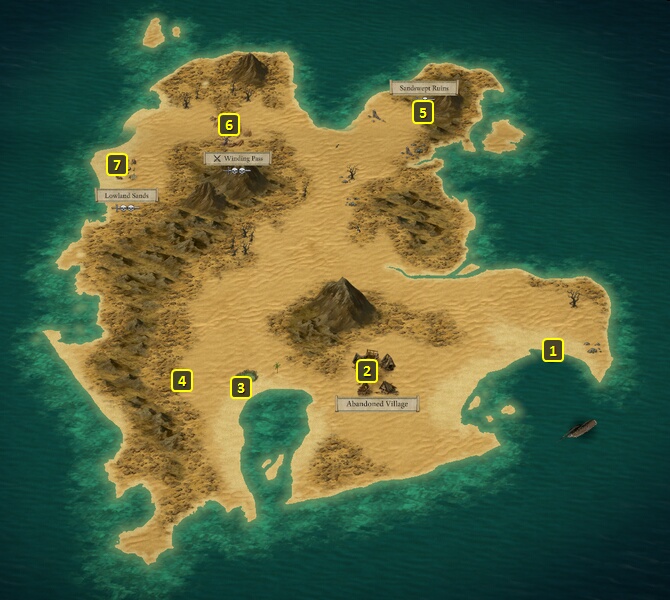
I sail southwest to the Desert Island at #6 on the World Map.
I dock at #1 on the map of the Desert Island. I enter the Corroded Wasteland at #4, which is the home of the first Mega Boss I fight, Dorudugan the Hellfire Colossus.
It has more Health than any other monster in the game, the neighborhood of at least 10,000+ in the Path of the Damned setting. Its Deflection isn't great, but its other Defenses are really high. It's immune to Mind Afflictions and has Resistance to Body Afflictions. All of those together make it extremely unlikely to inflict any hostile status effects on it.
Its basic attacks pretty much always Hit for massive damage, and always knock their victims Prone. The shield arm attack is also a sweeping attack that can connect on at least three characters in front of it.
It occasionally uses its Hellfire Barrage power, which shoots out several small meteors that are aimed for near where the characters are standing at the moment each meteor is released. Each meteor will lie in the ground for a second or two before detonating, making the power similar to multiple uses of Delayed Fireballs. You can run away to avoid the very heavy damage, but that running should start the second the meteors go up in the air.
He starts to use another power once he's brought to 75% Health. He'll once in a while use Charge Helstorm. By itself it won't do anything, but it will add a Charge Helstorm to his status, which you can verify by leaving the mouse-clicker over him. He can accumulate 3 Charge Helstorms. And once he does, that's when he unleashes the Helstorm itself. It's basically a LOT of Burning Damage over at least half of the map of the Corroded Wasteland. It is possible to avoid it by leaving him in one corner of the Wasteland, and hightailing it to the other corner before he unleashes it. But again it requires seeing it early and starting the runaway early to avoid getting hit. The Charge Helstorms will go back to zero, and Dorudugan can't unleash another Helstorm until he accumulates another 3 Charge Helstorms.
He'll occasionally use yet another power once brought to 50% Health. Magnetic Overdrive will basically Pull any character anywhere within the Corroded Wasteland within reach of Dorudugan's melee attacks. He'll also unleash Burning Damage within a 2.5m radius around him. And trying to run away from him after that means risking Disengagement Attacks from him, which score even more massive damage than his usual attacks.
He's also completely immune to Interrupts. So combine that with his very high Defenses and his Resistance, you can't really hope to stop him from using these powers.
Also, Burning Damage also heals him. Any Fire-based attack that Hits him will instead Heal him for 10% of the Damage it would normally have caused. So yes, that means Hellfire Barrage and Helstorm are not just ways to blow the party members away, they're also self-healing for him.
The good party has a lengthy and rather involved approach to this fight. It involves keeping it pinned down with infinite summons. Pallegina summons her Ogres every four Chanter Phrases. Mirke activates Enduring Dance. As long as she keeps her distance and avoids taking any damage, that ensures she can keep Dichotomous Souls on Dorudugan non-stop. Alliria casts Concelhaut's Draining Touch. She then summons a Phantom followed by Blood Sacrifice. She summons a new one whenever the previous one dies or expires.
It is important to keep these characters distant but close enough so that their summons can see Dorudugan upon arrival. Otherwise at least the Dichotomous Souls and the Phantom won't move on Dorudugan if they can't even see him within their range of vision.
Xoti appears on the opposite side of Dorudugan from the other three characters. She also slays closer to the Hellfire Colossus. Also, she doesn't summon Dichotomous Souls constantly. She holds that in reserve for a very specific situation.
What she does instead is fire away at Dorudugan with Kitchen Stove. The good party has very little hope of reducing Dorudugan's Health to zero through regular attacks. And that's especially true when it uses its fire-based powers.
The linchpin of the strategy is for Xoti to build up enough Resonance on it with Kitchen Stove. It's a very involved process. But one benefit of it is that Dorudugan's Health never dips below 75%, so it never gets the chance to use its Helstorm or Magnetic Overdrive powers. And the long-term goal is to unleash Resonance once she's built up enough of it on the Hellfire Colossus. Unleashing it after enough accumulation will insta-kill it, giving it no chance to replenish its Health with its fire-based powers.
Kitchen Stove is probably the best weapon in the game for purposes of building up Resonance for a single-class Monk, as it fires 6 bullets each attack, and has a reduced Reloading Time. The Reloading Time is reduced even further with Acina's Tricorn.
Every once in a while it will unleash a Hellfire Barrage. It will always aim it at the other trio of characters as long as they're within Dorudugan's view. Once the Barrage starts to drop, the trio run (even abandoning a summoning action if they have to) straightaway for the very north edge of the Wasteland to avoid any damage from the fire bombs. They bring themselves back closer to renew their summons, but only after the fire bombs have already exploded.
However, the Hellfire Barrage always has the potential to completely obliterate any summons presently attacking it. It is only in this situation that Xoti summons Dichotomous Souls, and behind Dorudugan so that they're not at risk from the Hellfire Barrage. It is by this method that I keep the Hellfire Colossus pinned down even following its use of Hellfire Barrages.
Of course, Xoti will need to build her Wounds back up after the summons. She alternates between Mortification of the Soul and firing another volley. Xoti uses this method instead of Enduring Dance, as she's at greater risk of getting Hit and taking damage compared to Mirke.
There is always a risk, either by an occasional lapse of attention on my part or because Dorudugan manages to wipe out all the summons on him in an instant, that Xoti will wind up exposed against the oncoming Hellfire Colossus. She manages to keep herself on the run while her comrades bail her out with fresh summons. That's the point of having Alliria equip Grog as a Pet. Xoti can run away from the Hellfire Colossus without any worry about highly punishing Disengagement Attacks.
It's a very lengthy and repetitive process that took over two hours to execute. But once I'm ready, I waited until I had piled up 1,024 Resonance on Dorudugan, that's when Xoti unleashes Resonant Touch and kills it instantly.
It leaves behind a Mythical Adra Stone and the Helfire Ironclad's Core. I have no use for the Trinket, but Alliria uses the Mythical Adra Stone to raise Modwyr from Legendary to Mythic.
I return to the ship, and now add Fassina to the party.
*Evil* Dorudugan
It may be challenging to get it off the ground, but I'm set once I can get the Salvation of Time loop set up, with Barring Death's Door on every party member. Zarathos quaffs a Potion of Ascension.
I also have Ydwin put Reaping Knives on Mirke, Tekehu and Xoti. That means they'll be scoring Raw Damage on Dorudugan without the need for Penetration. Ydwin puts Driving Echoes on Zarathos, since the Power Levels boost and high-Penetration means his Monk Fists are powerful enough to score hefty damage on Dorudugan in their own right.
It also turns out that Dorudugan's fire-based healing isn't anything to worry about. Once Ydwin takes the first hit from one of his explosions, Skaen's Hatred from the Effigy's Husk that she's wearing will kick in, and suppress the healing of the rest of his fire explosions. It's only a matter of time before he goes down.
I use the Mythical Adra Stone to raise the Watershaper's Focus from Legendary to Mythic.
It is now time to take on Hauani O Whe.