-

- Forums
- Chatrooms
- Gallery
- Gameplay Videos
- Upload
- Articles
- Mod Reviews
- Shop SP: Games, Movies, Books
|
|
| Pillars of Eternity 2 Video-Based Walkthrough by David Milward |
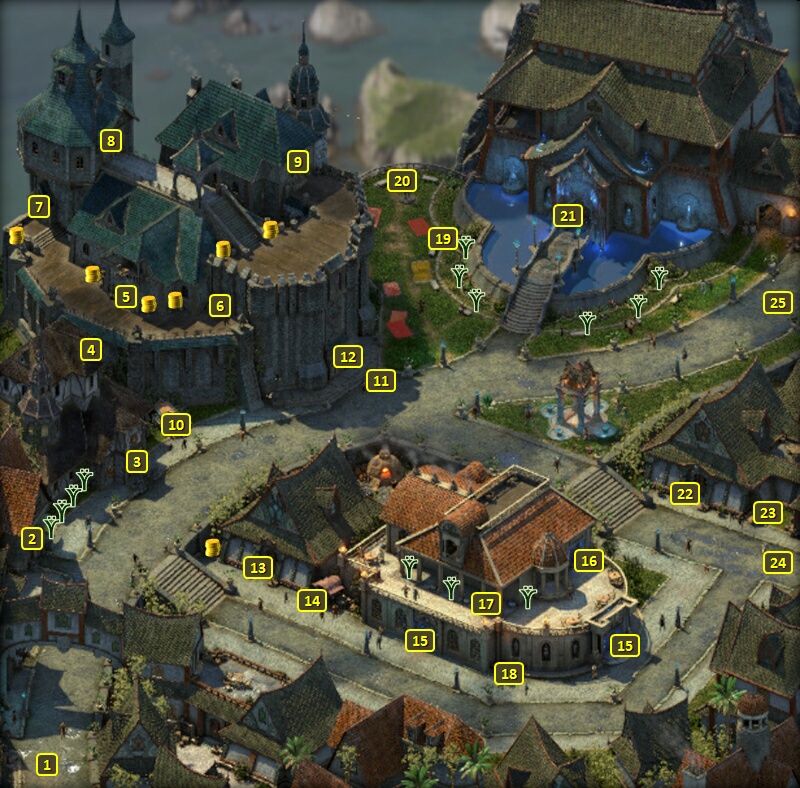
Neketaka
For the Republics!
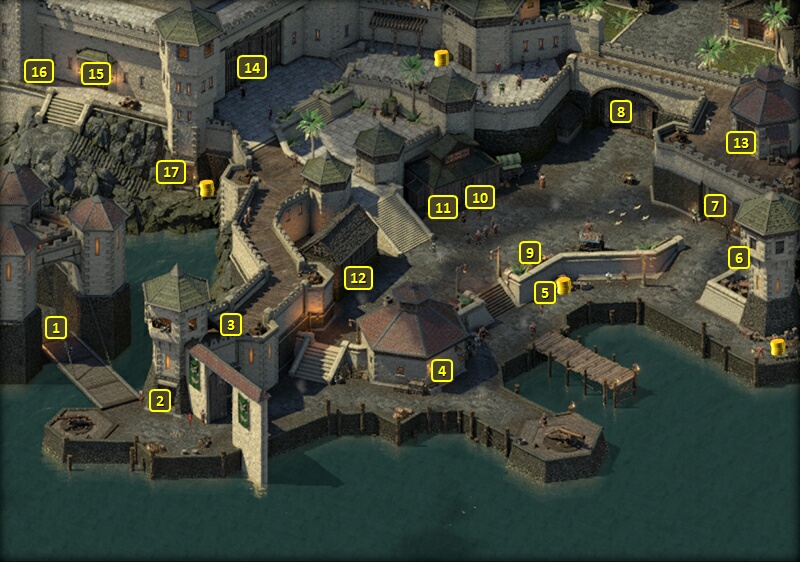
I am now at #24 on the map of Queen's Berth. I go through the door at #28 to enter the main floor of the Vailian Trading Company Headquarters.
That brings me to the door at #1. I speak to Lueva Alvari at #6, which means 3,500+xp and completion of the Quest called For the Republics!
She also assigns me the job of finding an expedition sent to Tikawara, which starts both the Terms of Trade and The Storms of Poko Kohara Quests. Alliria makes a combined Intellect check of 15 and a Diplomacy check of 4 to get an extra 1,000cp from Alvari, which also earns a little Clever disposition.
I thereafter leave out the door and go to the exit at #33 on the map of Queen's Berth.
Sky Dragon Wurm
First I travel to Serpent's Crown, and buy gems from Una at #3. I hit the exit at #1 and travel directly to The Dark Cupboard.
I buy crafting ingredients from the Imp at #2.
After that, I use the Critter Cleaver at #6 to create a new Pet that has the 'skin' or appearance of the Sky Dragon Wurm while keeping the +1 Fire Power Levels and +5% Damage from area-of-effect spells of Otto Starcat. I name it Icarasaracht, and leave out the door at #1.
That brings me to the door at #3 on the map of Periki's Overlook. I buy more crafting ingredients from Cuitztli's at #2, and then head for the exit at #1.
The Brass Empire
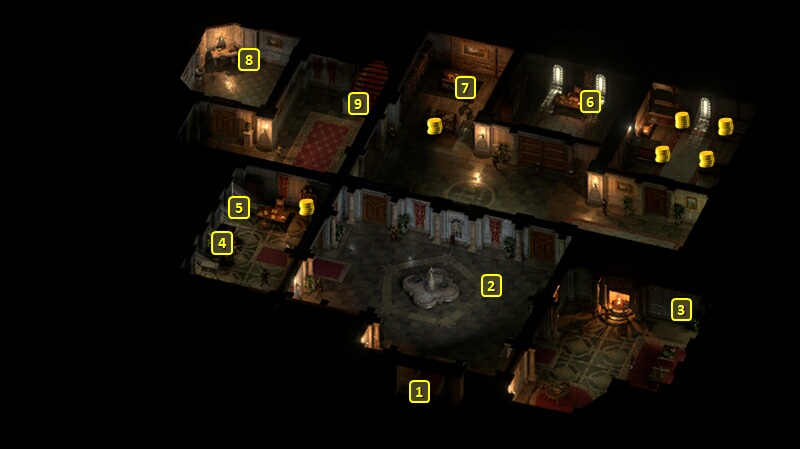
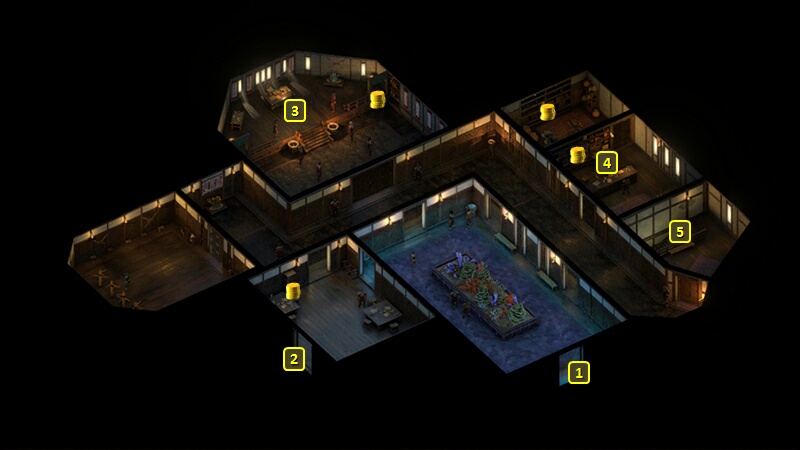
I go through the door at #14 to enter the Imperial Compound.
That brings me to #1 on the map of the main floor of the Imperial Compound. I speak to Hazanui Kanui at #3, which completes The Brass Empire Quest.
She bids me to speak to somebody named Atsura. So now I go down the stairs at #5.
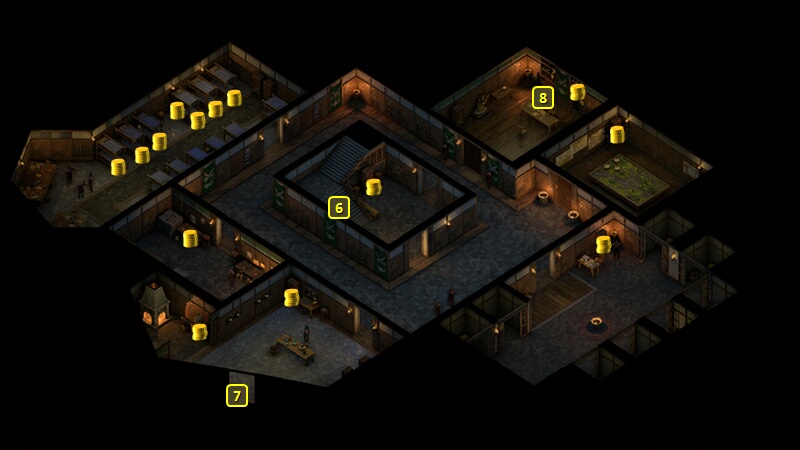
That brings me to #6 on the map of the lower floor. I speak to Atsura at #8, which starts the Dim Prospects Quest. I thereafter leave the Compound.
Emeini
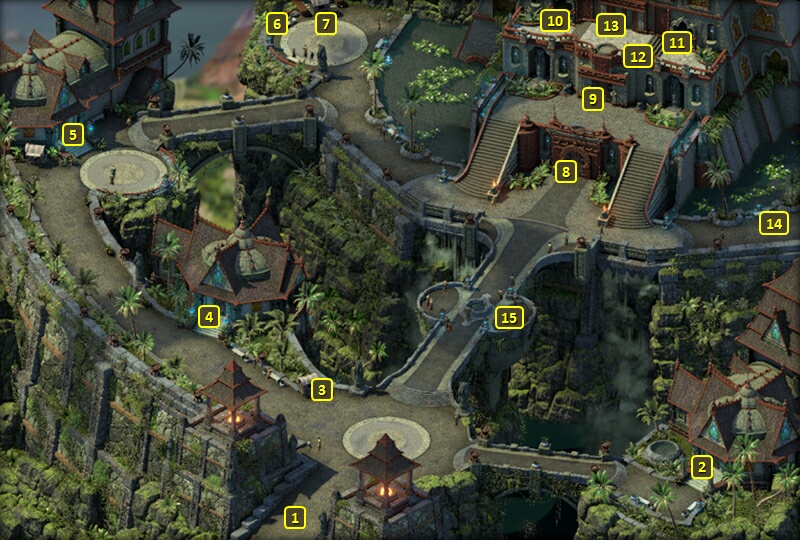
I am now at the door at #14 on the map of the Brass Citadel. It is at this point, now that the good party has at least 3 points of positive reputation with Neketaka, that they are able to recruit Emeini at #11 as a spare Crew Member.
Bounty on Radulf
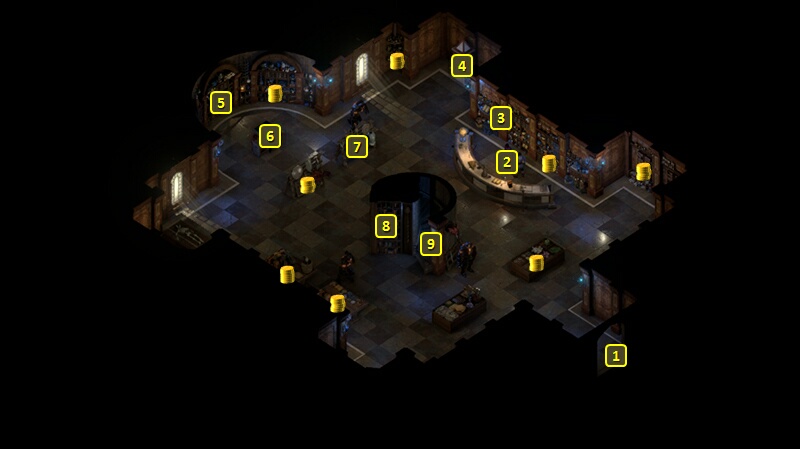
Now I enter the Fleet Master's Office through the door at #10.
I have Alliria and Konstanten each consume a Thief's Putty. That gives Alliria just enough points in Mechanics with an assistance bonus to pick the lock on the door to the right of Fleet Master Wakoyo.
I speak to Wakoyo and collect 3,900+ xp, 2,500cp and a moderate gain of reputation with the Royal Deadfire Company as rewards for the Bounty on Radulf. I then accept the Bounty on Burunga.
That and the little bit of xp I got for picking the door means Aloth now gains two abilities on his 10th level-up. One of them is Vigorous Defense, which will improve all of his Defenses by +20. It will be one of a multitude of buffs that he starts each fight with, and which will help him get the most out of Wizard's Double and Ironskin. It can also be extended by a Wall of Draining when he gets that.
He also gets Pull of Eora. It creates an orb that both slows down the Stride of any creature within its radius, and will also Pull any creature within its radius towards it. It's a crowd-control spell that he can use in addition to Grease. I get it on level-up because it won't be available through any of the Grimoires that I have him use.
I leave and make towards the exit at #8 on the map of the Brass Citadel. I put my core party back together. Eder now takes Weapon Specialization on his 10th level-up. It will add +10% Damage with his Dagger, which he is by now Proficient with.
I thereafter return to my ship.
*Evil* The Brass Empire
The evil party does this part after collecting on the Bounty on Radulf.
I approach the east exit of the Brass Citadel after my conversations with Hazanui Karu and Atsura. I bring in Eder. I upgrade Amra with Wanton Gore. I might have preferred Riven Gore, as its area-of-effect burst will outright kill enemies with 50 Health or less, and that scenario would be frequent during ship battles. But I decided I didn't want to wait for the Reptilian Blood that I would have needed, and I wanted him to get going with his area-of-effect burst attacks.
I also upgraded to Unstable Temper. Reducing the deflection penalty with Tempered Fury is usually meaningless for two-handed weapon characters, and certainly is for this build. And Eder will himself get hit plenty, so taking Unstable Temper means increasing his odds of triggering the Frenzy from Amra.
I upgrade Aloth's Leather Armor with Elementally Stable and Structurally Stable. I reasoned that Wizard spell attacks would be too infrequent during ship battles to justify Known Causality. I also upgrade its enhancement level to Exceptional.
*NOTE* I do not do any Superb enhancements, because I expect particular crafting ingredients (i.e., Sea Dragon Scales) will come my way.
Mirke gets two abilities on her 10th level-up. One of them is Vigorous Defense. It increases all Defenses by +20 for 15 sec. It will be one of those staple buffs she uses every battle, and will get extended endlessly by Salvation of Time.
Xoti gets three abilities on her 10th level-up. She automatically gets Circle of Protection. I don't use it though, as it's redundant and inferior to Tekehu's Moonwell.
She takes Duality of Mortal Presence, and activates the mode that increases Intellect by +1 for each Wound she has. The fundamental point in this instance is to increase as much as possible the area-of-effect of her buffs, especially Salvation of Time when she gets it. It will increase the initial duration of buffs she personally casts. And in the instance of buffs like Blade Turning and Swift Flurry that have short default durations, that has the additional point of maximizing their durations and in turn maximizing their chances of getting included in the endless extension of all buffs through endless castings of Salvation of Time.
She also takes Devotions for the Faithful. It buffs party members' Might by +4 and Accuracy by +10, while inflicting equivalent penalties on enemies within the area-of-effect. I cast it at moments where I can have its area-of-effect apply to both the party and as many enemies as possible. The buff may benefit some party members, while not stacking with other buffs that party members are already using. But it's also the chance to inflict hefty penalties on numerous enemies that still make casting the spell worth it when the occasion arises.
*Evil* Griffin's Blade
I switch out Ydwin for Serafen, and attempt to return to the ship. The evil party now runs into the Grubs and Skuldraks. I choose the Shady option that uses Kusi as bait so I can sneak up on them, which condemns her to death.
I sneak up on them as they gang up and kill her. I start the fight by having Tekehu put a Chill Fog over them. He follows up by summoning an Ondra's Whip, and then hitting the monsters with Nature's Mark. The rest of the party forms a partial ring around him, and hacks away at the monsters until they're dead.
Serafen gets the Griffin's Blade as an interim weapon. I give it the Hound's Resilience enchantment on the reasoning that Serafen is going to get hit and hit a lot during ship battles.
*Evil* Battered Dog Figurine
It is now that the evil party gets the Battered Dog Figurine fight. I switch out Tekehu and Serafen for Konstanten (for his passive healing from Ancient Memory) and Rekke. I slide Mirke over as the fifth party member, so that the enemies on the right side of the battle will come after her and she can tank them.
The approach here is for the party to gang up on the enemy glass cannons one at a time, like the Chanter and the Brawler and the Pistoleer and Dionne, while Mirke keeps some of them pinned down.
Xoti casts Devotions of the Faithful when she can catch everyone, friend and foe alike, with it. She also makes frequent use of Restore to keep the party up on their feet and fighting. Konstanten uses his Offensive Invocations when I can. I eventually manage to outlast the enemies, and pick up the Battered Dog Figurine.
I switch out Konstanten and Rekke for Tekehu and Maia.