-

- Forums
- Chatrooms
- Gallery
- Gameplay Videos
- Upload
- Articles
- Mod Reviews
- Shop SP: Games, Movies, Books
|
|
| Pillars of Eternity 2 Video-Based Walkthrough by David Milward |
Engwithan Waystation, Level 2
Poko Kohara Expedition Log
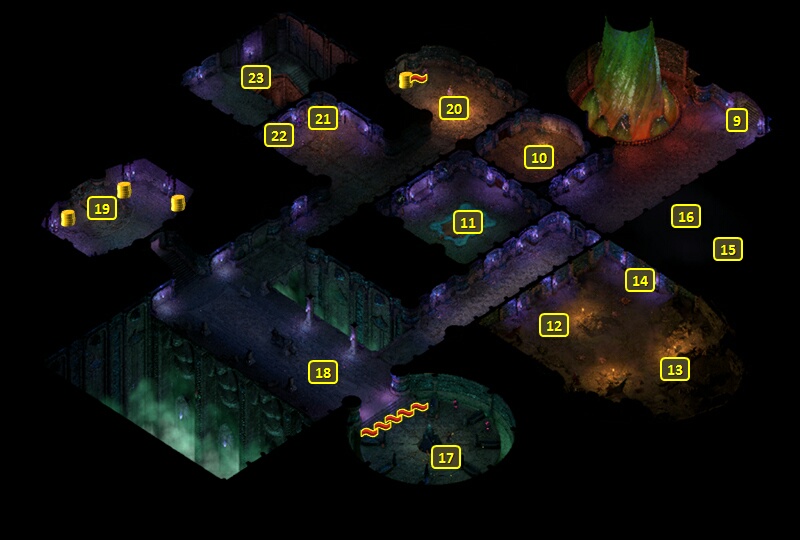
I start off at #9 on the map of the second level of the Engwithan Waystation. I go to #10, where Alliria has another vision of the doomed expedition. She also finds and reads the Poko Kohara Expedition Log.
I "Wait" until evening. The next set of foes will have high Armor Rating against Burning Damage, but low Armor Rating against Freezing Damage. That fight is at #11, and consists of a pair of Greater Black Oozes and several Desert Imps. It consists of Alliria blasting as many enemies as she can with the cycle of Ninagauth's Shadowflame followed by Blood Sacrifice, while the other party members go work on those enemies outside the spell blast.
Marux Amanth
I go a little east and through the door. Aloth switches to Jernaugh's Careful Calamities.
There will be a large number of Desert Spiders, Desert Spiderlings and a few Flame Blights at #12. I stay behind the door and let them try to come to me through the bottleneck.
They can use webs that Paralyze, so Pallegina uses Shatter Their Shackles to start, and uses it whenever she's back to three Phrases.
Aloth and Eder hold the door. Aloth starts with Infuse with Vital Essence, then Grease just on the other side of the door, and then Pull of Eora. He uses another Grease when the first one expires.
The Blights and Desert Spiders are immune to Burning Damage, but have low Armor Rating against Freezing Damage. So Alliria starts with Infuse with Vital Essence, and then cranks out the cycle of Ninagauth's Shadowflame followed by Blood Sacrifice. It is also Evening when I'm doing this, so I get the +2 Frost Power Levels from Sun and Moon.
Mirke is firing away with her guns. Victory follows as a matter of course.
There will be a few gunpowder barrels at #14. Mirke hits them with her guns to trigger an explosion, revealing a door.
A sarcophagus at #15 has a Soubound Dagger called Marux Amanth. Pallegina binds it to her soul and uses it for the rest of the game. The Parrying Blade Modal of course allows her to add her own +10 active bonus to Deflection. Scoring a Hit with the weapon has a 10% chance of unleashing a Burning Damage attack called Corona of the Soul that harms only enemies in a small radius. One of the upgrades for Paladins will enhance Corona of the Soul so that it also provides Strong (+5 Might) and Smart (+5 Intellect) for the Paladin. The +5 Might will enhance her healing powers even more. The +5 Intellect will enhance the radius of her healing auras, and the duration of any buffs she provides like Shatter Their Shackles or Rejoice My Comrades!
I hit a lever at #16, which opens a door leading west. But I prefer to go back the way I came, as my next fights will be towards the southeast corner.
*Evil* Marux Amanth
The evil party conducts the battle in a similar fashion, keeping the door held as a bottleneck. Tekehu applies a lot of the firepower with spells like Chill Fog, Blizzard and The Skies Opened and Vengeance Rained Down. Ydwin chips in too with Silent Scream.
Ydwin gets two abilities on her 11th level-up. One is Amplified Wave. This becomes her weapon of choice when faced with numerous hordes of enemies. It inflicts Crushing Damage and knocks enemies Prone in a very wide area-of effect.
The other is Disintegration, which is arguably the most powerful single-target spell in the game. It inflicts hefty Raw Damage over time to the single target that tends to outpace any Healing it can receive, and will kill it outright if its Health is reduced to zero.
Xoti gets Marux Amanth as part of a secondary weapon set for her in the evil party. The appeal of this Dagger for a Priest is that any spell cast by the Priest has a 10% chance of casting twice over. That can mean Restore doing double-healing, or an offensive spell hitting its targets twice, and so on. In fact, Marux Amanth and Tuotilo's Palm together become her primary weapon set for now, at least until she gets Salvation of Time.
Marux Amanth - Sacrifice
The first upgrade for Marux Amanth requires that Pallegina score 250 points of Burning Damage. It doesn't have to be from Corona of the Soul. It only requires that Pallegina in any way inflict 250 points of Burning Damage on her enemies.
Alliria lends her Firethrower's Gloves and Ring of Focused Flame to Pallegina for this occasion.
I also craft a Scroll of Torrent of Flame. The scroll itself requires 7 ranks in Arcana to equip in a quick-item slot. Pallegina's 6 ranks in Arcane, as well as the +1 bonus to Arcana from the Firethrower's Gloves, allow her to do that. I also craft three Scrolls of Fan of Flames to go with the two I already have. Pallegina also equips five Cinder Bombs that I have on hand.
I go southwest to #18. I get swamped by a massive horde of skeletal undead. I wait until the horde gathers around the front line of the party. Pallegina carefully positions herself so that she unleashes her Scroll of Torrent of Flame to catch as many undead as possible, but without hitting any of her comrades. She then braves a Disengagement Attack or two to position herself alongside the front line. I check her upgrade progress. She has almost but not quite the 250 points of Burning Damage she needs. She therefore uses a Scroll of Fan of Flames to catch as many undead as she can. That gets me past the threshold.
It is afterwards that the party proceeds to bring down the undead with their usual methods. Several undead have gathered around Alliria. So she keeps herself protected with Arcane Veil followed by Blood Sacrifice whenever possible. She also unleashes Fireball followed by Blood Sacrifice every chance she gets.
The first upgrade is Sacrifice, which is a once per Rest Full Attack that can instantly destroy its target.
*Evil* Marux Amanth - Sacrifice
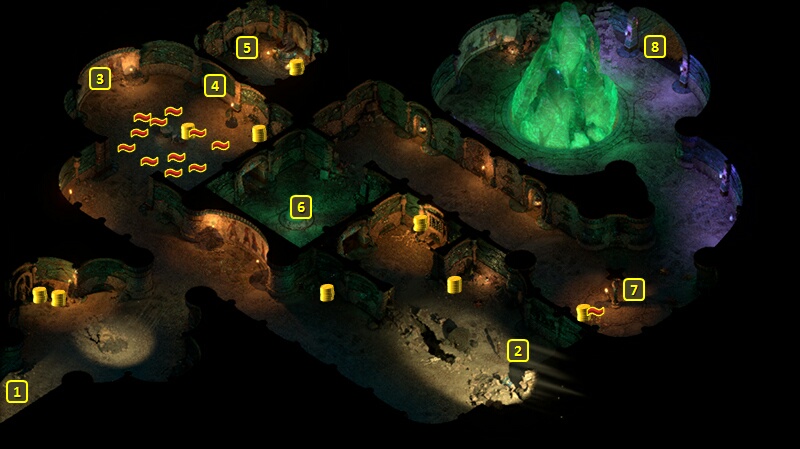
Xoti obtains the Sacrifice upgrade in a similar fashion. The evil party also temporarily returns to the surface with a specific purpose in mind, but without fighting the Engwithan Saints just yet. They begin by going up the stairs at #9 to return to the first level.
That brings them to the stairs at #8 on the map of the first level. I go out the door at #1.
*Evil* Echoes of Faith
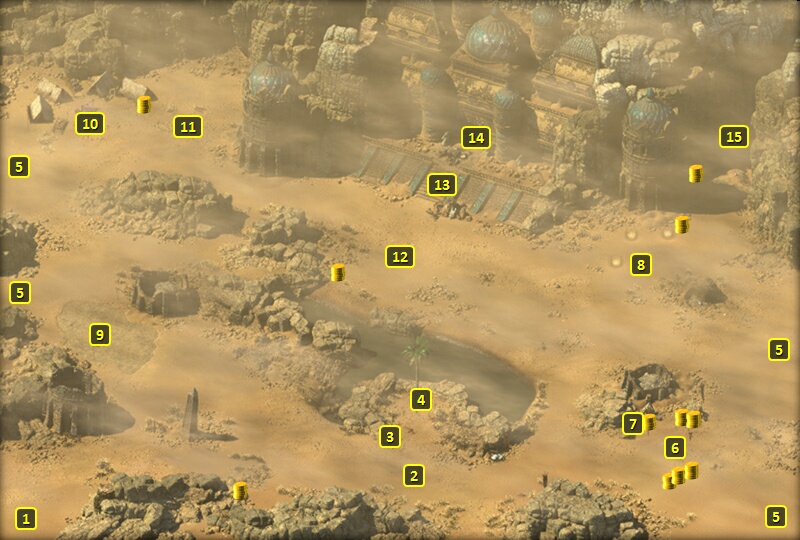
And that brings me to #14 on the map of the Poko Kohara Ruins. Now I attack the Scarab Beetles and Sand Blights at #8. I let Xoti attack the Sand Blights (which are classified as Spirits) until she has scored 250 points of Damage on Spirits, and thereby fulfills the requirements for the second upgrade for the Marux Amanth. And for a Priest, that upgrade is Echoes of Faith. Any Priest spell that is cast while the Dagger is equipped has a 10% chance of casting twice over.
*Evil* Worthy Sacrifice
Now I start by having Xoti equip Marux Amanth alongside Xoti's Lantern instead of Tuotilo's Palm. The reason is a simple one, at least for the next battle. The next upgrade is to kill 10 enemies, and the killing blows have to come from Marux Amanth itself. Xoti's Lantern as a bashing shield can take away those killing shots that I want for the upgrade.
Now I fight the Sand Blights and Grubs at #9. I make a point of reducing an enemy to near death, moving my party on to the next enemy, and letting Xoti land the killing blow with Marux Amanth. I have to use plenty of healing to conduct the battle this way, but I want to get the upgrade done and out of the way.
The upgrade is that the enhancement of Marux Amanth gets improved from Exceptional to Superb, and Sacrifice gets improved to Worthy Sacrifice. Worthy Sacrifice means that successfully killing a near death target with the instant death attack also restores +2 class resources.
I thereafter put Marux Amanth back together with Tuotilo's Palm and return to the second level of the Engwithan Waystation.
Soul Feeding
I have Mirke disarm the line of traps to the southeast. There will be a pair of Engwithan Saints, who can cast spells, to the southeast. They will awaken a few Adra Animats.
I lead the Animats out of the room and kill them off. One of the Saints died in the meantime.
Now I have Pallegina attack the remaining Saint by herself. The point is for her to get 250 points of Damage against Vessels (which the Saint is) for her next upgrade. Once I confirm she's crossed that threshold, I have the rest of the party gang up on the Saint and finish it off.
The second upgrade for Marux Amanth, for Paladin wielders, is Soul Freeing. Triggering Corona of the Soul will now provide the Paladin with Smart (+5 Intellect) and Strong (+5 Might) for 30 sec.
A corpse in the room has a Sigil of Nightmares Wardstone.
Xakoras
I travel to #19, which is the resting place of an Engwithan Saint named Xakoras.
I lead his Luminous Revenants out of the room. I gang up on them, but stop short of killing them outright each time. I instead allow Pallegina to give each one the finishing blow. The last upgrade requires landing a killing blow on 10 enemies with Marux Amanth.
I go back, and this time he summons a Risen Armsman and a few Skeletons. I lead them out of the room and let Pallegina rack up the killing blows.
I repeat the process when he summons a pair of Adra Animats.
Now I gang up on Xakoras himself, but let Pallegina score the killing blow. She has 9 out of 10 killing blows she needs for the last upgrade.
Pallegina takes Bull's Will on her 11th level-up. The +10 to Will stacks with bonuses to Defenses vs. Resolve Afflictions with Divine Purpose. And that's important so that she can use Rejoice My Comrades when faced with monsters capable of Resolve Afflictions.
Worthy Sacrifice
I go northeast and approach the room at #20. There will be Adra Animats and Adra Oozes led by a Menpwgra. I go into Stealth mode, which allows me to get close to the Menpwgra and attack her right away. I otherwise wear everything down with the usual methods.
I allow Pallegina to finish off the last two remaining Adra Oozes herself. That allows her to obtain the last upgrade for Marux Amanth, Worthy Sacrifice. It upgrades Sacrifice so that the killing attack also recoups +2 class resources for the wielder. The dagger itself also gets upgraded from Exceptional to Superb.
Engwithan Sigil of Nightmares
There are a few undead near a Sigil of Nightmares at #21. I defeat the undead easily, and then destroy the sigil.
I unlock the door at #22, and then go down the stairs at #23 to enter the third level of the Engwithan Waystation.