-

- Forums
- Chatrooms
- Gallery
- Gameplay Videos
- Upload
- Articles
- Mod Reviews
- Shop SP: Games, Movies, Books
|
|
| Pillars of Eternity 2 Video-Based Walkthrough by David Milward |
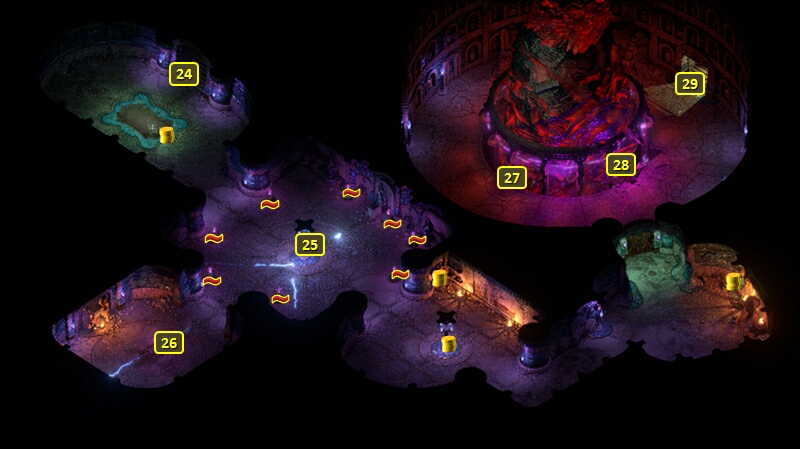
Engwithan Waystation, Level 3
Beza
I am now at #24 on the map of the third level of the Engwithan Waystation.
There is a machine at #25 that shoots bolts of lightning towards its surrounding Battery Essences. The bolts themselves can cause the System Shock Injury (-2 Perception, -3 Shocking Armor Rating). I send Mirke to use her guns to destroy the Battery Essences from a safe distance and permanently remove any danger.
The corpse of the leader of the ill-fated Vailian Expedition, Beza, is at #26. Alliria uses her Watcher powers to see Beza's last memories.
Searching the corpse leads to obtaining Beza's Pages and Ngati's Idol, both of which may be of interest to certain individuals in Tikawara.
I also grab Beza's Toothed Blade from under Beza's body. I'll have Serafen use it as an interim weapon. Its chief utility is that it can ignore Arcane Veil and other Veil-based bonuses to Deflection. I add the Rending Cut enchantment (-2 Armor Rating on Critical Hit for 10 sec) instead of First Blood, simply because I have plenty of the ingredients for Rending Cut compared to First Blood.
I also get a Ruby from a nearby container. Alliria adds the Golden Sun enchantment (25% of Burning Damage from weapon regenerates Health) to her Sun and Moon Flail. Every little bit of Health she can recover for herself as a Blood Mage helps.
Anaharu
Now I go to the room to the east. I click on the panel at #27 to open a portal at #28. The portal itself leads to the Adra Realm.
The Adra Realm itself is a small space where the only purposes are to encounter several spirits trapped inside the Adra Pillar, and then make a decision about the Pillar itself.
I step forward a little and encounter Huana spirits led by the former Priest of Tikawara, Anaharu, and spirits of the Vailian Trading Company expedition led by Beza. Anahara will speak first, and proclaim that he's deliberately causing the storms by blocking the flow of souls through the Adra Pillars. It's easier to keep him hostile to you then on your side, even without Aggressive dialogue options that pick a fight with him. There will be an opportunity to ask him about the Pillar itself, which includes an opportunity to relive his soul memories of his unsuccessful challenge against Ranga Ruanu's authority.
Getting him and the other Huana spirits to depart peacefully requires a specific dialogue sequence that begins with asking him if he really thinks causing the storms will actually save Tikawara, then asking why not let the Huana of Tikawara defend themselves, and then promising to destroy the Adra Pillar. Anaharu will leave the party, but then Beza and the other spirits of the expedition will attack you. I don't go down that road, because doing so will lose reputation with Pallegina. Note that the other options besides asking why he can't let Tikawara defend itself when that option actually does appear are likely to get all of the spirits, the Vailian ones included, attacking you.
I spend some time with Benevolent or Honest options that neither promise to destroy the Pillar, but also avoid angering him into attacking outright (which is otherwise very easy to do). Beza at some point cuts in. She'll express an interest in having the souls of the expedition join with the bodies outside the pillar. Playing on her hopes that it's possible will only end up provoking all of the spirits into attacking you. Alliria is honest with her, and makes a Metaphysics check of 4 to tell her that it isn't possible, which will convince her.
Anaharu and the other Huana spirits will attack, but I have little trouble outlasting them.
It now becomes a decision of what to do with the Adra Pillar for purposes of The Storms of Poko Kohara Quest. Alliria decides to restore the pillar to its luminosity.
I am returned to the third level of the Engwithan Waystation. The door at #29 leads to #15 on the map of the Poko Kohara Ruins.
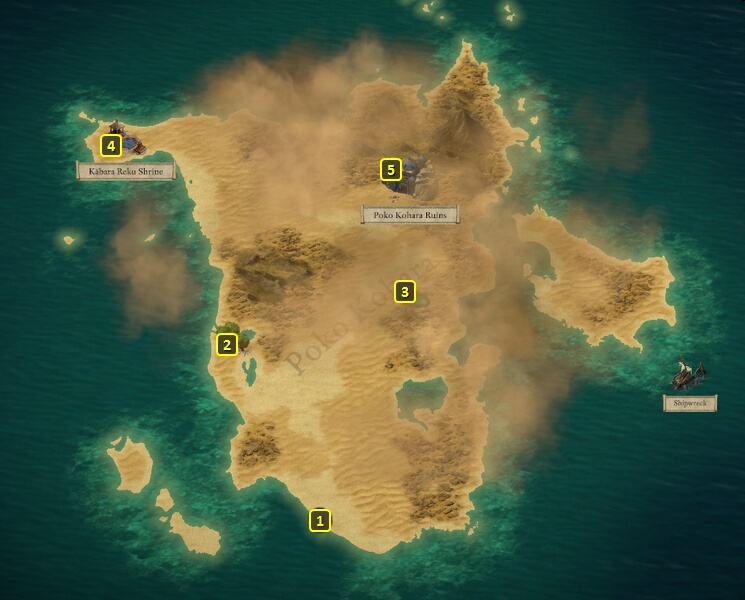
I leave through the exit at #5 on the east edge of the map.
That brings me to #5 on the map of the Poko Kohara Island. I return to my ship at #1.
*Evil* Anaharu
The battle is more challenging for the evil party, partly because I plan on taking on both groups of spirits and partly because the evil party doesn't have the same capacity for self-regeneration that the evil party does. I craft five Scrolls of Wilting Wind for Xoti beforehand. I also have Tekehu equip Bombs he may have in his quick-item slots.
I then step through the portal to the Adra Realm. I gather the party at a bottleneck so that Zarathos, Mirke and Xoti will form a solid line to block off the bottleneck. Tekehu and Ydwin are kept safely behind the line.
Zarathos goes on ahead. He chooses Aggressive replies whenever possible, and ultimately ends up provoking both Anaharu and Beza into attacking. He regroups with the party.
Mirke holds part of the line, and activates Vigorous Defense.
Ydwin attacks with her Rod, and unleashes an Amplified Wave centered on Mirke whenever she has at least 60 Focus.
Tekehu buffs the party with Nature's Balm and Moonwell. He follows up with a Nature's Mark on as many enemies as he can include, as well as a Chill Fog spell. He then either uses a Stun Bomb on a cluster of enemies, or The Skies Opened and Vengeance Rained Down invocation.
Xoti buffs the party with Holy Meditation, and then uses Devotions of the Faithful on as many allies and enemies as she can include. She then starts to bombard the enemies with her Scrolls of Wilting Wind. I soon reduce the enemies to one or two, whereupon I just gang up on them and finish them off.
Zarathos then decides to destroy the Adra Pillar, and returns to his ship.
Storms of Poko Kohara
I sail and run down a Royal Deadfire Company Master Captain. This one has five Royal Bronzers on both sides. It sails closer to me, and comes within 253m, so I grab the opportunity to turn starboard and point my Vailian Hullbreakers at it.
I trade volleys with it a couple of times. But at one point I take out 3 Below-Deck Crew Members during a volley. I was going to sink it, but now I decide to whittle down their Above-Deck Crew with a couple volleys of Grapeshot and then board it for an easy win.
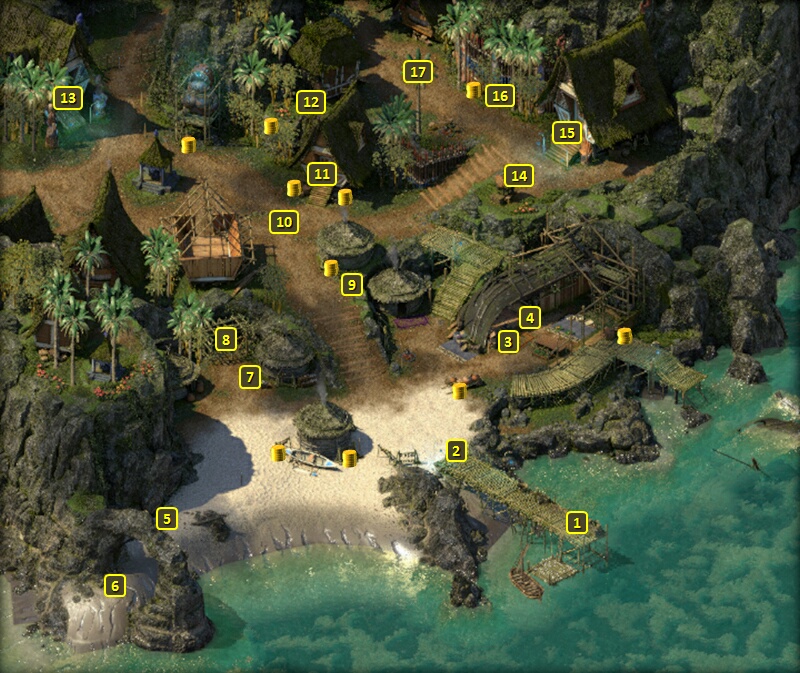
I go west and board a Vailian Expert Captain. Now I head south and dock at Tikawara.
That brings me to #1 on the map of Tikawara. I switch out Mirke and Pallegina for Xoti and Serafen. Serafen equips Beza's Toothed Blade.
Xoti acquires two abilities on her 11th level-up. One of them is Turning Wheel. It upgrades the Intellect modal of Duality of Mortal Presence so that her attacks will inflict an additional +2% Burning Damage for each Wound that she has at the moment of Attack.
She also takes Improved Critical. It improves the Damage scored by Critical Hits by 10%. It's a logical choice for any warrior, but especially for a Monk who has several abilities that are more fully realized on scoring Critical Hits.
I go northwest a bit and am greeted by a large gathering of the locals. Ranga Ruanu is pleased with Alliria for restoring the Adra Pillar, which facilitates trade with the Vailian Trading Company. He also rewards her with an Exceptional Spear.
I speak to him again in his hut at #15, and give him Beza's Pages for a major gain in reputation with Tikawara. I would have lost reputation with Pallegina had she been in the party. He'll insist on keeping Beza's Pages. Only a Shady dialogue option can get them back, so I leave it at that and return to the ship.
*Evil* Storms of Poko Kohara
I sail north and zero in on a Royal Deadfire Company Master Captain. This one has five Royal Bronzers on both sides. I jibe and put myself at 500+m. I have to absorb an initial volley. But soon I get the enemy ship locked down. It won't fire as long as I'm both going Full Sail and beyond the range of its Royal Bronzers. It will only fire if I stop to Hold Position. But I never do. I just go three Full Sails, and then fire Cannonballs to wear it down, rinse and repeat.
I was originally going to sink it. But Vanizzi at some point manages to get in a Raking Shot with Haeferic's Nose that takes out four enemy Below-Deck Crew Members with one blow. I switch strategies after that. I start using Grapeshot to reduce the Above-Deck Crew Members too. And I noticed that they don't have a Surgeon in place. Once I've got the enemy crew reduced to a handful, that's when I close in for an easy boarding battle.
I head south towards Tikawara and board a Huana Expert Captain. I board Tikawara and refill my Ship Supplies.
I switch out at least Xoti. The Ranga is really upset with Zarathos for destroying the Adra Pillar, but now he can indulge in the Shady and Cruel replies with Xoti out of the party for the moment.
I then go see Nairi in her Shrine at #13 on the map of Tikawara. She gives me 1,000cp for destroying the Adra Pillar. I also give her Beza's Pages and get two Potions of Moderate Healing and two Potions of the Resilient Body when I insist on a reward. I thereafter reassemble my core party and return to the ship.
It is now time to Return to Neketaka.