-

- Forums
- Chatrooms
- Gallery
- Gameplay Videos
- Upload
- Articles
- Mod Reviews
- Shop SP: Games, Movies, Books
|
|
| Pillars of Eternity 2 Video-Based Walkthrough by David Milward |
Poko Kohara
*Evil* Poko Kohara Island
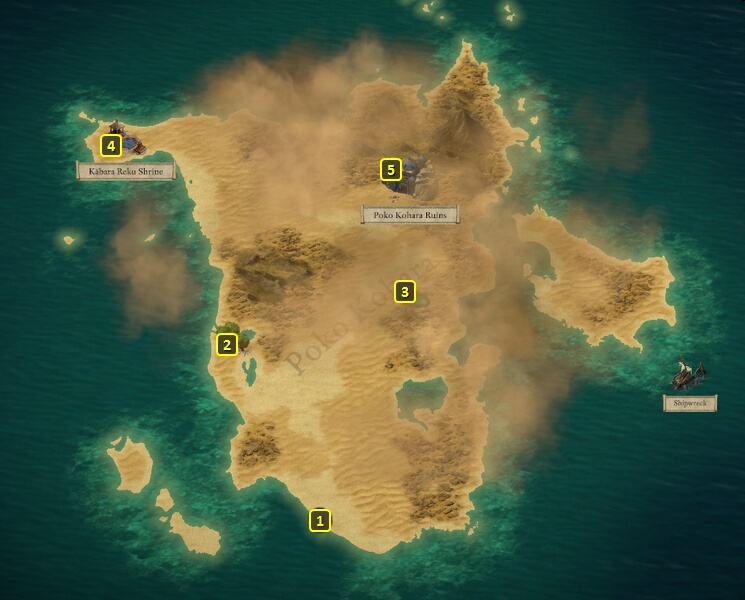
I start off at #1 on the map of Poko Kohara Island. I grab the Fresh Fruit from the grove at #2.
But I ignore the Kabara Reku Shrine at #4. I can't get its +2 Resolve bonus without triggering a rest.
I journey on to the Poko Kohara Ruins at #5. Xoti takes Enduring Dance on her 11th level-up. It now makes Dance of Death a real option, as now three attacks have to get through her high Defenses to end her Dance when she uses it. And it means limitless and passive replenishment of Wounds when she does use it.
I also upgrade Xoti's Sickle to Superb, and her Tuotilo's Palm to Legendary, now that I've raised some cash.
Desert Wurm Hatchling
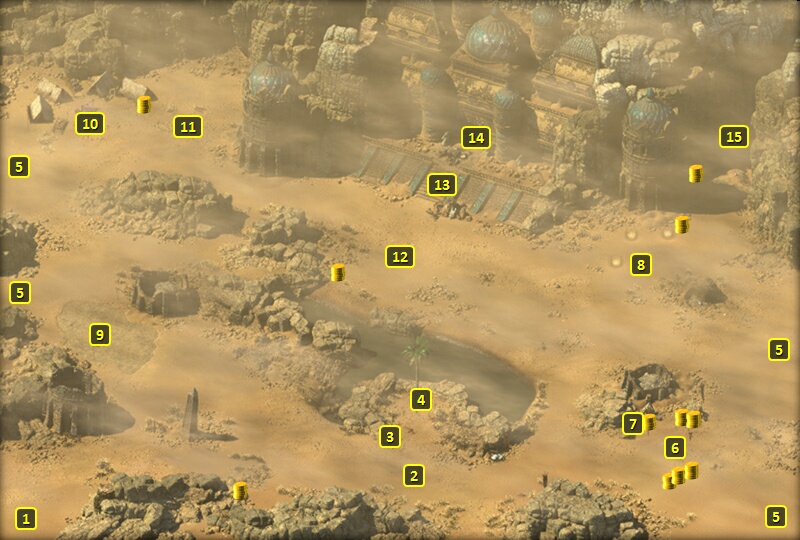
I start off at #1 on the map of the Poko Kohara Ruins. I "Wait" until evening, as most of the foes here will have weaker Freezing Armor Rating than Burning Armor Rating. Aloth switches to Jernaugh's Careful Calamities.
There are several Delemgans and Desert Wurms at #2, led by a pair of Drakes. There's also a nook south of #2 that can only be approached from the northeast. I pack the party in there, with Mirke tucked in behind the rest of the party who form a shield wall. Pallegina is at the left end of that wall.
I send Eder ahead to get their attention and lead them back. Alliria begins with Infuse with Vital Essence followed by Blood Sacrifice, while Aloth begins with Infuse with Vital Essence.
Pallegina uses Rejoice My Comrades on the party. It immunizes the party against being Terrified by the Drakes. And she'll use it again whenever she's back to 4 Phrases. Its healing effects are also welcome when she uses it in the heat of battle.
I wait until the foremost Drake indicates that it's about to breathe fire. Mirke hits it with Confounding Blind in order to Interrupt it. That clears the way for the party to set things up in earnest. Alliria also tags it with Brand Enemy.
Aloth hits the enemy masses with Grease, and then Pull of Eora. He also casts Kalakoth's Minor Blights and starts blitzing away.
Alliria goes on the cycle of Ninagauth's Shadowflame followed by Blood Sacrifice. She occasionally uses White Flames if the party has taken enough damage. Mirke is firing away with her guns.
The crowd eventually thins out, and it becomes a matter of ganging up on the Drakes one at a time. Alliria tags the second one with Brand Enemy as well.
An egg at #3 has a Pet Desert Wurm Hatchling. But I have no use for it.
Thundercrack Pistol
I enter Stealth mode and go east. There will be a large tribe of Xaurips at #6. I use Stealth to dig myself into a nook similar to how I did during the last battle.
I also conduct the battle along similar lines, but with a difference that Pallegina uses Shatter Their Shackles every 3 Phrases instead. The point being to immunize the party against the Xaurips' paralysis poisons.
The chest at #7 has the Thundercrack Pistol. Mirke makes it an interim part of a secondary gun set.
Fair Trial
There's a few Sand Blights and a couple of Scarab Beetles at #8. I conduct this battle with a view towards obtaining an upgrade for Aloth's Soulbound Mace, the Magistrate's Cudgel. It requires that he inflict 250 points of Damage against Judged enemies. Judged is placed on enemies whenever he lands a hit with the Magistrate's Cudgel, but the 250 points of Damage against Judged enemies doesn't necessarily have to come from the Cudgel itself.
I have Aloth buff up to the max to minimize Damage to himself, and have him fight by himself. Although the party and especially Pallegina with her healing auras are sure to be close by. Aloth takes down two enemies himself. I check just to make sure he got his 250 points of Damage. I have the party finish off the fight routinely once I confirm the threshold has been met.
Fair Trial itself gives the wielder a random Inspiration once he's been hit with an Affliction. Not a big deal, but it's a stepping stone to the next upgrade and for what will be an interim weapon in the long run.
*Evil* The evil party saves this fight for later, and with a view towards a different Soulbound weapon upgrade.
Alliria takes Scion of Flame on her 11th level-up. It adds +1 Penetration to all of her attacks that are key-worded to Fire, including White Flames, Fireball and Sacred Immolation.
Deliberations
The good party circles back around along the south edge of the area, and west towards #9.
I conduct this battle in a similar fashion. I let Aloth do the fighting himself, with Pallegina staying nearby. I sometimes use healing resources like Potions or Lay on Hands or White Flames to keep Aloth going.
I continue this way until I confirm that Aloth has scored 750 points of Damage for purposes of the next Soulbound upgrade. After that, the rest of the party joins in and wins the fight in routine fashion.
The Magistrate's Cudgel acquires a new power, Deliberations. For a Fighter, that means a killing blow will mean one of +1 Armor Rating, +1 Penetration or -20% Recovery Time for 15 seconds whenever an enemy is Engaged.
*Evil* The evil party avoids the Sand Blights and other creatures for now. There's a specific reason why, having to do with upgrading a weapon that Xoti will find.
Vailian Expedition Camp
I continue north and come across an abandoned Vailian expedition camp at #10. I grab a few nearby random items.
Alliria goes down the rope in the well at #11. She makes an Athletics check of 3 to grab the bag lodged in the side of the well. She then makes a Dexterity check of 12 to keep several Aquamarines, Garnets and Emeralds.
I continue on to #12. Alliria has a vision that suggests that the expedition met with a grim fate.
Engwithan Titan
A huge and powerful Engwithan Titan is waiting at #13. A couple of Risen Armsmen and a Risen Mage will usually spawn to the south. I gather the party a little bit to the east of where Alliria had her vision of the expedition.
Alliria goes ahead to #13 to waken the Titan, tags it with Brand Enemy, and then regroups with the party.
Aloth and Eder put up their buffs and attack the Risen Mage.
Pallegina summons her Ogres. Alliria summons her Phantom on the way back, and recoups it with Blood Sacrifice.
The party goes all out for the Risen Mage, and takes him out first and foremost. I then take out the Risen Armsmen one by one. Pallegina summons her Ogres again whenever she's back to four Phrases. Alliria summons her Phantom whenever the previous one expires. She also keeps Arcane Veil up, recouped by Blood Sacrifice, whenever she can.
It then becomes a matter of ganging up on the Titan, and then taking out the Blights and Scarab beetles it summons once it reaches half-Health.
Eder takes two abilities on his 11th level-up. One of them is Refreshing Defense. It upgrades Vigorous Defense so that any Damage received from an Enemy, even minimal Damage received from a Graze, will add a few seconds of duration.
He also takes Overbearing Guard. His Disengagement attacks already inflict Prone through the Guardian Stance and thus make his Engaged enemies extremely reluctant to Disengage. This passive makes his Disengagement Attacks that much more powerful by adding +15 Accuracy and +50% Damage to them. The usual result is that almost no enemy will ever risk Disengagement. But there is value in that, in that Eder can keep his foes locked down tight around him while he enjoys several Damage Reduction bonuses.
The door at #14, once opened, provides access to the first level of the Engwithan Waystation at #9. There's a number of ways to open it:
*Evil* Engwithan Titan
The Risen Armsmen and Risen Mage didn't show up for the evil party. So I have relatively little trouble ganging up on the Titan and then the Sand Blights and Scarab Beetles afterwards.
Mirke takes Duality of Mortal Presence on her 11th level-up. She uses the Body modal, which gives her +1 Constitution per Wound. She'll also upgrade it to Iron Wheel when she gets a chance, so that it will also boost her Armor. It's the natural choice for a Monk build that emphasizes tanking.
Now I use the Copper Muzuma Shell Key to open the door at #14. There are other ways to open the door, but they risk Injury.
And now I explore the first level of the Engwithan Waystation.