-

- Forums
- Chatrooms
- Gallery
- Gameplay Videos
- Upload
- Articles
- Mod Reviews
- Shop SP: Games, Movies, Books
|
|
| Pillars of Eternity 2 Video-Based Walkthrough by David Milward |
Black Isles
*Evil* The Heaving Harlot
I sail towards the Black Isles at #24 on the World Map. I encounter a Principi Junk called The Heaving Harlot. The Crew itself is 15th-level, so a boarding battle against all of them is not advisable. But the ship itself is potent. It's constructed with Mageweave Sails and a Blackwood Hull. It's ready for long-range combat with five Imperial Long Guns on one side. It also has three Vailian Hullbreakers and two Double Bronzers on the other side.
But I manage to get the jump on it with repeated fire from my Magranite Flamethrowers. I take out most of his crew, and then close in for boarding. And the boarding is much easier for having reduced the crew to a handful.
Their captain, a 15th-level Barbarian named Fyrgist, leaves behind a Club called Kapana Taga. Zarathos takes it as part of his secondary weapon set. He prefers to use his unarmed Monk fists whenever possible. But having a secondary weapon set can be helpful against enemies that have high Armor against Crushing Damage, or are even altogether immune to Crushing Damage. The club can inflict either Crushing or Slashing Damage. It also has a 20% chance on Hit to Daze its target. It also increases its Damage by 3% for each Engaged Enemy, and itself adds +1 Engagement. I add the Champion's Relic enchantment so that it adds +2 to Engagement. I also add Unblockable, which increases Accuracy by +4 for each Engaged Enemy. His Thick Skinned passive adds another +1 Engagement. And he'll get another +3 Engagement whenever Ydwin casts Tactical Meld on him. All of that together will really bring out this weapon's power during mob fights. This weapon is also a natural fit with the Reckless Brigandine, as both items' powers increase in proportion to the number of Engaged enemies. Like I said, I prefer Monk fists since on the balance they will still be more powerful. But it's not hard to think of plenty of other builds that combine this club with the Reckless Brigandine that are based on Engaging as many enemies as possible.
Another possibility is to add All Comers instead of Unblockable. That may be a preference for parties where the Watcher is a Tactician. All Comers will immunize whoever uses the club against Flanking. And that can help realize the benefits of Brilliant Tactician, which depends in part on no one in the party getting Flanked.
I sail to and land at the Black Isles at #24.
The Heaving Harlot
The good party likewise prefers a boarding battle, but only after reducing the crew. With the initiative, and The Heaving Harlot being at a distance, I turn my ship portside. I use a couple of long-range volleys of Grapeshot to reduce their Crew. Recall that Haeferic's Nose can take out at least two enemy Crew Members with each hit. It is after the two volleys that I close in for the boarding battle.
The battle is initially my core party holding the fort against the oncoming mass of Fighters led by Fyrgist, while my ship combatants go to work on the Pistoleers and Warblers. At some point my ship combatants have taken down a few of the Pistoleers and Warblers, but have themselves gone down.
It is at that point that I switch strategies. My core party breaks off and hunts down any Pistoleers and Warblers one by one. Alliria's Phantom and Pallegina's Ogres manage to hold up Fyrgist and the Fighters.
And once the remaining Pistoleers and Warblers are gone, that's when I can wear down Fyrgist and the remaining Fighters.
Even so, it's not an easy fight even with my passive healing auras. Alliria had to make frequent use of White Flames, while Pallegina had to use Lay on Hands a few times.
Alliria used Brand Enemy on Fyrgist at the start of the battle. And she uses it on the last Fighter after Fyrgist falls and the one Fighter is left.
The interest of the good party in this battle, and the reason for boarding The Heaving Harlot under more favorable conditions, was that I now obtain my fourth and last Vailian Hullbreaker. It now completes my portside armament. I could only get it by winning a boarding battle against Fyrgist and his crew.
I sail to and land at the Black Isles at #24.
*Evil* Shadowed Vale
I switch out Tekehu and Maia for Aloth and Ydwin.
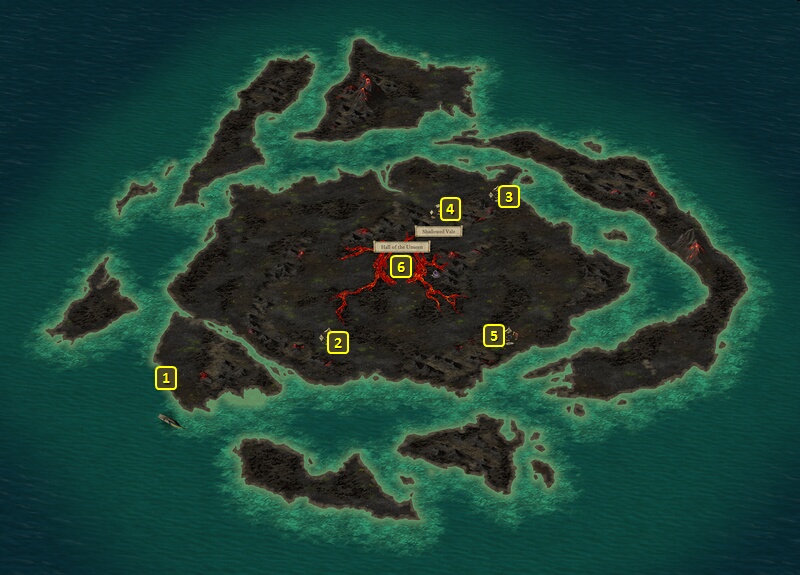
I then go to the Shadowed Vale at #4, which can lead to a lengthy scripted interaction. The first stage is the initial approach to what is a camp of devotees of Wael. You can ask your companions for their thoughts before the actual approach. Asking Eder can ensure a guaranteed welcome into the camp. You can approach openly, and begin the rest of the interaction. You can also have a character make a Stealth check of 6, but the worshippers of Wael will still become aware of your presence.
Zarathos decides to attack them with an Aggressive reply, which is an option throughout the dialogue. I am punching somewhat above my weight with this battle.
I note that the Wizard Explorer is by himself, and just a little north. So I rush him. The other enemies start to gather around me, so I have Mirke lock as many oncoming enemies as she can as a tank. Ydwin took some Damage, so I have her quaff a healing potion. Zarathos and Xoti activate Swift Flurry. Having them take down the Wizard as quickly as possible is my immediate strategic priority. Aloth uses more than one ranged Crippling Strike on the Wizard to interrupt his spells. I quickly take him out.
Aloth sets up with Infuse with Vital Essence, Merciless Gaze, and then Kalakoth's Minor Blights. Xoti casts Devotions for the Faithful over the party and as many enemies as possible. I moved Ydwin a little closer in so that she could benefit from the spell as well.
My next priority is the Mysterious Chanter. He takes some doing, because his shield gives him some staying power. But his Invocations can change the tide, especially if he uses them multiple times over the course of a long battle. It goes without saying that Xoti will use Restore whenever multiple party members have taken significant damage.
Aloth manages to Interrupt the Chanter with Crippling Strike. But now a hitch gets thrown into my strategy. Aloth was going to Interrupt the Chanter again. But he himself got Interrupted when a Fighter Explorer uses Into the Fray on him. That gave the Chanter enough time to get off The Thunder Rolled Like Waves on Black Seas. Zarathos and Aloth get Pushed back and Stunned.
Xoti and Mirke continue to work on the Chanter. But in the meantime the two Fighter Explorers hone in on Aloth and Ydwin. Aloth uses Escape to break Engagement and get away from them. Ydwin quaffs another healing potion and walks away.
I take a risk at this point. I want to bring that Chanter down for good. So I have Zarathos break off from the Fighter Explorers and join in against the Chanter. That means the Fighter Explorers continue to pursue Aloth and Ydwin. So they go westward. The Fighter Explorers thankfully gave up the pursuit and joined the main fight. That gave Aloth and Ydwin the chance to recover with more healing potions. Xoti meanwhile casts another couple of Restore spells to bring the melee combatants back up.
My next target is the Rogue with the hood and yellow armor. She's a glass cannon, so she falls under a sustained assault.
I next go after the Mysterious Priest. Xoti took some damage to set up a Flanking position, so she uses Second Wind on herself.
But Aloth is now taking severe damage from the Ranger Explorer who's using an Arbalest. I have him go closer, so that Xoti can use Withdraw on him before it's too late. Ydwin also gets the Ranger Explorer to switch sides temporarily with Puppet Master.
The Mysterious Priest has in the meantime made herself a much tougher nut to crack with an Arcane Veil spell. So I switch targets to the Mysterious Rogue. Xoti has run out of Restore spells, so now she starts to use Scrolls of Minor Healing when the party's taken enough damage.
The Domination of the Ranger Explorer has worn off just as I take out the Mysterious Rogue. I have Mirke tank and lock down the Fighter Explorers. That leaves the rest of the party free to surround the Ranger Explorer and take him out.
After that, I Flank and take out the Mysterious Priest. And at that point it's just a matter of cleaning up on the two Fighter Explorers.
The enemies leave behind a Cloak of Greater Protection. Zarathos equips it as an interim cloak.
Aloth gets two abilities on his 10th level-up. One of them is Adept Evasion. It reduces any Graze on an attack against his Reflexes to a Miss.
He also takes Snake's Reflexes. It adds +10 to Reflexes, and it will augment Adept Evasion by increasing the probability that attacks against Reflexes will be reduced to Grazes, and in turn a further reduction to Misses.
Ydwin takes Keen Mind. It increases the Focus with which she starts each battle by +10.
Now I go on ahead to #5, and obtain a second Kraken's Eye (in addition to the one I stole in Port Maje). I use them to raise the quality of Zarathos' Reckless Brigandine from Exceptional to Superb. Adding the Superb enhancement to armor normally requires using a rare and expensive Adra Ban, so I try to do that through alternative ingredients whenever I can. And Zarathos, being the Watcher, is given first priority.
I enter the Hall of the Unseen at #6.
Shadowed Vale
Alliria makes a Diplomacy check of 7 to get welcomed into the camp. An Intimidate check of 7, or a Clever response that becomes available if you had previously asked Eder for his thoughts, were alternatives.
Another possibility is the hooded figure in the camp. If you ask about him, or ask him directly who he is, you'll get the usual vague answers. You can look under his hood and notice his strange appearance. At that point you can return to the camp and resume the interaction, or notice that he may be a manifestation of Wael (including with a Religion check of 9). Note that picking up on the resemblance to Wael will result in your consciousness drifting into a shadowy void, and ending your encounter in the Shadowed Vale. It also amounts to a Rest that will expire any Resting bonuses you may have in place.
Another possibility is to try to steal from them (which earns Shady reputation). It begins with a distraction. One method of distraction involves summoning a creature through a spell (anyone in the party can). The other involves making a Bluff check followed by an Arcana check of 10, a Bluff check of 7, a History check of 7, a Metaphysics check of 6, or a Religion check of 5. The distraction is followed by the Watcher making a Sleight of Hand check. Doing so gets 7 Reptilian Eyes. The only difference the Sleight of Hand check makes is whether you get caught or not, and they don't really seem to care even if they do catch you.
You can also eat and rest with them. That ends the encounter, and you get the Good Food, Better Friends (+2 Constitution, +5 All Defenses) resting bonus. Keep in mind that it triggers a Rest, and Good Food, Better Friends will replace any Food or Inn Resting bonuses you may have had in place.
I avoid these possibilities since I want to keep my until Rest bonuses intact. I do ask where the rest of the crew is, and only get a vague "around" kind of answer.
Alliria grabs the opportunity to ask about the Black Isles themselves, and follows up with a Religion check of 9. Alternatives were a Survival check of 5, or an option that can be made with either an Arcana check of 7, a Metaphysics check of 9, or the Watcher having the Mystic background. There's also two other dialogue options that don't require any checks. No matter which option you choose, the worshippers of Wael will not be very forthcoming and tend to provide evasive answers.
Asking about the Isles themselves makes available the option to leave without rest, and I grab that opportunity as soon as it shows up.
I get the second Kraken's Eye at #5. I at that point upgrade Eder's Desgraza Breastplate from Fine to Exceptional. I then use both Kraken's Eyes that I've acquired to upgrade the armor from Exceptional to Superb.
I enter the Hall of the Unseen at #6.
*Evil* Hall of the Unseen
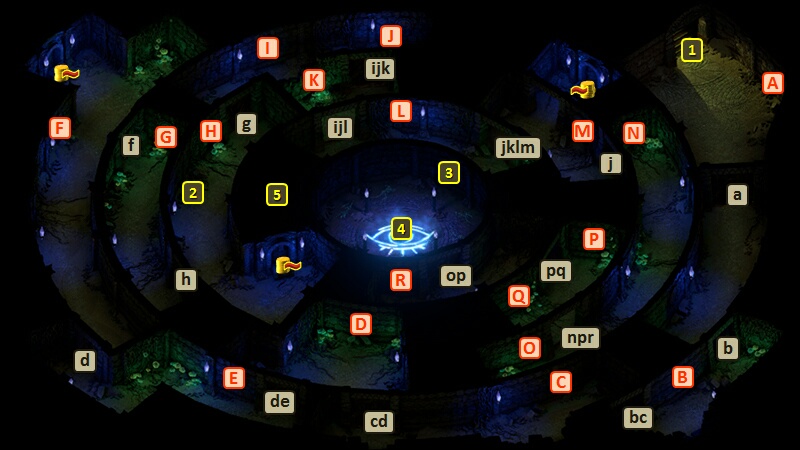
The evil party starts off at #1 on the map of the Hall of the Unseen. Note that this hall consists of a series of concentric rings, with a complex network of doors and switches. The capitalized letters signify switches that open or close doors. The doors they open are marked with the same letters in lower case. And yes, sometimes a switch can open or close more than one door.
There will be points where you sometimes have to leave a character further behind to be able to make progress. For example, you may have to leave a character behind at the G switch while the rest of the party makes its way to the H switch. Then you may need to hit the G switch to open the g door, and then have the party hit the H switch so that the left behind party can catch up while leaving both the g and h doors open.
As another example, you may need to leave behind individual characters at the switches on the north side of the Hall. Have a character hit the J switch to open the j door towards the northeast corner, and then play around with the I and K and L switches so that the party can regroup and still be able to pass through the northeast j door.
I find a Pet dog named Eliel at #2.
I eventually find my way to the center. I prepare for the next battle by backing Aloth and Ydwin against a wall, and then having the rest of the party form a tight half-circle around them. I hit the switch at #3, and get attacked by several Shades and Spectres. Spirits can and often do teleport next to squishier spellcasters. The point behind surrounding Aloth and Ydwin with a wall to their backs, and having the rest of the party form a tight-half circle next to them, was to deny the spirits any spots to teleport next to them. I take down the spirits rather easily once things get going.
A pedestal at #3 has a Scepter called The Eye of Wael. Aloth equips it in his off-hand for the rest of the game. It's an ideal off-weapon for a ranged Spellblade. Taking up only the off-hand means that the primary attacking hand is free for Kalakoth's Minor Blights. The Scepter itself has a 10% chance of making its wielder go Invisible for 8 sec on scoring a Critical Hit. And for a Spellblade with the Backstab talent, and Kalakoth's Minor Blights in his primary hand, that means an opportunity to hurl the Blight with Backstab's 100% bonus to damage against multiple enemies in an area-of-effect. I enchant it with The Hundred Visions, which provides a +2 bonus to Illusion spells. And a lot of Aloth's spells are going to be from the Illusion school. I also enchant it with Shrouded Strike, which has a 10% chance of causing a random Affliction on scoring a Critical Hit. It's an easy choice over Lidless Gaze, which is a per Rest power.
*Good* Alliria also equips it in the off-hand of her secondary weapon set. She likewise adds The Hundred Visions. She will also add Shrouded Strike when she gets a Skuldr Ear. She does sometimes use Illusion spells herself, particularly those from the Iron-Clasped Grimoire when she gets it.
I return to the exit after enchanting the Scepter.
*Evil* The Black Pit
I leave the Hall of the Unseen and name the island "The Black Pit". This was another of the islands I needed to discover for the Mapping the Achipelago: Tikawara Quest.
I go south and board a Crookspur Captain. I thereafter switch out Aloth and Ydwin for Tekehu and Maia.
Mara-Mara Trench
I leave the Hall of the Unseen, and rename the Black Isles to "Tenebrosia".
I return to my ship. Pallegina stays, but I now bring in Serafen, Rekke and Konstanten.
I sail east to the Mara-Mara Trench at #27, which involves a scripted interaction and encounter with a whale called a Bowhead.
I could choose to hunt it, which will lose reputation with Eder if he's in the party.
It starts with a Crew Member injuring the whale from the skiff, but also getting Injured.
You can make either an Insight check of 4 or a Survival check of 5 to identify a real danger should the whale manage to dive into deeper water. A successful check will also reveal the check you need to avert the danger.
That check is that the Deckhands of your ship need to make a combined Deckhand Rank check of 5. What happens is you eventually manage to wear the Whale out, and can harvest Mohora Meat from it. Crew Members will get 210xp, 2 Sailor Experience and +10 Morale.
If you attempt the Deckhands Rank check and fail, the whale will make the dive and pull the crew on the hunting skiff underwater. One of them will die permanently. The whale will also escape.
If you start the hunt and fail, either because you gave up partway through or because it made the dive, Crew Members will gain 189xp and 2 Sailor Experience, but also lose -5 Morale.
But I prefer to pass it in peace. The benefit is that the party members whom I previously selected now also receive Ngati's Blessing (+2 Constitution) until Rest. That would have earned positive reputation with Eder had he been in the good party.
I thereafter put my core party back together.
*Evil* The Intrepid
I sail north and intercept a Vailian Dhow called The Intrepid. I jibe and increase the distance to 500+, so as to put myself beyond the range of any of its cannons. I use Grapeshot to reduce their crew, and then close in for boarding. Their leader, Anes of the Many Eyes, is a multi-class Priest / Wizard. But the battle itself is not particularly challenging by now. I get an Arcane Lantern as a free upgrade for my ship.
A Vailian Master Captain is now close by. I originally tried to hit it up close with my Magranite Flamethrowers. But then it started to sail away. So I myself sailed in the opposite direction to get to 500+ range. And this time the Grapeshot from a distance approach works spectacularly. A single volley, with each Cannoneer scoring a Raking Hit, takes out 8 of their crew. I immediately board. Now Tekehu can bring spells like Moonwell and Chill Fog (after the initial Nature's Balm buff) into the mix, while Xoti can unleash Devotions of the Faithful. That alone makes this fight significantly easier, and it's a matter of outlasting those crew members who are left.
*Evil* The Red Arrow
I sail towards the southeast corner of the World Map. I confront the Crookspur Dhow called The Red Arrow, captained by an Orlan Rogue named Faina Short Fur. I board and slaughter them as lower-level enemies.
The Intrepid
The good party sails west after having done the Mara-Mara Trench and then boards The Intrepid to get the Arcane Lantern.
I thereafter sail to Tikawara at #32.
*Evil* Mara-Mara Trench
I equip Mirke with the Superb Plate Armor that I got from the Vailian Master Captain.
I rearrange the crew so that it's the melee-heavy ship combatants, Eder, Serafen, Rekke, and Konstanten who receive Ngati's Blessing from the Mara-Mara Trench.
I sail to Tikawara at #32. I board a Huana Master Captain on the way there.
I sell off my excess gear and enter town once I reach port.