-

- Forums
- Chatrooms
- Gallery
- Gameplay Videos
- Upload
- Articles
- Mod Reviews
- Shop SP: Games, Movies, Books
|
|
| Pillars of Eternity 2 Video-Based Walkthrough by David Milward |
Crookspur | Ori O Koiki | Fampyr Island |
Crookspur (Good)
Seafol
I am now at Ori O Koiki at #54 on the World Map. I sail south to Sayuka at #45, and attack a Royal Deadfire Company Master Captain. It sails closer to me, and then willingly fights me at a range of less than 200m. I so gladly turn starboard side and blow it away with my Vailian Hullbreakers.
I dock at Sayuka to instantly repair the ship, sell my excess goods, and stock up on ship supplies. I go a little south and fight another Royal Deadfire Company Master Captain. It stays at a distance of about 400+m, and it is a Junk with five cannons. So it turns into a long range battle. It has 5 shots per round against my 4. But my Hull Health far exceeds the enemy ship. I turn portside and wear it down with my Iron Thunderers and Haeferic's Nose. I do at one point have to switch in Emeini for Baltia when the latter gets Injured. But I otherwise outlast the Rauataian Junk. I refill my ship supplies at Sayuka again.
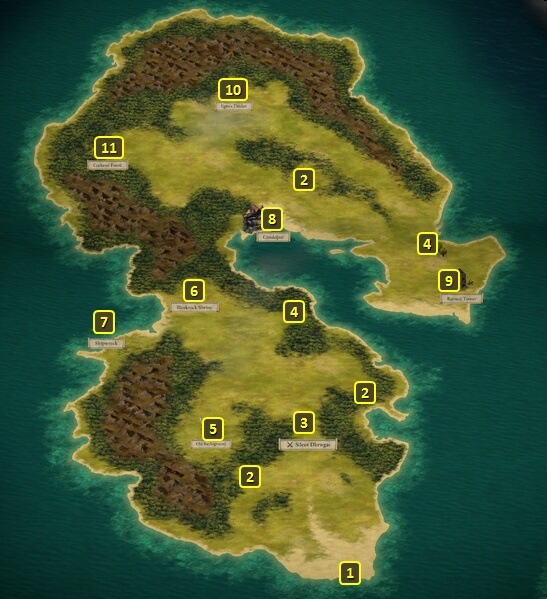
Now I sail west until I reach Crookspur Island at #9 on the World Map. I board a Crookspur Captain along the way.
I approach the port of Crookspur itself, which is at #8 on the map of Crookspur Island. I switch out Eder and Pallegina for Serafen and Konstanten for the moment.
Seafol, who is Aeldys' contact for purposes of the Cruel Cargo Quest, is at #2 on the map of Crookspur. Alliria falls in with finding a way to free the slaves and wipe out the Slavers.
Crookspur Merchant
I buy two items from the Merchant at #3. One of them is the Helm of the Falcon for Konstanten. The key point is that it reduces Recovery Time with two-handed weapons by -15%.
The other is the Patinated Plate for Serafen. It starts off as a Legendary Plate Armor with an additional +1 Armor Rating, but with the downside of +15% Recovery Time. I add the Bronze Juggernaut enchantment so that the Armor Rating bonus increases to +2, and the penalty to Recovery Time increases to +20%. It's all consistent with the theme of maximizing Serafen's Armor Rating to the utmost. And he'll be able to have his cake and eat it too by frequently triggering instant Recovery, either through his Bloodthirst ability, or through landing Hits or Critical Hits with weapons he will acquire later in the game.
I choose Heavy Rebound over Constant Rebound, the reason largely being that I still have plenty of enchantments that I'll want to spend my Rubies on, but actually have a significant number of Ambers to use.
I briefly return to the ship and swap out Serafen for Pallegina. That means I've put my core party back together, but with Konstanten subbing in for Eder for the time being. There's a powerful weapon that Konstanten will soon acquire.
I return to Crookspur, and go to the tunnel at #4. I swim through the lighter tunnel to reach the Sea Cave without Injury. I could have first swam to the darker tunnel to catch my breath and reduce the Athletics check to reach the Sea Cave to 8.
Cockerell Forest
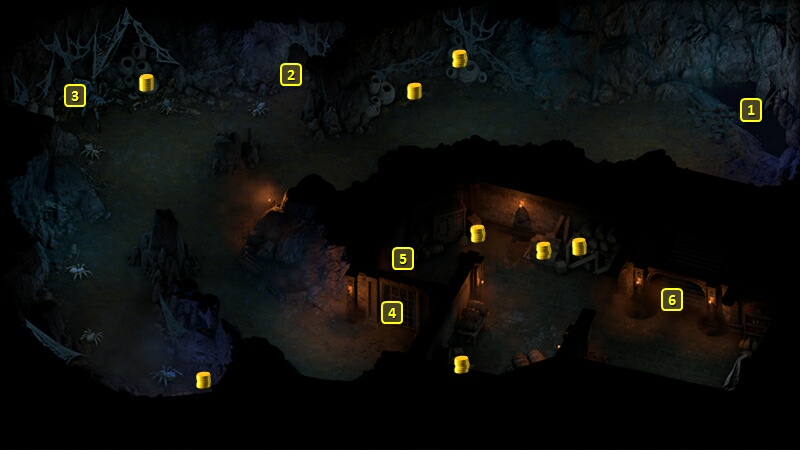
I start off at #1 on the map of the Crookspur Sea Cave. I sneak my way through past the nearby spiders and to the exit at #2.
That brings me to #8 on the map of Crookspur Island. I gather Food and random items from nearby points marked #2, #4, #9 and #10.
Cockerell Forest is at #11, which is the hiding place of a trio of escaped slaves named Cathwenna, Camoc and Hadongo. They'll initially be hostile, and signal as much by firing arrows at your feet. *Evil* For ways to end this encounter violently, see how the evil party handles things.
Alliria makes an Insight check of 10 to get them at least open to the idea of talking to you. Gaining an audience with them requires one of these follow-ups:
That brings me back to #1 on the map of Crookspur. I go to #4 and swim through the light tunnel again to return to the Sea Cave.
Crookspur Sea Cave
I am back at #1 on the map of the Crookspur Sea Cave. I slaughter the Crystal Spiders and Crystal Spider Queen at #3.
I go to the door at #4. I can't reach the lever at #5. I can only open the door through a scripted interaction, the options for which are:
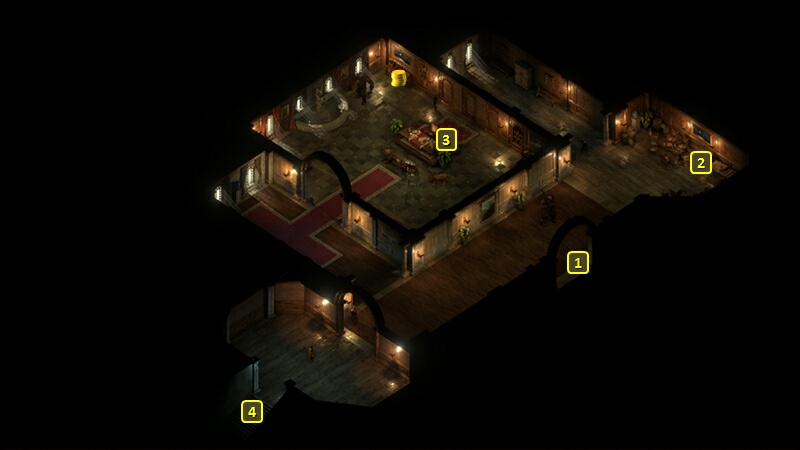
Crookspur Dungeon
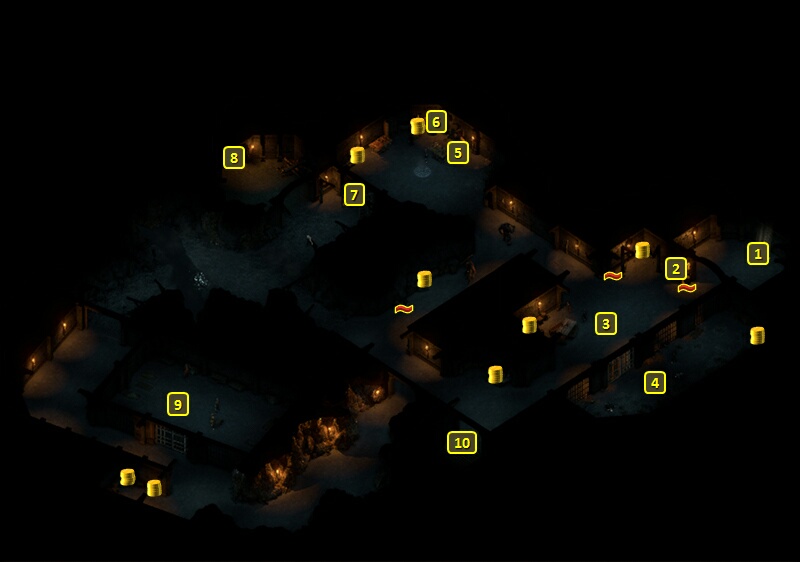
I start off at #10 on the map of the Crookspur Dungeon.
I go northeast and kill a few Ogres and Slaver Guards at #3. I don't bother with the Crane-Crested Key, since I get xp for using Mechanics checks to open chests and doors. I free the slaves at #4. That becomes progress for purposes of the Principi Quest called A Shrewd Proposition.
I also find another Blackwood Log in the chest at #2. The good party won't really need it though, as its choice of endgame ally will see them through without the need for a ship constructed from the Blackwood Hull.
I proceed to slaughter the Ogres and Mercenaries on the north side of the Dungeon. They leave behind the Large Iron Key, but I leave it since I get xp for picking locks and doors with the Mechanics skill. I also happened to find a Sapphire among the loot.
I find a Morning Star called The Willbreaker in a chest at #6. Konstanten uses it as his weapon for the rest of the game. It's the best Morning Star of the game, coming in at Superb quality, a 25% chance to cause Shaken (-5 Resolve, -3 Power Levels) on Hit, +10% Action Speed, and Hits cause a -5 penalty to Will for 30 sec that can stack up to 5 times. The appeal for Konstanten's build is that he keeps the Body Blows Modal active to inflict a -25 Fortitude penalty on his targets. Attacks made while Spirit Frenzy is active will give his targets the Staggered (-5 Might, cannot Engage) Affliction and impose another -10 Fortitude penalty. The Phrase called The Long Night's Drink Birthed the Revenge of Morning will give nearby enemies the Weakened (-5 Constitution, Healing Received reduced by 50%) Affliction, and another -10 Fortitude Penalty. That sets up the Brute Force passive, when his targets will have their Fortitude drastically reduced and often well below their Deflection. All of these pieces coming together means he often drastically increases the probability of Critical Hits with each attack he makes. And more Critical Hits means accumulating Phrases faster as a Skald, and being able to use his Offensive Invocations more often.
I go south and meet Bahua, the leader of the Wahaki prisoners, at #9. Alliria frees the captive, but makes a Survival check of 5 and another Survival check of 8 to talk Bahua out of taking immediate vengeance against the slavers.
I go up the stairs at #8.
Master Kua
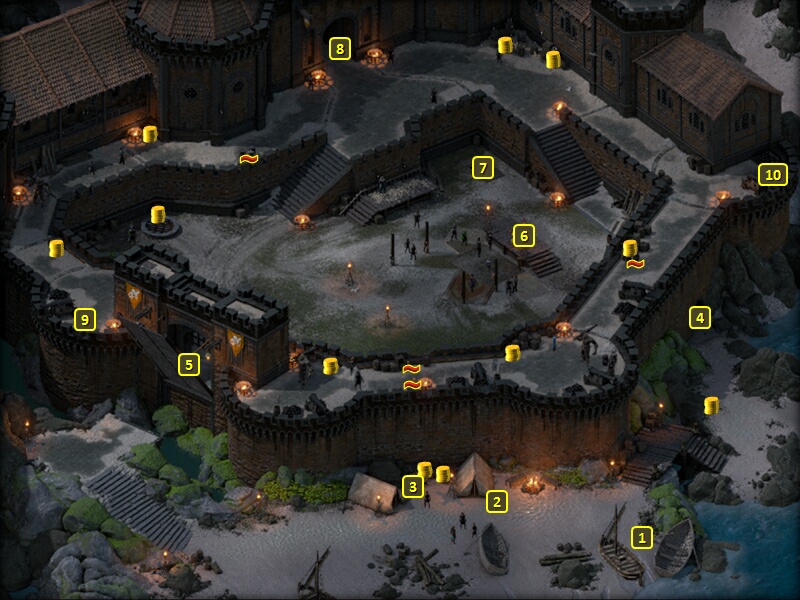
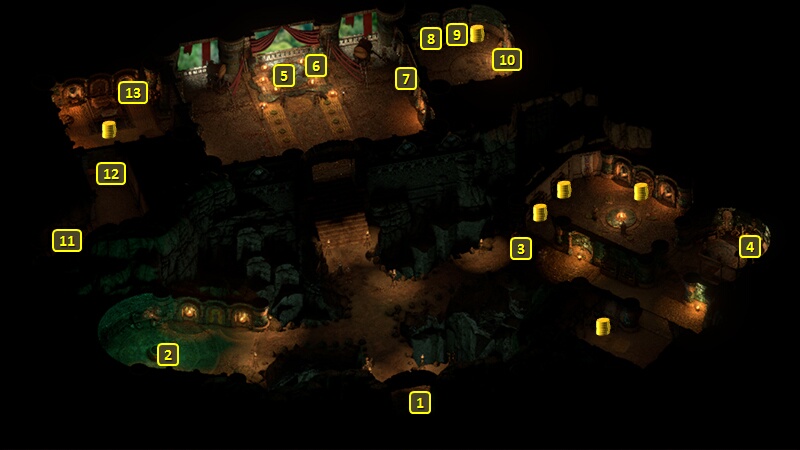
I emerge at #4 on the map of Crookspur Fort. I am immediately attacked by numerous Slavers and Ogres, but defeat them easily.
I go on to #3 and kill Master Kua and his bodyguards, and again quite easily. The desk at #3 has a Ring of Overseeing, but I already have what I need in that regard. Killing Master Kua is progress for purposes of all of the Cruel Cargo, Clearing Out Crookspur, and Fruitful Alliance Quests.
A rack at #2 has a Large Shield called the Shining Bulwark, but it doesn't fit into any of my plans.
I go out the door at #1.
Crookspur
I emerge at #8, and now begin to slaughter the remaining Slavers and Ogres, both on the ramparts and in the courtyard.
Note that I make a point of going east, south and west along the ramparts until I am a little east of the gate at #5. I hit a lever just a little east of that gate to open it.
I free a Death Godlike slave named Handsome Eliam at #6 and bid him to make his way to the Temple of Berath in Neketaka. I have no place for him on my Crew.
Now I walk out of the courtyard after I've wiped everyone out, and make my way to #1 to return to my ship.
Cruel Cargo
I am now at #50 on the World Map. A Rauataian fleet has the island surrounded with the intention of taking it over and ending the slave trade. I parley with them, and Kana from Pillars of Eternity 1 greets me. The event means Crookspur Captains will no longer be on the World Map. It is also progress for purposes of the Clearing Out Crookspur Quest.
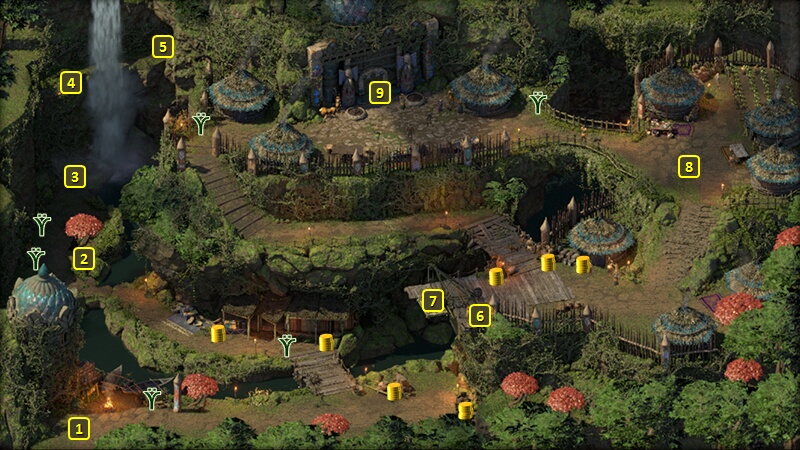
I sail to Ori O Koiki at #54 on the World Map. I bring in Serafen, Fassina, Rekke and Konstanten as the characters with the least xp. I enter the town of Orii O Koiki.
I start off at the door at #1. I go up the lift at #7, and then through the door at #9.
I start off at #1 on the map of the Ori O Koiki Sanctum. I bring the news of the Slavers' defeat to Ranga Ruasare at #5, and she agrees to join in an alliance with Queen Onekaza and the Kahanga of Neketaka which is progress for purposes of the Fruitful Alliance Quest. I also get 15,000+ xp for completing the Cruel Cargo Quest.
Fassina gains three abilities on her 19th level-up. She gets Lashing Vine as an Animist. And it does make its presence felt when she summons it during ship battles.
She also takes Quick Summoning. It helps her get her castings off faster when she summons Blights or the Lashing Vine and such.
She also adds Wall of Draining. A wall that drains enemies of their beneficial effects, and adds the equivalent amount of time to extend the caster's beneficial effects. A well-placed Wall of Draining can extend Fassina's buffs to easily last the whole fight.
I return to the ship and reassemble my core party. Fampyr Island is next.