Doing this Quest will also help towards completing the Principi Quest
called A Shrewd
Proposition in a way that favors Captain Aeldys.
It will help complete the Huana Quest called Fruitful
Alliance in a way that Queen Onekaza will approve of, and help
cement an alliance with the Huana as your endgame allies if that is what
you want.
Be forewarned that completing the Quest means failing the Tip
of the Spear Quest.
The Quest itself will be given in Oro
O Koiki, which is at #54 on the World
Map.
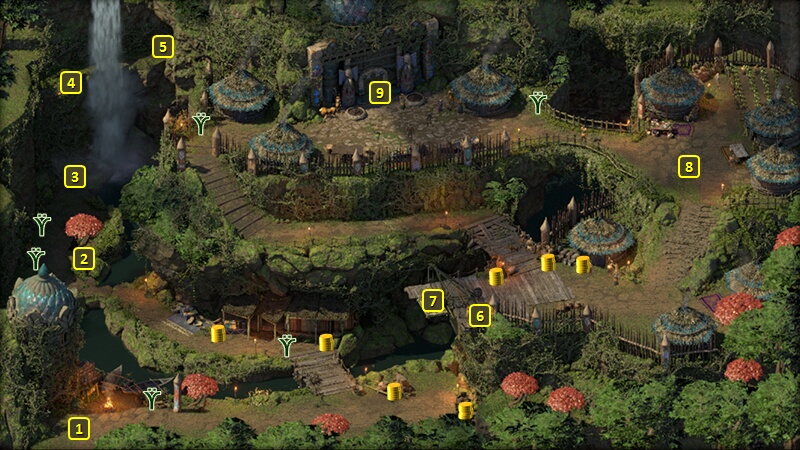
You'll start off at #1 on the map of Oro
O Koiki. Kipeha will be at #6. She acts as the gatekeeper for
whether you can enter the village as a welcome visitor, and can grant
permission to use the lift at #7 to enter the village. That is what you
will want if you want to be given this Quest.
You can convince her to let you use the lift and enter the village with:
Paying 1,500cp as an entry fee, after the initial offer of 1,000cp
gets refused.
Making either a Diplomacy or Insight check of 8. Any subsequent
checks won't matter.
Making a Bluff check of 9.
If you started the Fruitful
Alliance Quest, mention that you come on behalf of Queen
Onekaza and follow up with the words "Over crumbling mountains,
across blighted seas". If you mention the Queen, but don't use the
passphrase, Kipeha will fire an arrow at you and turn the village
hostile. An Athletics check of 7 dodges the arrow.
If you started the Tip of
the Spear Quest, mention that the Crookspur Slavers seek
revenge. Any subsequent checks won't matter.
You can then use the lift at #7 to enter the village.
Kipeha will be at #8 afterwards if she allowed you entry into the
village, at least during the daytime. She now sells several items, most
of them being crafting ingredients. The one distinctive item that she
does sell is a Ring called Kaura's
Prize.
You will start off at #1 on the map of the Ori
O Koiki Sanctum. You can now have an audience with Ranga Ruasare
in her throne room at #5. Her request will be to kill the leadership of
the Crookspur Slavers. You don't have to commit to that demand then and
there. It's enough for her to make the demand to start the Quest itself.
Seafol will be your contact at #2 once you arrive at #1 on the map of
Crookspur. She'll have a
skiff ready and waiting for any slaves you can free from Crookspur.
You have two key objectives. One is kill Master Kua, and by extension
the rest of the Slavers as well. The other is to free the Wahaki being
imprisoned as slaves in the Dungeons. It doesn't matter in which order
you do things, and there are multiple ways of completing both
objectives.
Killing Master Kua
The gate to the courtyard is at #5, at which an Ogre stands guard. You
can select an Aggressive dialogue option that turns all of the Slavers
hostile immediately. This will lead towards completion of the Quest if
you can defeat all of the Slavers then and there, and then make your way
to the Fort.
If you're not willing to the force the point just yet, the Ogre will let
you through with little fuss, assuming the auction hasn't completed yet.
The auction of Handsome Eliam
takes place at #6. Either buying him, or otherwise letting the auction
for him proceed without making a fuss, will mean that Auctioneer Marocca
will recommend you see Master Kua.
Questioning the legality of the auction, particularly with either a
Bluff check of 10 or a Streetwise check of 10, is likely to get you
expelled outside the courtyard and the gate closed on you. Making your
way back in (i.e., through the Dungeons) will mean the local slavers
attacking you on sight.
If you purchased Handsome
Eliam, you'll need to see Master Kua first to make the purchase
final. You can also force-attack any of the Slavers now to get things
started.
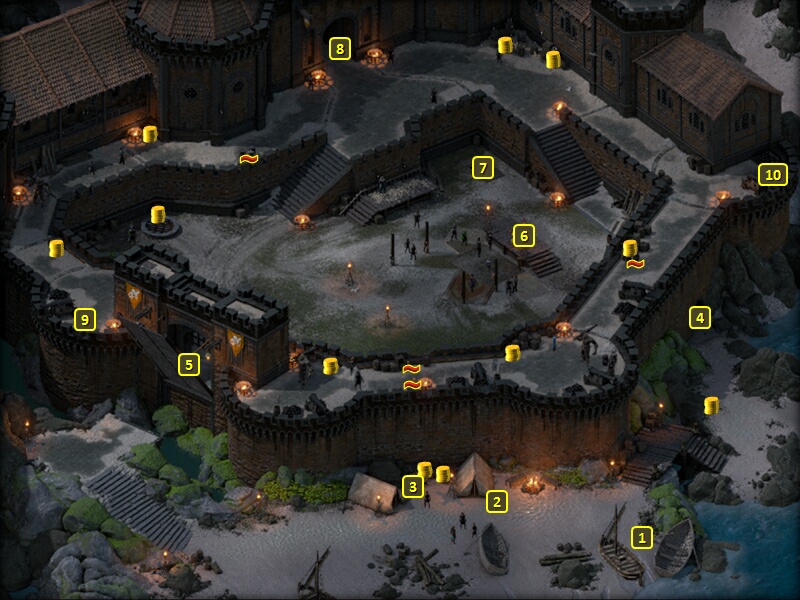
The stairs at #8 lead to the Crookspur
Fort, if you made it through the auction without turning the
Slavers against you.
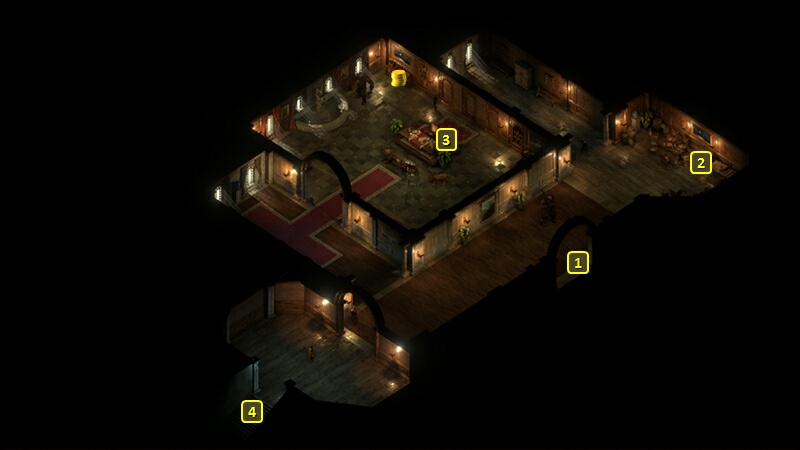
You'll start off at #1 on the map of the Crookspur
Fort. Master Kua will be at his desk at #2.
Kua wants you to take out the leader of a Huana tribe that are scuttling
his ships. Accepting the request starts the Tip
of the Spear Quest. Refusing his request leads to being attacked
by Kua and his minions. You can also force-attack any of the Slavers now
to get things started. Pick up the Head of Master Kua after killing him.
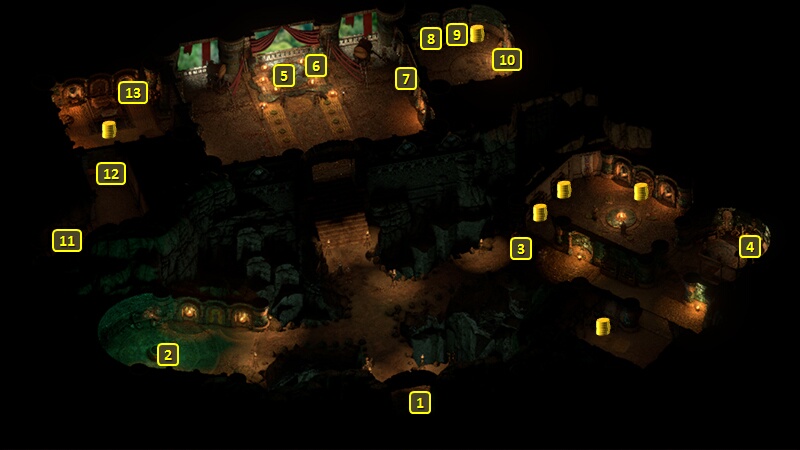
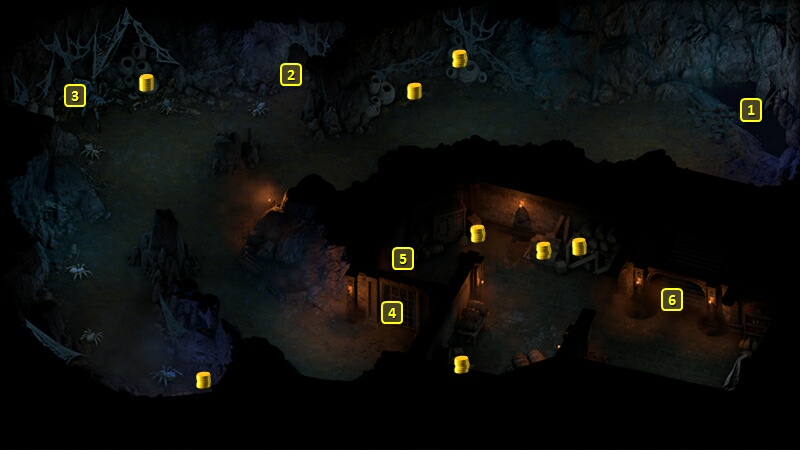
The tunnel itself involves a scripted interaction. Taking the bright
tunnel can lead to the Sea Cave
at #1, although it requires an Athletics check of 10 to do it without
Injury. The darker tunnel allows you to surface and catch a breath of
air, the point of which can reduce the Athletics check for the brighter
tunnel to 8.
There will be a Crystal Spider Queen and a few Crystal Spiders to
fight at #3 of the Sea Cave.
There will be a gate at #4. Your options if you approach the gate from
the south are:
There will be plenty of Ogres and Cutthroats around the Dungeon. The Wahaki Slaves that you need to rescue to complete this quest will be locked in a cell at #9.
Rescuing the Slaves locked in the cell at #4 helps towards completing the Principi Quest called A Shrewd Proposition.
If you want to sneak the slaves out, a character with good Stealth and Mechanics (can make a check of at least 12) can sneak past the enemies to the cell doors and unlock them. The Slaves will make their own way out. The Wahaki Slaves in particular will be willing to help you kill any Slavers that remain here in the Dungeon or other parts of Crookspur.
Alternatively, you can just slaughter all the Ogres and Cutthroats here as well. Taskmaster Grom at #5 will leave behind the Large Iron Key, which you can then use to open the cell doors if you can't make the Mechanics skill checks.
This chest at #2 will have a Blackwood Log in it. Although that is not directly relevant to this Quest, it can help provide an additional option as you near the end of the game.
Leave Crookspur by Ship. You will be once again greeted and surrounded by a Rauatai fleet, this time commanded by Kana from Pillars of Eternity 1.
Bring the Head of Master Kua to Ranga Ruasara to complete the Quest and earn a 15,000+ xp reward.
Sorcerer's
Place is a project run entirely by fans and for fans. Maintaining
Sorcerer's Place and a stable environment for all our hosted sites requires a substantial amount of our time and funds on a regular basis, so please consider supporting us to keep the site up & running smoothly. Thank you!
Supporting Sorcerer's Place
Has Sorcerer's Place been useful? If you'd like to show your appreciation
for our hard work on the site, and help us pay the bills the site generates
every month, please consider helping support SP.
Thank you!