Pillars of Eternity 2 logo


Pillars of Eternity 2 Online Walkthrough by David Milward
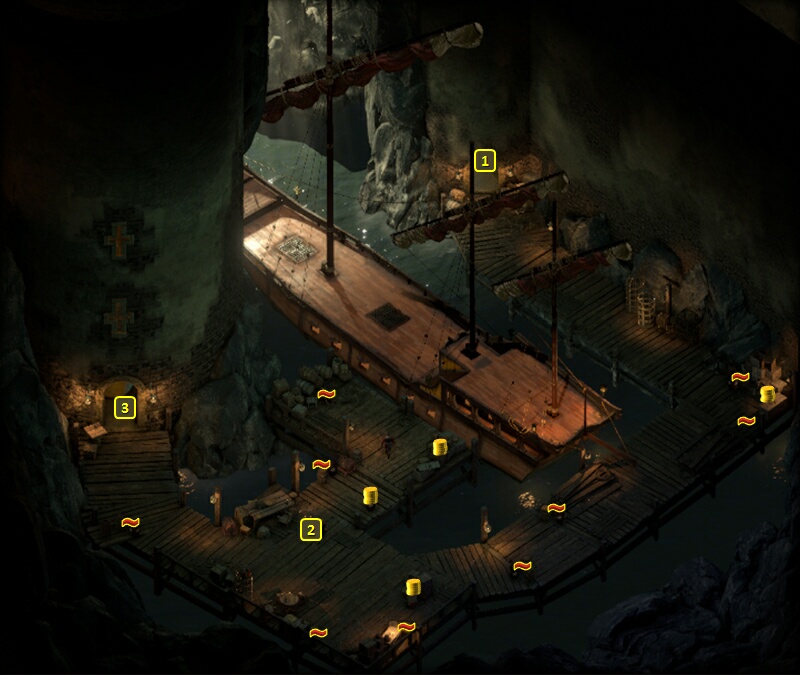
INTRO & ABOUT | CHARACTERS | COMBAT AND RULES | ITEMS | SHIPS
Quests | Areas | Mega Bosses
Disable all ads!

Main Game: Main Quests | Character Quests | Side Quests | Tasks | Bounties
Faction Quests: Huana | Principi | Royal Deadfire Company | Vailian Trading Company
Expansions: Beast of Winter | Forgotten Sanctum | Seeker, Slayer, Survivor

Principi Quests: Blow The Man Down | Goods and Services | Symbols of Death | A Shrewd Proposition | Honor Among Thieves | A Dance With Death

Blow the Man Down

World Map

  1. Captain Furrante and SerafenYou'll more or less be able to begin sailing your ship after finishing the Stranded quest. Captain Furrante's ship will home in on you almost the instant after. There's nothing you can do during the scripted interaction to avoid his ship. He wants you to somehow get Benweth, the same pirate captain who boarded you during the prologue, to stop being a liability
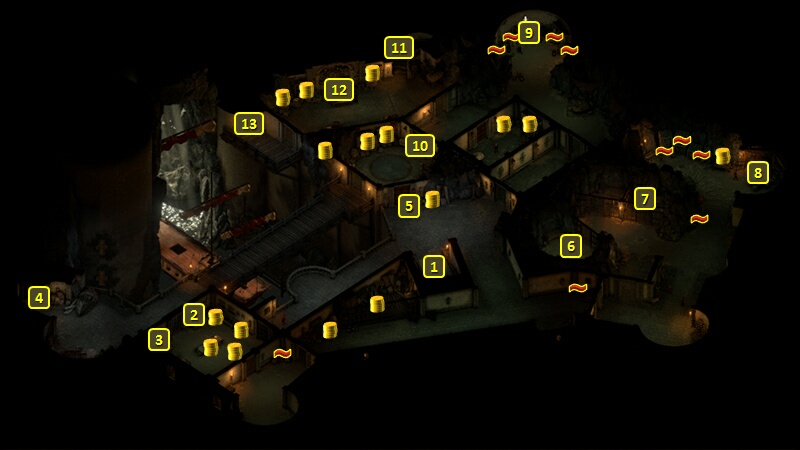
 to the Principi sens Patrena.

    The Orlan named Serafen can also join your party at this point.

  2. Fort Deadlight is at #4 on the World Map. Clicking on it the first time prompts a scripted interaction, where it becomes a question of how to make your initial entry.

  3. The safest and most reliable way is to sail your ship up to dock with your ship donning Principi colors. You can get the colors either by defeating any of the Enemy Ships that carry the colors and taking them, being given them by Dereo the Lean after completing The Cornett's Call Quest for him, or by stealing it from Mad Morena's quarters in the Undercroft.

  4. Another way is possible if you have a Spyglass. Wait until nightfall, although that results in any resting bonuses you might have expiring. You now end up at #14 in Fort Deadlight. Click on #15, and use a Rope and Grappling Hook along with an Athletics check of 3 to scale up the wall to the window. You will end up at the Dungeon of Fort Deadlight at #3.

  5. A third way is to make a frontal attack. That means sustaining some significant damage to your ship and its sails, even with a sturdy ship like a Galleon or a Junk. It also means committing yourself to literally slaughtering everyone in the Fort to complete the Quest, including a prospective sidekick named Mirke.
  6. Fort Deadlight

  7. Assuming you want to avoid a mass slaughter, the most direct way to complete the Quest is to head for a direct confrontation with Benweth in his headquarters in the Deadlight Donjon. And there's more than one pathway there.

    The most difficult way is to sneak to the front door of the Donjon through the upper ramparts. You'll first need to distract Unlucky Ancret from her post at #5. You can do that by:

    • Using a missile weapon to drop the crane payload at #3.
    • Using a missile weapon to blow up any of the gunpowder or lamp oil barrels that are marked 'X' on the map.
    • Getting confirmation that Snake Eyes Condwen at #2 is cheating at his dice games. That can be obtained by speaking to either Mirke (at #3) or Siryi the Siren (at #4) in the Deadlight Court, or pickpocketing the Peculiar Dice from Condwen at #2. Whichever confirmation you obtain, you can then use them to convince Ancret to abandon her post while she confronts Condwen.

    You can then go through the door at #5 to reach the ramparts at #16. It then becomes a matter of sneaking your way to the door at #19. That door would bring you to #1 on the map of the Deadlight Donjon.

    What makes it difficult is that there's a guard west of the door who watches over a rather narrow approach from stairs that you'll have to take going up. The whole party will need significant ranks in the Stealth skill to pull it off.

    The easier way begins by entering the Deadlight Dungeon through the door at #9 if you sailed into port with Principi colors. You will already be at #3 in the Dungeon if you had used a Rope and Grappling Hook to sneak in through the window at #13.

    Deadlight Dungeon

    You start off at #1 on the map of the Deadlight Dungeon if you came in through the stairs, or #3 if you snuck in through the window. You can send a character with Stealth to go to the northeast corner and then northwest past the guards in the northeast powder room, and then open the door at #10 from the other side. The whole party can then make their way to the stairs at #11.

    Deadlight Court

    The stairs themselves lead to #7 on the map of the Deadlight Court. Trying to go through the door at #6 will lead to everyone in the Court turning hostile.

    Simply go west a little to the stairs at #10.

    Deadlight Donjon

    You start off at #3 on the map of the Deadlight Donjon.

    Benweth will be at #6. You can choose to attack him and his guards. He'll leave behind the Miscreant's Leather if you win, and you will have completed the Quest. It also means that any surviving Guards inside the Deadlight Donjon itself will remain hostile, but they can now be killed without raising the alarm. Guards in certain forbidden areas, such as the ramparts, the east side of the dungeon, and the area near the door to the Forge, will remain hostile if you come too close.

    You can if you prefer negotiate with him instead. Opening the door requires any one of preliminary skill checks of Intimidate 5, Streetwise 4 or Diplomacy 4. You'll need to follow up with enhanced skill checks of Intimidate 6, Streetwise 6 or Diplomacy 7. You may need to follow up any of those with either a now downgraded skill check (e.g., Streetwise 3) or an Athletics check that involves smacking him around. Successfully negotiating with him means that he'll now give you free run of the entire Fort and all its areas, including the Donjon. That also includes guards in the aforementioned forbidden areas as well, who will now become friendly. That concludes the Quest as well.

  8. Deadlight Court PartyThere are two other pathways that involve drawing Benweth out from the Donjon. One involves throwing a party. Enter the Deadlight Court throught the door at #10 on the map of Fort Deadlight.

    Speak to Mirke at #3 on the map of Deadlight Court. She'll reveal that if a wild enough party can be started in the Court, then Benweth will come down to enjoy the festivities. She'll also drop the hint that Benweth also likes to play on the harpsichord at #5.

    As for getting the party started, Mirke suggests that god-killer's rum is needed, and that a shipment of it can be found near the crane.

    Return to Fort Deadlight. Get Unlucky Acret to leave her post at #5 through any of the methods described above for reaching Benweth through the ramparts.

    Go through the door at #5 to reach the ramparts at #16. A chest at #18 has the God-Killer's Rum.

    Bring it back to Mirke. The party will start, but Benweth will not show up just yet.

    Talk to her again. She'll indicate that a special spicy stew from Cookie Maina is needed to take the party to the next level. Maina can be found in the kitchen below the court. Keep in mind that trying to go through the door at #6 will still make everyone in the Court go hostile, Mirke included. So you'll have to go the long way.

    Return to Fort Deadlight, and enter the Deadlight Dungeon through the door at #9.

    You start off at #1 on the map of the Deadlight Dungeon if you came in through the stairs. You can send a character with Stealth to go northeast and then northwest past the guards in the northeast powder room, and then open the door at #10 from the other side.

    Speak to Cookie Maina at #12, and she'll give you the Special Stew without any fuss. Now go back to the Court.

    Note that you have an opportunity with respect to the harpsichord at #5 of the Deadlight Court before you speak to Mirke again. You can click on it and rig it with a Bomb that can cause damage. Or not, it's up to you how to want to play things out with Benweth when he arrives.

    Speak to Mirke again. She'll use the Stew to kick the party into high gear. That's when Benweth arrives. He'll want to show off his skills with the harpsichord. If you had rigged it with a bomb, it will blow and kill him outright. Nobody will suspect you, and the Quest will be completed then and there. You can now loot his items, including the Miscreant's Leather.

    If he plays and lives because you didn't rig the instrument, he'll remain standing by the Harpsichord. You can now click on him to speak to him. One approach is to choose a dialogue option that leads to combat. Not everyone in the Court will join in the fight against you, but several of his loyal personal guards will help him out. You can kill him and his Guards to complete the Quest, loot his items, and the rest of the Fort will remain friendly. The notable exception will be the Guards stationed at the Deadlight Donjon, who will go hostile should you enter.

    Another is again to try and negotiate with him. The one difference here is that a Diplomacy check of 4 and an Intimidate check of 4 are available right away that convinces some of the patrons to leave, although it did not noticeably reduce the number of his guards that I would have had to fight. After that, the same options for talking him down become available as described above for when you make your way to him in the Donjon.

  9. Another pathway starts with the west part of the Deadlight Court known as the Forge. The most direct way in is through the door at #15 on the map of Fort Deadlight. The problem is that an extremely vigilant guard named Ungwith the Craghearted stands watch over the door. Getting close enough to her forces a choice between letting her force you back down the stairs you came from, or attacking her and setting all of the Fort's inhabitants to turn hostile against you.

    The only way to get her to abandon her post is with a distraction. Ruddy Feyr is at #12. Talking to him drops the hint that drinking and loud carousing often gets Ungwith's attention, and not in a good way. The way to make the distraction work is to drink him under the table. The first round requires either a Constitution check of 11 or a Sleight of Hand check of 4. The second round requires either a Constitution check of 13 or a Sleight of Hand check of 5. The third round requires either a Constitution check of 15 or a Sleight of Hand check of 6. Pass all three rounds and Ruddy will pass out and leave you still standing.

    Ungwith will come down the stairs to check out the commotion. That's your chance to break for the door. Be careful not to come within sight of the guards west of the door, otherwise they'll sound the alarm.

    You will wind up at #12 on the map of the Deadlight Court. Lamond will be at #13. He's willing to help you, but only if you free his crew from the dungeons and without killing anybody. He'll give you the Deadlight's Storage Key, which he says can make reaching his crew easier. Take the stairs at #15.

    You'll now be at #4 on the map of the Deadlight Dungeon. The Deadlight's Storage Key can be used to open the door at #5.

    You can now have a Stealth character make his or way towards the southeast corner, avoiding any patrolling guards along the way, and find Oromino and the rest of Lamond's men at #6. You can open his door then and there if your character can make a Mechanics check of 5. Otherwise, you'll need him or her sneak to the table at #8 to pilfer the Deadlight's Jail Key and use it to free the captives.

    Now make your way back to Lamond. He opens the door at #11 of the Deadlight Court, but he has another plan in mind that he'd like to make you a part of. He wants you to kill some of Benweth's men guarding his secret dock, and then go the ramparts to ring a bell three times to act as a signal for Lamond and his men to make off with Benweth's personal ship. Lamond gets to make off with Benweth's prized possession, while he assures you that Benweth will be flushed out of the Donjon. Take the stairs at #15 again to go back to #4 of the Deadlight Dungeon.

    You can send a character with Stealth to go northeast and then northwest past the guards in the northeast powder room, and then open the door at #9 from the other side. Now make your way to the stairs at #12 and go down them.

    Secret Dock

    They bring you to #1 on the map of the Secret Dock. You'll have to defeat several guards at #2, but you can do so without raising the alarm for the whole fort.

    One of the guards leaves behind the Deadlight's Western Ramparts Key, which opens the way forward. The stairs at #3 lead up to the western ramparts of the Fort.

    You'll now be at #20 on the map of Fort Deadlight. Click on the bell at #21 to ring it three times. Lamond and his men will now make off with Benweth's ship, and Benweth will indeed come out in a rage over his stolen ship.

    You now have the same choices for either attacking him or talking down as with the other two pathways. A key difference here is that if you do choose to attack him, it will be under the most favorable circumstances here as he will be by himself without any guards.
  10. The Quest yields 3,500+ xp, in addition to any items you've accrued along the way.

Amazon.com
Amazon.ca
Amazon.co.uk
Sorcerer's Place is a project run entirely by fans and for fans. Maintaining Sorcerer's Place and a stable environment for all our hosted sites requires a substantial amount of our time and funds on a regular basis, so please consider supporting us to keep the site up & running smoothly. Thank you!

Disable all ads!