-

- Forums
- Chatrooms
- Gallery
- Gameplay Videos
- Upload
- Articles
- Mod Reviews
- Shop SP: Games, Movies, Books
|
|
| Pillars of Eternity 2 Video-Based Walkthrough by David Milward |
Dunnage
The Man of Chimes
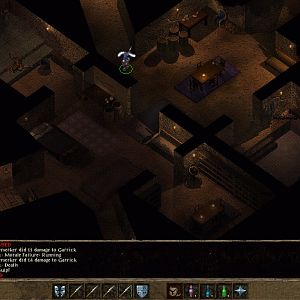
I start off at #1 on the map of Lifter's Refuge. A Nature Godlike named L'il Woody will be standing guard at the door at #3 on the map of Lifter's Refuge. I could choose to attack L'il Woody and kill her. But doing so dooms Giacolo to death. That in turn means Pallegina's Quest, The Man of Chimes, will fail. That means Pallegina will give you Pallegina's Farewell and leave for good.
It will be easy enough to talk her into willingly letting you pass the door. It is preferable for me to do so.
The good party then goes through the door to begin the encounter with a group of Godlike pirates led by Captain Tatzatl. He is on the fence about whether he should kill Giacolo, his captive. He'll try to resolve his dilemma on the basis of answers you provide to his questions. If you want to convince him and his Pirates to let Giacolo go free, the correct answers are as follows ...
Answer "Good" in response to the question of whether a mother should kill her own Godlike child to spare it a life of suffering.
Answer "make it available to everyone" in response to the question about the development of a dangerous new technology.
Answer "allow the persecution to continue" in response to the question of whether you should allow the unfair persecution of an enemy of yours
to continue.
Answer "not kill him" in response to the question of whether you should allow someone to live who has thus far done good but may in the future unintentionally cause great harm.
Answering all three or all four questions correctly will convince Tatzatl to free Giacolo and his research then and there. Completing the Quest in any way that peacefully secures Giacolo's release will be the most satisfactory to Pallegina, and she'll remain with the party afterwards. Note that Perception checks can pick up on what Giacolo thinks will be the right answer, while other party members may chime in as well.
Alliria answers questions one, two and four correctly. I answered "stop the persecution" in response to the third question as it earns Benevolent disposition, whereas the correct answer would have earned Cruel disposition. But there are alternative ways that matters could have played out.
If you get two questions correct, Tatzatl is willing to free Giacolo but destroy Giacolo's animancy research so that nobody else can use it. You can either accept those terms to conclude the Quest, or try to preserve the research. A combined Bluff check of 8 and Metaphysics check of 5, or a combined Diplomacy check of 8 and Intellect check of 14, will convince Tatzatl to change his mind and release the research as well.
If you got all of the questions wrong, Tatzatl will want to kill Giacolo. Combat becomes a given. Giacolo is likely to get killed. Captain Tatzatl will go for him first and foremost to kill him in one shot. The Captain is also immune to any Affliction that can either immobilize him or slow him down. It is theoretically possible to use a power like Flagellant's Path to have a party member block the Captain and keep Giacolo alive, but the time window to pull it off is extremely small.
If you give the nod to Pallegina to attack the Godlike Pirates after Captain Tatzatl announces his decision, it is still likely to mean Giacolo's death. However, Pallegina will appreciate that you at least tried to save Giacolo and will remain in the party. You get the 5,000+ xp and can loot the Heart-Chime Amulet from Giacolo's dead body afterwards.
If you attack the Godlike Pirates without giving the nod of permission to Pallegina first, she will curse you for failing to help Giacolo and leave the party. She'll leave behind Pallegina's Farewell. The Quest itself will fail, meaning you won't get the 5,000+ xp and Heart-Chime Amulet as rewards.
The dialogue with Captain Tatzatl provides the option at every turn to go straight to combat, often earning Aggressive disposition. And that option remains available even after Tatzatl expresses a willingness to release Giacolo and / or his research. Choosing such an option will also lead to Quest failure and Pallegina leaving for good. If you complete the Quest with Giacolo still alive, he and Pallegina will have a heart to heart before he leaves. He'll also reward you with 5,000+ xp and the Heart-Chime Amulet.
But in any event I ensured that Giacolo remained alive through what could be considered the optimal route. Alliria, Pallegina and Giacolo have a brief three way discussion. He provides rewards of 5,000+ xp and the Heart-Chime Amulet.
Alliria wears the Heart-Chime Amulet for the rest of the game. The amulet itself provides different powers depending on which type of Godlike is wearing it. A Moon Godlike enjoys +1 Power Levels during night time. That can mean even more power put behind Ninagauth's Shadowflame when I use it at night. It can also help augment the power of abilities like White Flames, to partially make up for the loss of the +2 Fire Power Levels from Sun and Moon during night time.
Alliria takes Inspired Path on her 14th level-up. It adds +1 Zeal, which means more White Flames and Brand Enemy, and decreased cost of using Sacred Immolation when I gain that power.
*Evil* Torkar
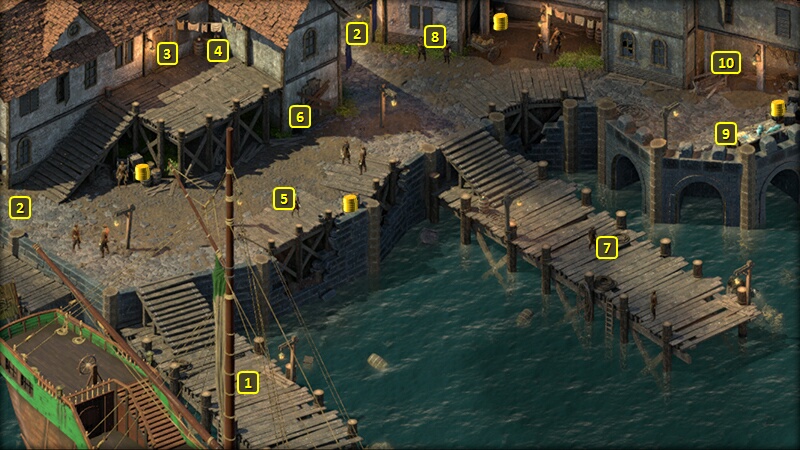
I start off at #1 on the map of Lifter's Refuge. An Ogre named Torkar, who is the last of Dessiral's Bounties is at #7.
I position myself so as to surround. Zarathos and Mirke will be just to his south. The former so that he can go after oncoming foes from the south, and the latter so that she can tank either Torkar or the enemies come from the south end of the dock. Xoti will be just a little north of Torkar, and ready to meet the gradually incoming enemies from the north. Tekehu makes sure he's within a small radius of everyone (for purposes of Nature's Balm), while Ydwin stays out of melee by positioning herself on the west edge of the docks. I speak with him to start the fight.
I put up my usual buffs. Torkar has a LOT of Health, so Zarathos goes to work on the squishier enemies on the south side of the dock. Tekehu, after putting up his buffs, makes generous use of offensive powers like Chill Fog, Relentless Storm, Nature's Mark, Seven Nights She Wept and The Skies Opened. Ydwin frequently uses powers like Phantom Foes and Amplified Wave.
Note how I have Xoti use Blade Turning multiple times when she is surrounded by enemies.
Torkar is severely weakened by the time I wipe out the foes on the south side of the dock, so I gang up on him to finish him off. It becomes a mop up on enemies who are coming in from the north.
Torkar leaves behind a belt called The Maker's Own Power. I loot it along with everything else.
I hit the north exit and sell off all my excess loot. I switch in Eder and Aloth. Eder wears The Maker's Own Power for the rest of the game. It provides the last +1 Might bonus he needs to get his Might to 25, and that means he can use Amra to its full power (i.e., causing area-of-effect damage on Critical Hits) from the very start of battles.
Aloth gains two abilities on his 13th level-up. One is Deep Wounds, which adds extra Raw Damage over time to all of his weapon attacks. And that includes multiple enemies struck by Kalakoth's Minor Blights.
He also takes Rapid Casting. Several of his spells, especially his offensive ones, will have significant casting times so this passive will definitely be a welcome addition.
Xoti takes Practiced Healer on her 14th level-up. It will increase the Healing provided by Restore and Holy Radiance by 15%.
Zarathos takes Barbaric Smash on his 14th level-up. It will recoup the Rage Cost of using Barbaric Blow. It is only after acquiring this upgrade that I am now open to working Barbaric Blow into a combat script for Zarathos. More on this later.
I now switch in the party members with the least amount of xp, Serafen, Maia, Rekke and Konstanten.
Bounty on Chornu
I go to the exit on the north side of Lifter's Refuge, and then bring in Serafen, Fassina, Rekke and Konstanten as the companions with the least amount of xp. Now I also remember to equip Rekke with his Gauntlets of Discipline.
Now I speak to Udita at #5. I collect rewards of 4,900+ xp and 1,500cp for the Bounty on Chornu. I also accept the Bounty on Kuaro. I thereafter make for the exit on the west side of Lifter's Refuge.
*Evil* The evil party brought in Serafen, Maia, Rekke and Konstanten as the companions with the least amount of xp. An additional benefit is that I avoid losing reputation with Tekehu, who would object to accepting the Bounty on Kuaro.
Yngfrith
I travel to Radiant Court, and end up at the exit at #1.
Yngfrith is now at #5 by reason of having upgraded Modwyr enough so that only the last upgrade remains. That last upgrade requires speaking to Yngfrith. The fate of the Sword itself depends on my last dialogue choice that ends the conversation.
The Aggressive option that attacks Yngfrith will result in the permanent loss of Modwyr. I could also give Modwyr back to Yngfrith with the Rational option, which will also result in permanently losing the Sword.
Alliria keeps the Sword with the Honest option. The Clever option would have worked as well. It remains a fully upgraded Soulbound Sword that will continue to speak. But I can now enchant it to upgrade it to Legendary. Also, it can now bind to anyone in the party and not just the Watcher.
It also now gains True Independence, which means its wielder is completely immune to Intellect Afflictions. Alliria will now use Modwyr during fights against certain enemies like Fampyrs and Ciphers. She herself will be immune to Charm or Dominate, and her Aegis of Loyalty passive allows her to rid a party member who is under an Intellect Affliction simply with one attack on that party member.
*Evil* Captain Henqua's Treasure Map
Now I start to work on a very limited script for Zarathos. I arrange priorities for his auto-attack, all of which have the target being within melee range as being the conditional. First priority is lowest Health, as that will play into his Death Godlike passive that scores bonus Damage on near death enemies. Second priority is lowest Fortitude, which will take advantage of Brute Force when he gets it, and also indirectly feeds into the first priority (lower Fortitude means lower health). Third priority is lowest Deflection, and last priority is nearest target.
I also script for him to use Barbaric Smash on the conditional of the target having 25% or less Health. The point there is for him to use it only when there's a reasonable possibility that it will deliver a killing blow, and trigger a recovery of the Rage spent to use it.
I also go into the "Quest Items" section of my inventory screen, and right-click on one of the Map Fragments I've collected from Dessiral's bounties. I click on "Assemble Map" now that I have all four fragments. The newly assembled Captain Henqua's Treasure Map reveals the location of the treasure near a place called the "Drowned Barrows". This is of special interest to the evil party, as the treasure will include an item that I have in mind for Serafen.
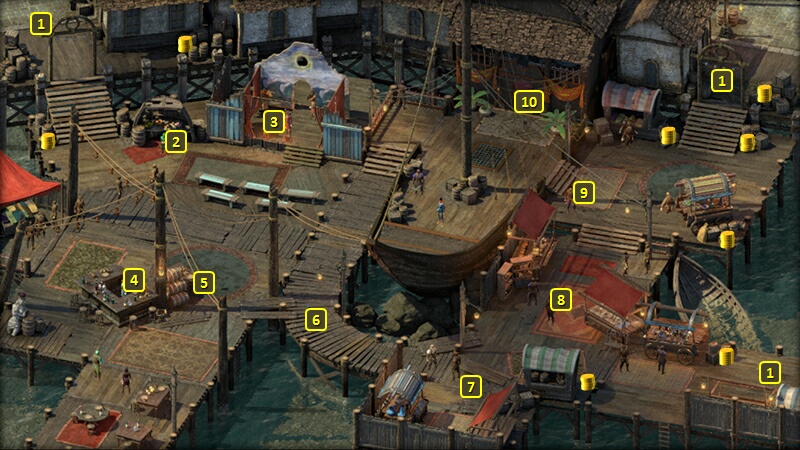
I speak to Dessiral at #6 on the map of Radiant Court, and collect xp and monetary rewards for all of her bounties.
Konstanten gains two abilities on his 13th level-up. One is Boil Their Flesh From Skin to Bone. It inflicts Raw Damage on enemies within a cone area-of-effect. If it kills a 'Near Death" enemy, that enemy explodes causing Corrosive Damage to nearby enemies. The other point is that its upgrade will give those explosions the power to heal allies at the same time.
He also takes Mercy and Kindness Followed Where'er She Walked. It adds +50% to Healing Received for any allies. It's a natural Phrase to include for any Chanter who uses healing abilities like Ancient Memory.
Rekke also gets two abilities on his 13th level-up. One is Barbaric Smash.
He also takes Mob Stance. It upgrades Cleaving Stance so that he enjoys a 5% reduction of Recovery Time for every enemy that is threatening within Melee range.
Maia likewise gets two abilities on her 13th level-up. She takes Driving Flight, a passive whereby any Ranged Weapon Attack that hits will result in the projectile passing through for another Ranged Weapon Attack on a nearby target, but for less damage. This passive would certainly work better with a weapon like The Red Hand since that would mean not only two original attacks, but two bounce attacks as well. I might insist on it were Maia a core party member. But I don't mind workable even if less than optimal or perfect builds for characters who are mostly ship combatants.
She also takes Uncanny Luck, a passive that provides both a 5% chance to avoid any attack completely, and a 5% chance to convert a Hit to a Critical Hit. Note that I don't take Deep Wounds, which would be my usual choice for Rogue builds at this point, because her really low Intellect owing to her Ring of Mule's Wit means it won't really have any meaningful duration.
And Serafen also gets two abilities on his 13th level-up. One of them is Blood Storm. It upgrades Blood Frenzy so that killing blows will extend its duration.
He also takes Blood Thirst. Scoring a killing blow will result in a brief benefit whereby any actions taken by the Barbarian will have instant Recovery, with no Recovery Time at all in between those actions. It's pretty much an obligatory choice for Barbarians when the 7th-tier abilities are reached.
I then go to the Treasure Trove at #10, and buy some gems from Dimessa.
Captain Henqua's Treasure Map
Here is the equivalent video for the good party. Fassina gains three abilities on her 13th level-up.
She automatically gains Plague of Insects as an Animist. It can be a very useful spell, especially against multiple enemies that use activated abilities. It scores Raw Damage over time to multiple areas in a large 5m radius, and Sickens (-5 Constitution, -25% Healing Received) them, and nullifies their ability to use Concentration to avoid Interrupts when attempting to use activated abilities.
She also takes Relentless Storm. It hits enemies in a 5m radius around the caster with bolts of electricity that both inflict Shocking Damage and briefly Stun (-5 Might, Cannot Engage, Cannot take any actions, -4 Penetration) their targets, every 3 sec for 15 sec. Offensive damage and crowd-control rolled into one.
She also takes Wall of Force. It inflicts Raw Damage as well as Hobbled (-5 Dexterity, reduced Stride) only on enemies, so it can be planted right in the thick of battle with little fear for party members. It also benefits from Fassina's bonus Conjuration Power Levels.
Serafen gains two abilities on his 13th level-up. One of them is Blood Frenzy. It upgrades Blood Frenzy so that killing blows will extend its duration.
He also takes Blood Thirst. Scoring a killing blow will result in a brief benefit whereby any actions taken by the Barbarian will have instant Recovery, with no Recovery Time at all in between those actions. It's pretty much an obligatory choice for Barbarians when the 7th-tier abilities are reached. But it will have special meaning for this particular Barbarian build that's based on maximizing Armor Rating. The Patinated Plate, once I get it, will provide a +2 bonus to Armor Rating. But that comes at the expense of an aggregate +75% penalty to Recovery Time. Blood Thirst, when it triggers, allows the Barbarian to completely ignore that penalty and instantly Recover from any Attacks or other actions he takes for the duration. It very often means having your cake and eating it too.
*Evil* A Tidy Performance
Now I speak to Calandra at #3 on the map of Radiant Court. Her troupe has been struggling to draw crowds, and she'd like my help enlisting new actors that can take her play to the next level. She specifically wants Taerna, who works in King's Coffin, and someone big who can play a blue-skinned Eothas. Zarathos insists on a cut of the profits. I travel to King's Coffin, which is on the west side of Dunnage.
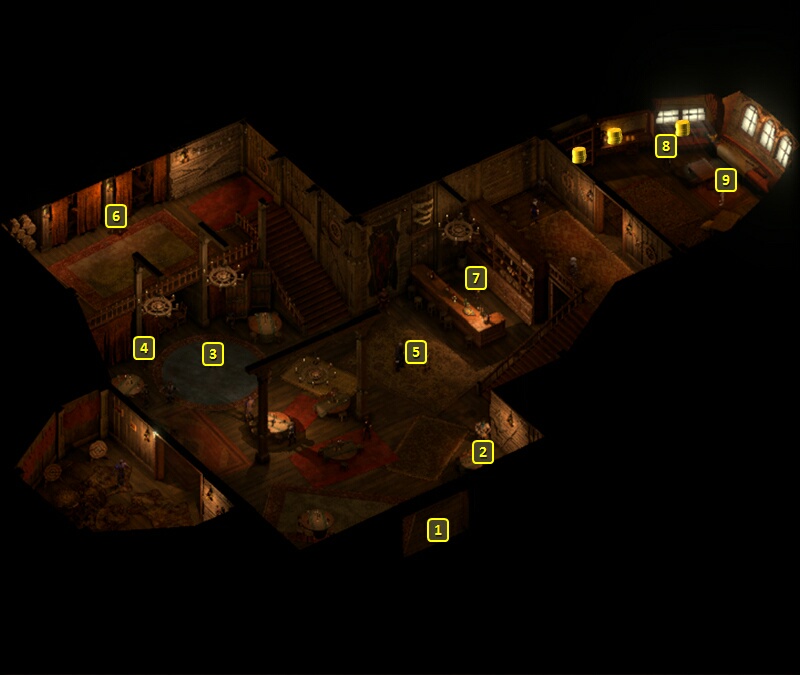
Taerna is at #3 on the map of King's Coffin. She'll gladly return to Calandra, but she's indebted to Jacob Harker for 700cp and is having to work it off. She'll insist that you pay Harker directly should you try to give her the 700cp yourself. This conversation starts the Task called A Tidy Performance.
Now I speak to Jacob Harker at #7. He won't accept 700cp to release Taerna, at least not initially. One option is to double the amount to 1,400cp to convince him to let her go. Another option is to make a Diplomacy check of 8 to convince him to accept the 700cp and let her go (which Alliria does in the good party). Zarathos makes an Intimidate check of 10 to accomplish the same thing. He informs Taerna afterwards, and she indicates that she'll pack up and head over to Calandra.
Now I go to Lifter's Refuge. A blind Aumaua beggar named Barquami will be at #6 on the map of Lifter's Refuge. It won't take much to convince him to accept the acting job.
Now I attempt to return to Radiant Court. But now a gang of thugs led by Eamund the Fox accosts me. He's convinced that I can pay him money he feels Harker owes him, and he'll pick a fight no matter what I may try to say. I do manage to win, even though I don't have my core party together. It's a matter of taking out the Cipher first, then the Pistoleers, and then Eamund himself. Leave the shield-wearing Thugs for last. He leaves behind a Ring of Minor Protection, Boots of the Stone and a Fine Sabre.
Zarathos wears the Boots of the Stone for the rest of the game. The +1 to Dexterity will help him attack more often. The +1 Resolve will augment his Enlightened Agony ability in that any negative effects on him will be cut even shorter in duration. The Resistance to Might Afflictions is also helpful. It will prevent at least attacks that cause the Staggered Affliction (-5 Strength, cannot Engage) from cancelling out the Tenacious (+5 Strength, +2 Penetration) Inspiration provided by his Frenzy ability.
The evil party returns to Radiant Court. Zarathos speaks again to Calandra, and she obliges him to watch the new play. I get rewards of 3,900xp and 1,500cp for completing the Task.
Iron Gut
Now I travel to King's Coffin.
I arrive at #1 on the map of King's Coffin. I speak to Pietro at #6. He swallowed a large gemstone to hide it from pirates who boarded his ship. But now he's having trouble "expelling it". He'd like my help in that regard. He believes Rosenella in the Radiant Court can come up with a concoction to help solve his problem. So now I travel back to the Radiant Court.
I arrive at #1 on the map of the Radiant Court. I speak to Rosanella at #4 on the map of Radiant Court. She informs me that a special concoction called Ondra's Bile can help Pietro, but it requires special ingredients. They are a Rotten Hagfish, an Unripened Palm Stone, and Fire Kelp Extract.
I buy the Unripened Palm Stone from Birna at #2. *Evil* The evil party had already stolen it from the crate near Birna when they were first in Dunnage, when the purpose had been to earn negative reputation with the Principi. I leave and travel to Lifter's Refuge.
I arrive at the exit on the north side of Lifter's Refuge. I get the Rotten Hagfish from the barrel at #10. Now I travel to King's Coffin.
I start off at #1 on the map of King's Coffin. Now I purchase the Fire Kelp Extract from Jacob Harker for 250cp at #7. I could have pickpocketed it from him instead.
Now I bring the ingredients to Pietro to complete the Task and receive rewards of 5,750xp and a Black Pearl.
Rekke takes two abilities on his 13th level-up. One of them is Power Strike. It spends 4 Discipline to make a Full Attack against a single-target with bonuses of +200% Damage and +4 to Penetration. It also Stuns (-5 Might, cannot Engage, -4 Penetration, cannot act) the initial target, and inflicts Staggered (-5 Might, cannot Engage) and Raw Damage on enemies in a cone behind the initial target.
He also takes Unbreakable. If Rekke should get knocked out, he'll revive with +100 Health, +10 all Defenses, and +2 Armor Rating. The revival can trigger once per Encounter. Having this trigger while Rekke is a ship combatant will not result in any Injuries for him. That's why I don't mind loading him up with items or abilities that make him take penalties on Deflection, and items that will unleash damage on nearby enemies upon being knocked unconscious.
*Evil* Symbols of Death
I switch out Serafen for Ydwin. I don't want to lose any influence with the former during my next conversation, and the other is about to get an item that I want for her. I travel to Balefire Beacon.
I speak to Captain Furrante at #3, and inform him of what I've learned from Yseyr. I get 14,000+ xp and the Upright Captain's Belt as rewards for completing the Symbols of Death Quest.
Ydwin wears the Upright Captain's Belt for the rest of the game. Of all the characters in the evil party, Ydwin is the character I least want standing next to enemies who make melee attacks whenever I can help it. The immunity to any Push or Pull effects is an extremely welcome benefit for a spellcaster who doesn't want to fight in Melee, and definitely wants to minimize getting Engaged. The +1 bonus to Constitution is sugar on top.
Captain Furrante also wants me to make contact with Master Kua on Crookspur Island. This particular conversation started the Quest called A Shrewd Proposition.
Now I assemble the core party back together. Mirke takes Armored Grace on her 14th level-up. The -25% reduction in Recovery Time can take a little of the edge off the otherwise slow Recovery Time, at least in those instances where she can get extra attacks through her Monk abilities or gain Instant Recovery through her Rannig's Wrath Rapier.
Tekehu takes Rapid Casting on his 14th level-up. Reducing casting times is always a good thing for dedicated spellcasters, but that is especially the case for Druids, whose spells usually have lengthy casting times.
I leave the ship, but get a letter from Captain Aeldys offering an alternative proposition.
Symbols of Death
The equivalent video for the good party. Alliria refuses to commit to the request to aid the Crookspur Slavers, which earns reputation with Serafen.
I go to the exit at #1, and briefly switch in Ydwin. She takes two abilities on her 13th level-up.
One of them is Keen Mind, which is a passive that gives the Cipher a +10 bonus to Focus at the start of each battle.
The other is Deep Wounds, which applies Raw Damage over time after each successful weapon Attack.
Now I put my core party back together. Mirke gets the Upright Captain's Belt, and for the same reasons as Ydwin in the evil party. I don't want Mirke to do anything but fire her guns from a distance, and the immunity to Push and Pull effects is thus a very welcome benefit for her. The +1 bonus to Constitution is likewise sugar on top.
She also takes Shadow Step on her 14th level-up. It's similar to Escape, but it also provides the option of spending 3 Guile instead of 1 for Escape so that the next weapon Attack will also cause Paralysis.
Eder takes Improved Critical on his 14th level-up. It adds +10% Damage to his Critical Hits.
Aloth takes Armored Grace. The -25% reduction of Recovery Time will not only help him attack faster in Melee combat, it will also let him Recover from casting spells faster. And some Wizard spells do have significant Recovery Times.
Now I return to my ship. It's time to collect some Bounties.