-

- Forums
- Chatrooms
- Gallery
- Gameplay Videos
- Upload
- Articles
- Mod Reviews
- Shop SP: Games, Movies, Books
|
|
| Pillars of Eternity 2 Video-Based Walkthrough by David Milward |
Bounties in West Deadfire
The Siren's Song
Alliria sails a little southeast, and comes across a Principi Dhow called The Siren's Song. I defeat Rafiq the Red Beard and his crew during a boarding battle.
As an aside, boarding this ship also leads to another chance to gain a Vailian Hullbreaker if you want one.
I sail north and engage in naval combat with a Principi Master Captain. It's a Galleon with the exact same cannon setup as my own ship, so this battle becomes one of trading blows. The battle starts at a range of 375, so I turn portside to aim my Iron Thunderers and Haeferic's Nose at it. I outlast it through more accurate gunfire, and having The Red Dream as my Hull.
I do once in a while have to deal with a problem like Flooding or a Crew Member Overboard. Luca shows the value of having a Master Boatswain in these situations. I choose the Report option, and then assign four spare Crew Members to it. And Luca having four Ranks in Boatswain means I can get rid of those problems very quickly.
The battle also shows the value of having spare Crew. Emeini briefly subbed in for Vanizzi when he was the Crew Member who got sent overboard. I eventually sink the enemy ship.
I continue north and board a Crookspur Captain along the way.
I continue north and dock at the south end of Crookspur Island, which is at #50 on the World Map.
*Evil* Dhwrgas the Ascetic
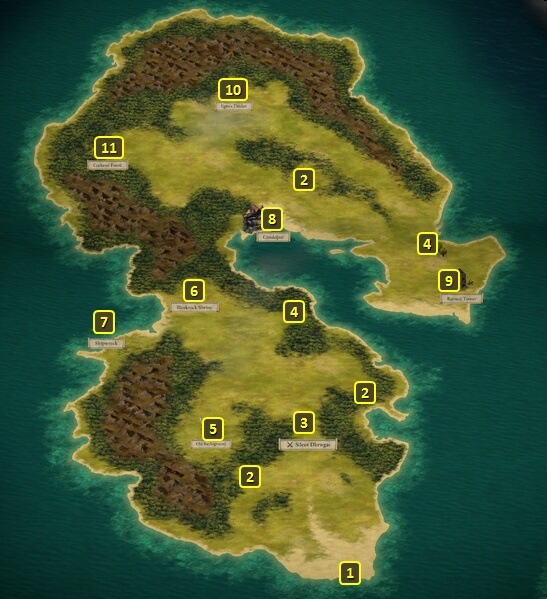
I switch out Ydwin for Eder. I go to #3 on the map of the island.
I rather handily defeat a band of Monks and Panthers led by Dhwrgas the Ascetic. Dwhrgas himself leaves behind an Amulet called Precognition. I have Eder wear it for the rest of the game. It feeds into his fighting style. The Damage of the first two Critical Hits he receives will be reduced by -75%. The first two Critical Hits he dishes out will have their Damage increased by 25%.
Eder also takes Armored Grace on his 14th level-up. The 25% reduction to Recovery Time will stack with the other reductions provided by the Devil of Caroc Breastplate and Mob Stance, which means he'll be making highly damaging attacks with his two-handed Amra with considerable frequency and speed.
I gather miscellaneous items from other spots on the island, but I ignore the Shrine at #6 as I have no use for it.
I switch out Eder for Rekke after returning to the ship.
The Blacktip
I sail southeast and board a Rauataian Dhow called The Blacktip. I defeat its crew led by Desiwa the Shark.
I thereafter dock at the island at #47 on the World Map.
Beina
I pick up some water from an Oasis on the island. I then enter Beina's staging area.
The area itself allows me to set up a bottleneck. So I have Aloth switch to Jernaugh's Careful Calamities. He starts the battle with a crowd-control sequence of Infuse with Vital Essence (for the Intellect bonus), Grease, Pull of Eora and then Malignant Cloud. Pallegina keeps the party buffed with The Prisoners Turned On Their Captors to protect against Dexterity and Might Afflictions.
Alliria spams Ninagauth's Shadowflame, as it is night time. Mirke spams Stunning Surge with her guns. I blow the enemies away in rather short order.
Beina leaves behind two items of note. One of them is the Nomad's Brigandine. It can be a good armor for tank builds. It is somewhat unique in that it is the only armor that is both a heavy armor and can provide a Deflection bonus. Chances are I would have used it but for the fact that I always had different armors for various reasons in mind for my characters.
The other is the Girdle of Eoten Constitution. Alliria wears it for the rest of the game. The +3 bonus to Constitution means maximizing the pool of Health she can draw on as a Blood Mage to fuel her spells. It also of course makes her more resilient in combat generally.
Pallegina takes Inspired Path on her 14th level-up. It increases her pool of Zeal that she can call on for purposes of using Greater Lay on Hands.
*Evil* Beina
Rekke gets the Girdle of Eoten Constitution in the evil party. More Health and more Fortitude is always a good thing for melee fighters, especially ones who fight with two-handed weapons and lower Deflection.
Mapping the Archipelago: West Wakara Reef
I sail back to Neketaka at #17 on the World Map. I board a Royal Deadfire Company Master Captain, a Crookspur Captain and a Deadfire Merchant Ship along the way.
I travel directly to Sanza's Map Emporium once I reach Neketaka. Konstanten takes two abilities on his 13th level up.
One of them is Barbaric Smash. It upgrades Barbaric Blow so that it recoups any Rage spent on it if it results in a killing blow.
The other is Seven Nights She Waited While the White Winds Wept. It's an Offensive Invocation that launches seven bolts of ice from the Chanter that inflict Freezing Damage only on enemies.
I report my discoveries to Sanza, and receive 4,000cp and 22,000+ xp as rewards for completing the Quest called Mapping the Archipelago: West Wakara Reef. He now gives me a new Quest, Mapping the Archipelago: The Burning Shoals. I now leave the Emporium.
Bounty on Desiwa
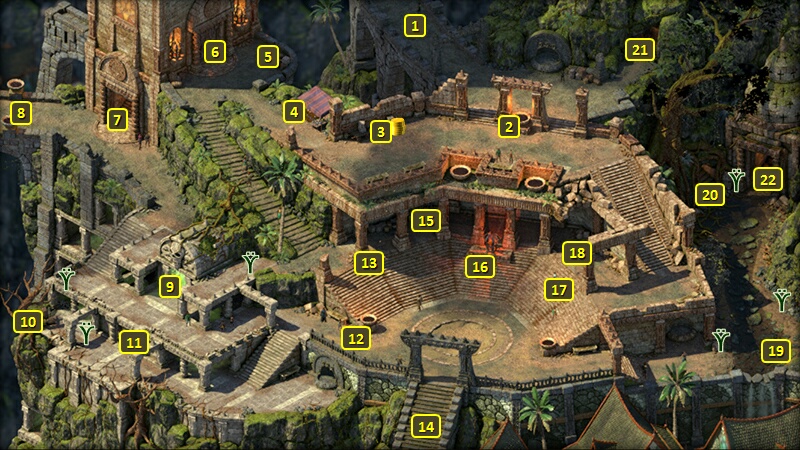
I am now at #20 on the map of Queen's Berth.
I go south and speak to Aenia at #27. I get rewards of 4,000+xp, 3,500cp and a moderate gain of reputation with the Vailian Trading Company for the bounty on Desiwa the Shark.
I leave through the exit at #33 on the southside. I buy crafting ingredients from The Dark Cupboard and Cuitztli's in Periki's Overlook.
*Evil* Bounty on Beina
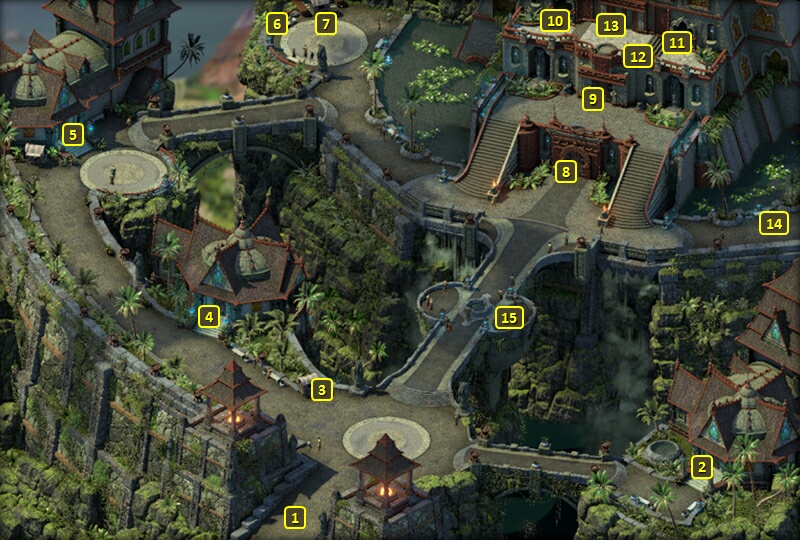
The evil party purchases some gems from Una at at #1 on the map of Serpent's Crown.
I go to Nungata at #6, and collect the bounty on Beina for rewards of 5,000cp and 18,000+ xp. He also accepts a bounty on Flamewalker Vessali.
Zarathos chooses Tough on his 15th level-up. More Health is always a good thing, especially for a character who thrives in himself getting hit and taking damage.
Aloth takes Tough on his 14th level-up as well. The motivation is similar yet different. In this instance it helps make a glass cannon (which Spellblades often are) a little less fragile.
Maia takes Faithful Companion. Ishi gains Resistance to both Intellect and Perception Afflictions.
I head over to the doors to the upper level of the palace at #9.
Bounty on Rafiq the Red Beard
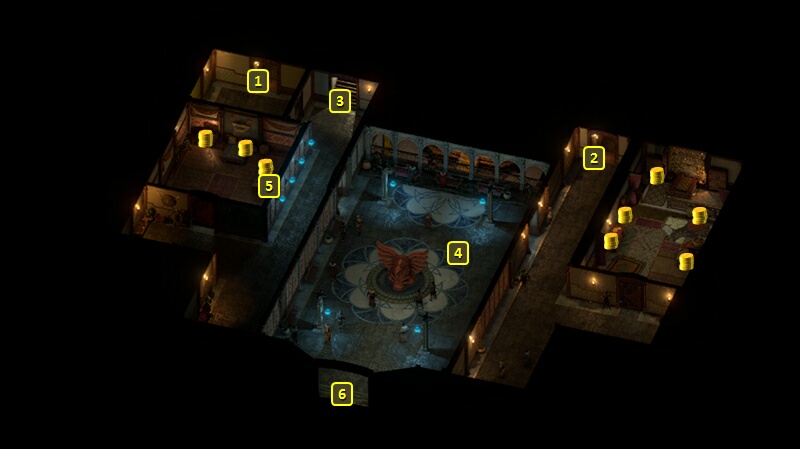
That brings either the good party or the evil party to #6 on the map of the Upper Floor of the Kahanga Palace. I speak to Barati at #4 and collect 2,500cp and 9,500xp as rewards for the bounty on Rafiq the Redbeard. Barati has no more bounties for me.
Fassina takes Rapid Casting on her 14th level-up. It increases Action Speed by 10% when casting spells.
Alliria takes Tough on her 15th level-up. More Health is always good for any character, but it's especially good for a Blood Mage who could always use a larger pool of Health to draw on when using Blood Sacrifice.
I go back out the door at #6, which brings me back to the door at #9 on the map of Serpent's Crown. I go east to the exit at #14.
I briefly bring Xoti back into the party. She takes Spell Resistance on her 14th level-up. It provides a 10% chance to avoid the effects of any spell outright, which makes it a good passive for any character regardless of class. I switch Konstanten back in after that.
*Evil* Bounty on Rafiq the Red Beard
The equivalent video for the evil party. Rekke takes Armored Grace on his 14th level-up. The 25% reduction of Recovery Time will stack with any reductions applied by Mob Stance.
*Evil* Bounty on Dhwrgas the Ascetic
I switch out Maia for Serafen. The evil party (and the good party too) travels to The Sacred Stair, and arrives at #1.
Zarathos speaks to Okauro at #3 and collects 5,000cp and 4,500+ xp as rewards for the bounty on Dhwrgas the Ascetic. I now get the bounty on Onadere the Temptress.
Serafen takes Spell Resistance on his 14th level-up. A straight 10% chance to avoid being affected at all by a hostile spell is not a bad passive to take, especially if you're running out of meaningful choices as a single-class character.
I reassemble my core party. Ydwin takes Rapid Casting on her 14th level-up. Although there are some Cipher spells with very fast casting times like Borrowed Instinct and Phantom foes, there are others that will benefit from this passive like Amplified Wave and Ancestor's Memory. I return to my ship.
The Bite of Ngati
I am now at #7 on the World Map. I sail northeast and board a Huana Junk called The Bite of Ngati. I have little trouble defeating their crew, led by Kuaro.
I thereafter chase down a Vailian Novice Captain and a Huana Novice Captain.
I then dock at the island at #33.
Onadere the Temptress
I enter the domain of Onadere the Temptress. Alliria switches to Modwyr, as the spirits here can Charm or Dominate party members.
I go on ahead to fight Onadere the Temptress, along with a pair of Wraiths, a Shade, and a pair of Earth Blights. I tuck Mirke up against a rock outcropping, and have the rest of the party form a shield wall around her so that spirits can't reach her. Pallegina also uses The Prisoners Turned On Their Captors to protect against both Dexterity and Might Afflictions. Beyond that the usual methods suffice to wear them down.
Onadere leaves behind a Cloth armor called Humility, but I don't really have any use for it.
I get a random item or two from the nearby Old Battleground and then return to ship.
Pwgra's Tooth
I sail a little southwest to begin with in order to attack a Vailian Master Captain. I notice that all of its cannons have a range that goes from 300+m and out. I therefore sail closer to bring it within range of my Vailian Hullbreakers. I originally intended to sink it outright. But then I got some Raking Hits that took out several of their Below-Deck Crew Members. So I pass another three rounds, and then hit them with Grapeshot to take out their Above-Deck Crew Members. I close in after that for a boarding battle against a drastically reduced crew.
Now I sail northeast and board a Huana Master Captain, and win rather handily.
I continue to sail northeast and board a Huana Dhow called Pwgra's Tooth, captained by Burunga. I defeat the crew swiftly.
Now I sail southeast and dock at the island at #35.
Flamewalker Vessali
I switch in Konstanten for Aloth for the next encounter. Now I enter the domain of Flamewalker Vessali.
Eder takes Clear Out on his 15th level-up. It makes a Primary Attack that can hit multiple enemies in an arc in front of him, and knock them Prone. It is also a prerequisite to an upgrade that I have in mind.
I "Wait" until Evening, and then set up at a bottleneck in the area. My tanks hold the neck. Alliria and Mirke spam Ninagauth's Shadowflame and Stunning Surge respectively. I thereafter gang up on the two Archers to close out the battle.
Flamewalker Vessail leaves behind an amulet called Orishia, which Konstanten wears for the rest of the game. It grants one of six effects at random at the start of each combat: +5% Action Speed, 25 point Damage Shield, -20% Hostile Effect Duration, +1 Penetration, -10% Recovery Time, +15% Stride. Most of them will enhance the abilities of a character designed to hit hard in melee for damage and as often as possible.
*Evil* Flamewalker Vessali
I switch out Ydwin for Rekke. The evil party conducts this battle differently, first going into Stealth mode and then quickly rushing the Archers, the Flame Blight and the Flame Bat before worrying about the Marauders.
Rekke gets Orishia in the evil party, and for the same reasons.
Bounty on Flamewalker Vessali
The good party sails back west. I attack a Principi Master Captain. It decides it's going to close in and board me. So I turn starboard, hold position and get in a volley with my Vailian Hullbreakers while I can. I manage to take out a few of their Crew Members. So I gladly win a boarding battle against a reduced Crew after that.
I continue to sail west and board a Huana Master Captain.
I continue west and attack a Royal Deadfire Company Master Captain. As a Junk, it has five cannons on either side. But my Galleon has far more Hull Health. And it plays right into my hands by sailing closer. My four Vailian Hullbreakers will far outpace its five Royal Bronzers or five Double Bronzers. I did at one point take a volley and had to deal with loose cargo, but Luca sending four Crew Members on that got rid of it very quickly. I otherwise sink the enemy ship in short order.
I sell off my excess loot and refill my ship supplies once I reach Neketaka. I switch in Xoti, Serafen, Fassina and Ydwin. I then buy crafting ingredients from both The Dark Cupboard and Cuitztli's in Periki's Overlook.
Ydwin takes Borrowed Instinct on her 14th level-up. It imposes Intellect and Perception penalties on an enemy target. But more importantly, it boosts the Cipher's Accuracy and Defenses by +20. And that will indeed augment Ydwin's ability to fight up close in Melee.
Serafen takes Stalwart Defiance on his 14th level-up. It allows him to use Savage Defiance at a reduced cost of 2 Rage instead of 3.
Now I switch out Xoti and Serafen for Rekke and Konstanten, and then travel to Serpent's Crown.
I arrive at #1 on the map of Serpent's Crown and buy gems from Una at #3.
I speak to Nungata again, and get 5,000cp and 10,000+ xp for completing the bounty on Flamewalker Vessali. I now also accept the bounty on The Steel Preacher.
Rekke takes Weapon Mastery on his 14th level-up. It adds another +5% to Damage with attacks made with his Estoc.
Konstanten takes Rapid Casting on his 14th level-up, which will reduce the casting times of his Offensive Invocations.
*Evil* Bounty on Flamewalker Vessali
The evil party attacks a Vailian Master Captain on the way back to Neketaka. It's equipped with only Aedyr Channel Guns and Imperial Long Guns. That means it has no guns for close up fire. That means the easy choice is to close in on them. I do a Half-Sail at one point just to keep myself about 100+m, and avoid spooking them into boarding me. I then fire away repeatedly with my Magranite Flamethrowers. It tries to get away, but I just board it after having taken out several of their Crew Members.
I also board a Huana Expert Captain and a Royal Deadfire Company Expert Captain along the way.
I sell off my excess loot and refill my ship supplies once I reach Neketaka. I switch in Serafen, Maia, Rekke and Konstanten, and then travel to Serpent's Crown.
I buy gems from Una. Konstanten takes Her Tears Fell Like Rain on his 14th level-up. It upgrades Seven Nights She Waited so that each Freezing Damage bolt causes a small area-of-effect of additional Freezing Damage when it first strikes a target.
I speak to Nungata again, and get 5,000cp and 10,000+ xp for completing the bounty on Flamewalker Vessali. I now also accept the bounty on The Steel Preacher.
Bounty on Onadere the Temptress
I travel to The Sacred Stair, and arrive at #1.
I speak to Okauro at #3 and gain a minor increase in reputation with Neketaka, 2,500cp and 6,000+ xp as rewards for the bounty on Onadere the Temptress. I then accept the bounty on Ikorno.
I go back to the entrance at #1 and briefly switch in Mirke. She takes Tough on her 15th level-up. More Health is always good for any character.
I switch Konstanten back in before heading for the Brass Citadel.