-

- Forums
- Chatrooms
- Gallery
- Gameplay Videos
- Upload
- Articles
- Mod Reviews
- Shop SP: Games, Movies, Books
|
|
| Pillars of Eternity 2 Video-Based Walkthrough by David Milward |
Sea-Lashed Crypt
*Evil* Sea-Lashed Crypt
I show the next battle from the perspective of the evil party, because it's quite instructive. Almost any battle can be won with the Salvation of Time-Ancestor's Memory loop. But one of the chinks in that armor is either Arcane Dampener (which will suspend all buffs) and Arcane Cleanse (which will reduce all buffs by 1,000 sec duration). The next battle has several 20th level Fampyr Wizards, all of whom can use Arcane Dampener. So I can't rely on the loop.
Tekehu loads up on Concussion Bombs and Stun Bombs in his quick-item slots.
Xoti prepares her quick-item slots so that she has five Scrolls of Minor Healing, five Scrolls of Plague of Insects and five Scroll of Wilting Wind.
I also make sure AI is turned off. The party goes into Stealth mode and then travels to the Sea-Lashed Crypt.
I set up so that Tekehu and Ydwin are tucked into a corner to the northeast. The rest of the party will form a protective ring around them. I come out of Stealth to start the fight. Tekehu starts with Nature's Balm, and Xoti starts with Holy Meditation (as much for the Concentration as anything else).
The strategy is one of bombardment. But what I do at a given moment is always dictated by circumstance. Zarathos and Mirke attack whoever comes within reach, but they never break the protective ring.
Xoti will use a Scrolls of Wilting Wind when the party is healthy and she has the chance to catch several Risen Armsmen and Fampyr Wizards with it. She'll use a Scroll of Plague of Insects if numerous enemies, especially Fampyr Wizards, are bunched in close around the party. She sometimes has to use a Scroll of Minor Healing or a Restore spell if the party has taken enough damage.
Tekehu will use a Concussion Bomb if he can likewise catch distant Risen Armsmen and Fampyr Wizards with it. He'll use a Relentless Storm spell or a Stun Bomb when enemies are more bunched in. He also uses his Many Lives Pass By phrase modal to give the enemies alternate targets.
Ydwin will use Amplified Wave when there's plenty of enemies at a distance, or Silent Scream for when they're bunched closer in. She may use an Ancestor's Memory on Xoti or Tekehu if I feel the need to renew their resources.
This strategy has the benefit of taking out the Risen Armsmen relatively quickly, as their massive hits for single-target damage can add up. The battle becomes distinctly easier when they're out of the picture.
But the Wizards can still be quite dangerous, especially if they use the Wall of Many Colors spell on the party. That's why Scroll of Plague of Insects (which deprives enemies of Concentration) combined with Silent Scream and Stun Bombs can help minimize the danger when the Fampyr Wizards start to gather in close around the party.
Furthermore, it is during this battle that Tekehu shows just how powerful the Garden of Life spell can be. It's a given that party members are going to take damage. But once I've brought down some enemies and they fall close to the party, that's the perfect situation to use Garden of Life. It turns each of those dead bodies into fonts of healing. Each of them send out pulses of healing that contribute to the cumulative healing of nearby party members. And that helps the party stay on its feet through the onslaught.
I cast it a second time after the first one expires. And it's even more powerful this time around, because it has even more dead bodies to work with. I eventually manage to outlast everything.
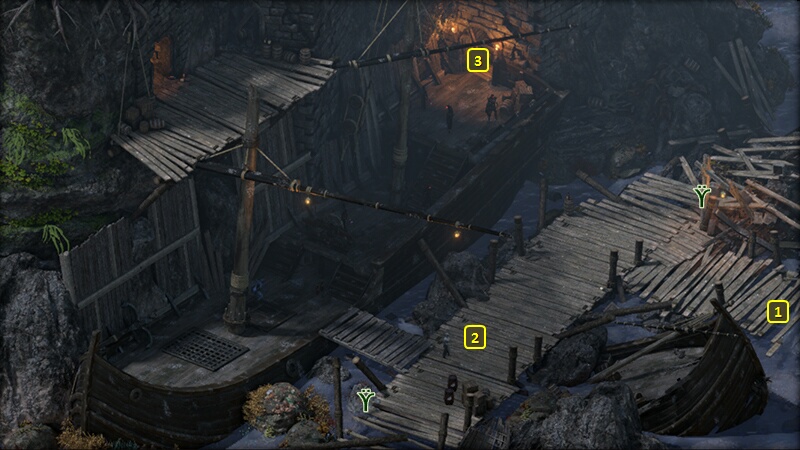
I head for the door at #3.
Voidwheel
That brings me to #4 on the map of the Crypt Interior. Mirke goes south and disarms a trap. The party kills off a Revenant Ogre at #5.
The door at #6 will require a Mechanics skill check of 18 to open. So Eder briefly lends Mirke his Burglar's Gloves, and she quaffs a Thief's Putty to open the door. I defeat a few Darguls, Skeletons and a couple of Fampyrs on the other side.
I find and press a hidden button at #8. A trapped sarcophagus at #8 has a Great Sword called the Voidwheel. It is an interesting possibility, as it starts off with bonus Raw Damage, and a 15% chance to hit the target with Necrotic Lance and reduce its Corrosive Armor Rating by -3. You can enchant it further to increase the chance of Necrotic Lance to 25%, and add 10% Corrosive Damage, and having 15 Health recouped on scoring a killing blow. It does however inflict 10% of the Damage caused by the weapon on the wielder as Raw Damage, although that can be mitigated with the Voidward ring. Like I said, interesting possibility but one that didn't fit into any of my plans.
Runemaster Kastor
Now I defeat Runemaster Kastor and his minions at #10. I loot a Vial of Fampyr Blood from his body, which I will need to reach the next area.
*Evil* Last Blackwood Log
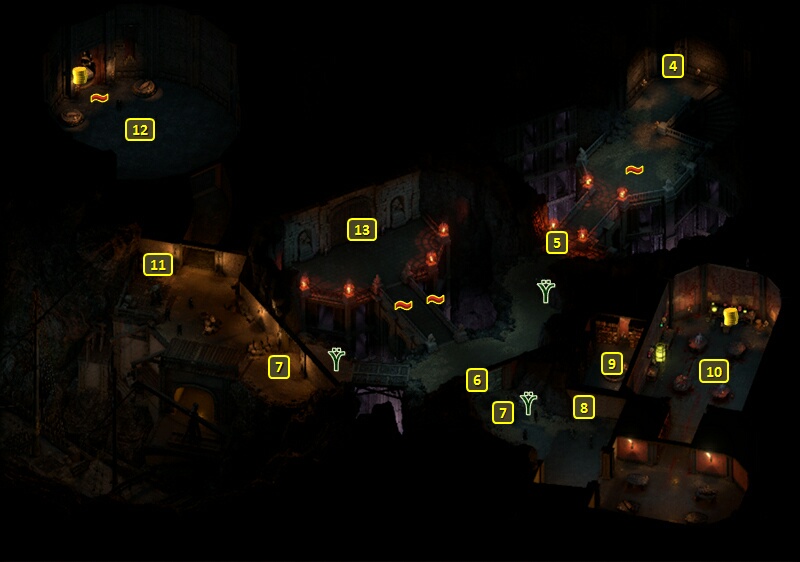
I show this part from the perspective of the evil party. They now go to the room in the southwest corner, and defeat another group of undead.
The crate at #11 has the fifth and last Blackwood Log that they need to construct the Blackwood Hull.
Quartermaster Harka
I go on to the room at #12, where I fight numerous undead led by Quartermaster Harka. I can't really set up a crowd-control zone, as several of them have abilities like the Barbarian's Leap or the Rogue's Escape. They surround my party. But here I show the possibilities of having a Paladin and a single-class Fighter in the same party. Alliria uses Sacred Immolation, more than once. And each time she does, Eder uses Take a Hit. Alliria has her Damage taken from using Sacred Immolation reduced by Take the Hit, as half of it passes on to Eder. And that in turn gets reduced even further by Eder's Voidward ring. Add the passive healing auras on top, and it's like I'm not even feeling a thing. Alliria throws in multiple castings of Death Ring for good measure. Mirke spams Stunning Surges as always, while Fassina unleashes spells like Relentless Storm and Plague of Insects.
Quartermaster Harka leaves behind the Blackened Plate Armor. Pallegina wears it for the rest of the game. The 50% reduction of Damage from Disease and Poison attacks is meaningless, since she has Righteous Soul. It provides one of Insightful (+5 Perception), Smart (+5 Intellect) or Steadfast (+5 Resolve) for at least 30 sec at the start of each combat. The real point is that I add the Life in Death enchantment, which provides yet another healing passive aura in addition to Ancient Memory and Exalted Endurance and Lethandria's Devotion. I also add Usher's Visage, which emits an aura that reduces the Armor Rating of all enemies within range by -1. I also upgrade it from Superb to Legendary.
Harka also leaves behind another Vial of Fampyr Blood. I head towards the central room, and disarm the two traps on the bridge. I then use both Vials of Fampyr Blood to open the door at #13, which leads to The Glowing Outcrop.