-

- Forums
- Chatrooms
- Gallery
- Gameplay Videos
- Upload
- Articles
- Mod Reviews
- Shop SP: Games, Movies, Books
|
|
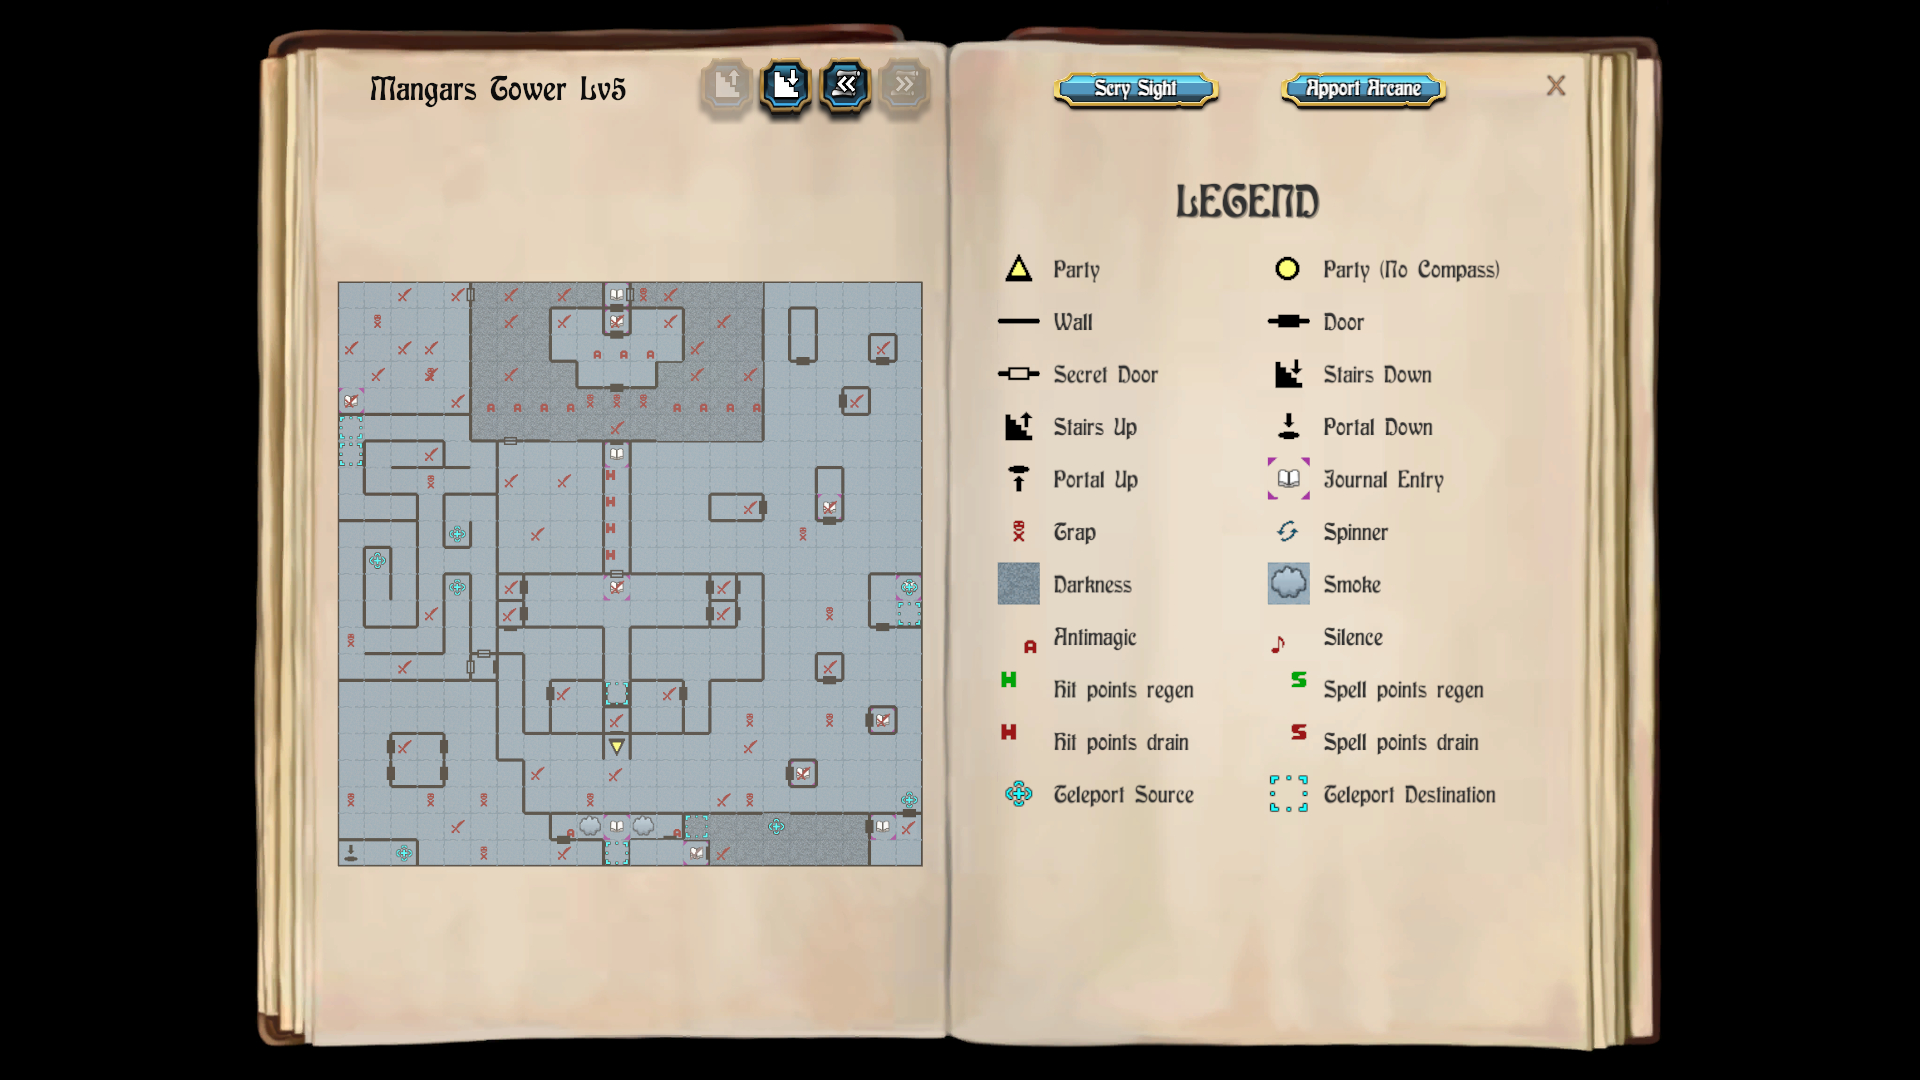
MANGAR'S TOWER, LEVEL 5
Mangar's Magic Mouth
I start off at 0N 0E on the map of the fifth level. I go two squares east to the teleporter, which takes me to 0N 10E.
I go one square north, where there's a Magic Mouth that serves no purpose other than to inflict some damage on the party members.
I go west two squares, and my spells get snuffed out by an anti-magic square. I continue south through the door, winning a fight against numerous monsters at 0N 8E.
I thereafter put up Kiel's Magic Compass and Locate Traps, and then use Trap Zap on the trap at 0N 5E.
Death Dagger
I next do the fight against random monsters at 1N 4E, and then another fight against random monsters at 4N 2E.
The latter fight results in my obtaining a Death Dagger, which insta-kills through Critical Hits on contact, as a random drop. I hold onto it. I won't be using it during the first game, but I have my eye on it for the sequels. In fact, it is a preferable alternative to the Stoneblade in that it also has a +3 bonus to hit.
I go back to where the Magic Mouth had been, go east two more squares and onto yet another anti-magic square (at 1N 12E), and then go south through the door. I put up Ybarra's Mystical Coat of Armor, Kiel's Magic Compass and Locate Traps once I am past the anti-magic square.
5 Storm Giants
I fight and kill five Storm Giants at 0N 14E. I go ahead one more square and win a fight against numerous monsters, and afterwards go to the east end of the dark room.
Dissension
At 1N 20E is a square that is guaranteed to make one party member become Possessed and force the party itself into self-combat mode. In this case, it happens to be my Paladin, Lord Stygar. Luckily, Talia was able to use a Dispossession spell on him before he harmed anyone.
I continue east one more square for another massive xp fight. After that, I go north through the door and get teleported to 16N 0E.
Now I use Trap Zap on the trap at 14N 3E, and then win fights against random monsters at 15N 3E and 9N 3E.
I next use Trap Zap on the trap at 8N 0E. I thereafter win a fight against random monsters at 7N 2E.
I go east another four squares to 7N 6E and make my way to the large central hall of the fifth level.
3 Ancient Enemies
I make my way eastwards, doing fights against hordes of monsters (i.e. Gimps and/or Maze Dwellers) at 3N 7E, 3N 10E, 2N 14E and 4N 15E.
At 3N 17E is a fight against 3 Ancient Enemies. They're the most powerful of enemies that can cause Withering. They pretty much always attack first, but my -34 to -35 AC (aided by Ybarra's Mystical Coat of Armor and Traveller's Tune) for my front-line warriors pretty much assures they'll always miss and allow me to kill them in short order.
Archmage
Now I go northwards and do fights at 13N 15E, 17N 19E and 19N 20E.
A fight against an Archmage is at 13N 18E. He starts off at 20' and likes to summon monsters like Storm Giants. But it's still easy enough for Cassandra to go into hiding and backstab him.
4 Balrogs
First I do a fight at 7N 18E.
At 5N 20E is a fight against four Balrogs, the most powerful monsters that can inflict Insanity with their attacks. They can also use Death Strike. I kill them all the same without a scratch.
Pool of Boiling Liquid
I go to the pool of boiling liquid at 10N 21E, and say 'yes' when asked if I want to go through. That results in a little damage for every party member, but also brings me to 6N 10E.
I go south through the door to 5N 10E and win a fight against lots of Maze Dwellers and some Cloud Giants. I continue south through another door.
The doors I just went through were one-way, so I have to go back through the pool of boiling liquid to return to 6N 10E.
I then engage in massive fights at 10N 14E, 9N 14E, 9N 6E and 10N 6E.
4 Spectres
There are two fights against random monsters at 6N 8E, 6N 12E, 9N 14E, 10N 14E, 9N 6E and 10N 6E.
At 10N 10E is a fight against four Spectres, and I kill them in short order with physical attacks.
3 Geometric Shapes
I continue straight north through the squares that drain away Hit Points, until I reach 15N 10E. Once there, having the Silver Circle, the Silver Square, and the Silver Triangle opens up a door to the north.
I go through the door, and finish a fight against numerous random monsters. I also go to the room west of the Hit Point-draining hallway, and win fights against random monsters at 14N 6E, 12N 7E and 14N 8E. I thereafter go back out the door to the room.
Mangar's Chamber
I go east four squares and then face north. I use Trap Zap on the trap at 17N 10E. I go one square north, and use Trap Zap on the traps at 17N 9E and 17N 11E as well.
I go north through the door and win the fights against random monsters at 20N 8E and 20N 12E.
I come back south out the door, and then go W W and N past the anti-magic squares. I thereafter cast Ybarra's Mystical Coat of Armor, Locate Traps and Kiel's Magic Compass.
Mangar's Dark Room
Now I do the fights against random monsters at 18N 6E, 20N 6E, 21N 6E and 21N 8E. I go west for three squares until I'm right up to the door leading to the room in the northwest corner of the level.
Spirithelm
I continue straight west through the door and get the fight against random monsters at 21N 4E. I continue with the fights at 17N 4E, 18N 3E (and then Trap Zap), 19N 3E and 19N 2E.
It is after the third fight that I get a Spirithelm. Gallard equips it. It provides 1 point less AC protection than the Diamond Helm he had been wearing previously, but it also provides a +2 bonus to hit. That falls in line with my eventual plan of transitioning Gallard into a back-rank sniper during the second game. I have him equip it now.
There are also a couple of asides about the helm itself. One is that Paladins cannot wear it. The other is that it provides limited charges of the Lesser Summoning spell, but that's not an important point for me.
Black Dragons
I do the fight at 18N 1E. At 17N 0E is a fight against a pair of Black Dragons, who are a little more powerful still than Red Dragons. Their breath causes draining damage instead of fire damage.
I also do the fights at 19N 0E and 21N 2E. After that, I go straight east and through the door to leave the room.
Spectre Snare
First I go straight south until I hit the wall, then I go seven squares east. From there, I go two squares north across the anti-magic square, and put my buffs and exploration spells back up.
Now I do the set encounters against random monsters at 18N 13E, 18N 15E, 19N 13E, 20N 14E and 21N 12E.
I cast Trap Zap and make my way to 21N 10E. The correct answer for the Magic Mouth is "Spectre Snare". I now get the Spectre Snare as a weapon. Ariel uses it for the rest of the trilogy. The 9 point bonus to AC helps increase her front-line durability. Its insta-kill ability also makes her a real threat in combat, and now the fact that she can only attack once a round becomes meaningless. She loses unlimited songs when she no longer has the Bardsword equipped, but I'll rectify that after I've defeated Mangar.
Mangar
One square south at 20N 10E will be the final fight against Mangar. He starts off at a distance of 50', and he'll be helped out by two Demon Lords and three Vampire Lords, all of whom start off within melee range.
This fight can be tough, even for high-level parties. The Demon Lords still have a chance to connect their physical attacks on my party members, even with their -34 AC. And should they connect, the result is the Stoning their targets. The Vampire Lords can't really connect and Drain when they make physical attacks, but they can still summon other undead and use Death Strike. Mangar starts off with Disrupt Illusion to protect himself against Mage Maelstrom and prevent the use of Wind Dragon or Wind Giant. He thereafter will be content to hang back and try to summon monsters (Wind Giants, Demon Lords, Greater Demons, etc.) non-stop.
I can usually manage to emerge unscathed from this battle. Cassandra went into hiding, while Ariel used Lucklaran to protect against spells and the fiery breath weapons of the Demon Lords.
I had my warriors go all out for the Demons Lords, and they succeeded in taking them out during the first round. *Note* If any of them or the Vampire Lords managed to survive by dodging my melee attacks (which is possible), Ariel's follow-up song would have been Seeker's Ballad to increase to hit bonus.
Mordred casts Wacum's Wizard War on the Vampire Lords which usually, as in this instance, suffices to kill them off in the first round.
Talia casts Preclusion, which for the entire fight will significantly (but not completely) reduce the probabilities of Mangar or any other enemies from summoning help thereafter.
After that, I have Cassandra edge closer and closer in case I need her to backstab Mangar and kill him in one shot. However, my Wizards bring him down with repeated castings of the Storal's Soul Whip spell.
*NOTE* I reloaded and repeated this battle until I got a second Spirithelm, with the intention of having Zarathos wear it afterwards.
Kylearan shows up to congratulate the party, reward them with 300,000xp and 300,000gp, and return them to the Adventurer's Guild.
Now I have a couple of easter egg battles to take care of.