-

- Forums
- Chatrooms
- Gallery
- Gameplay Videos
- Upload
- Articles
- Mod Reviews
- Shop SP: Games, Movies, Books
|
|
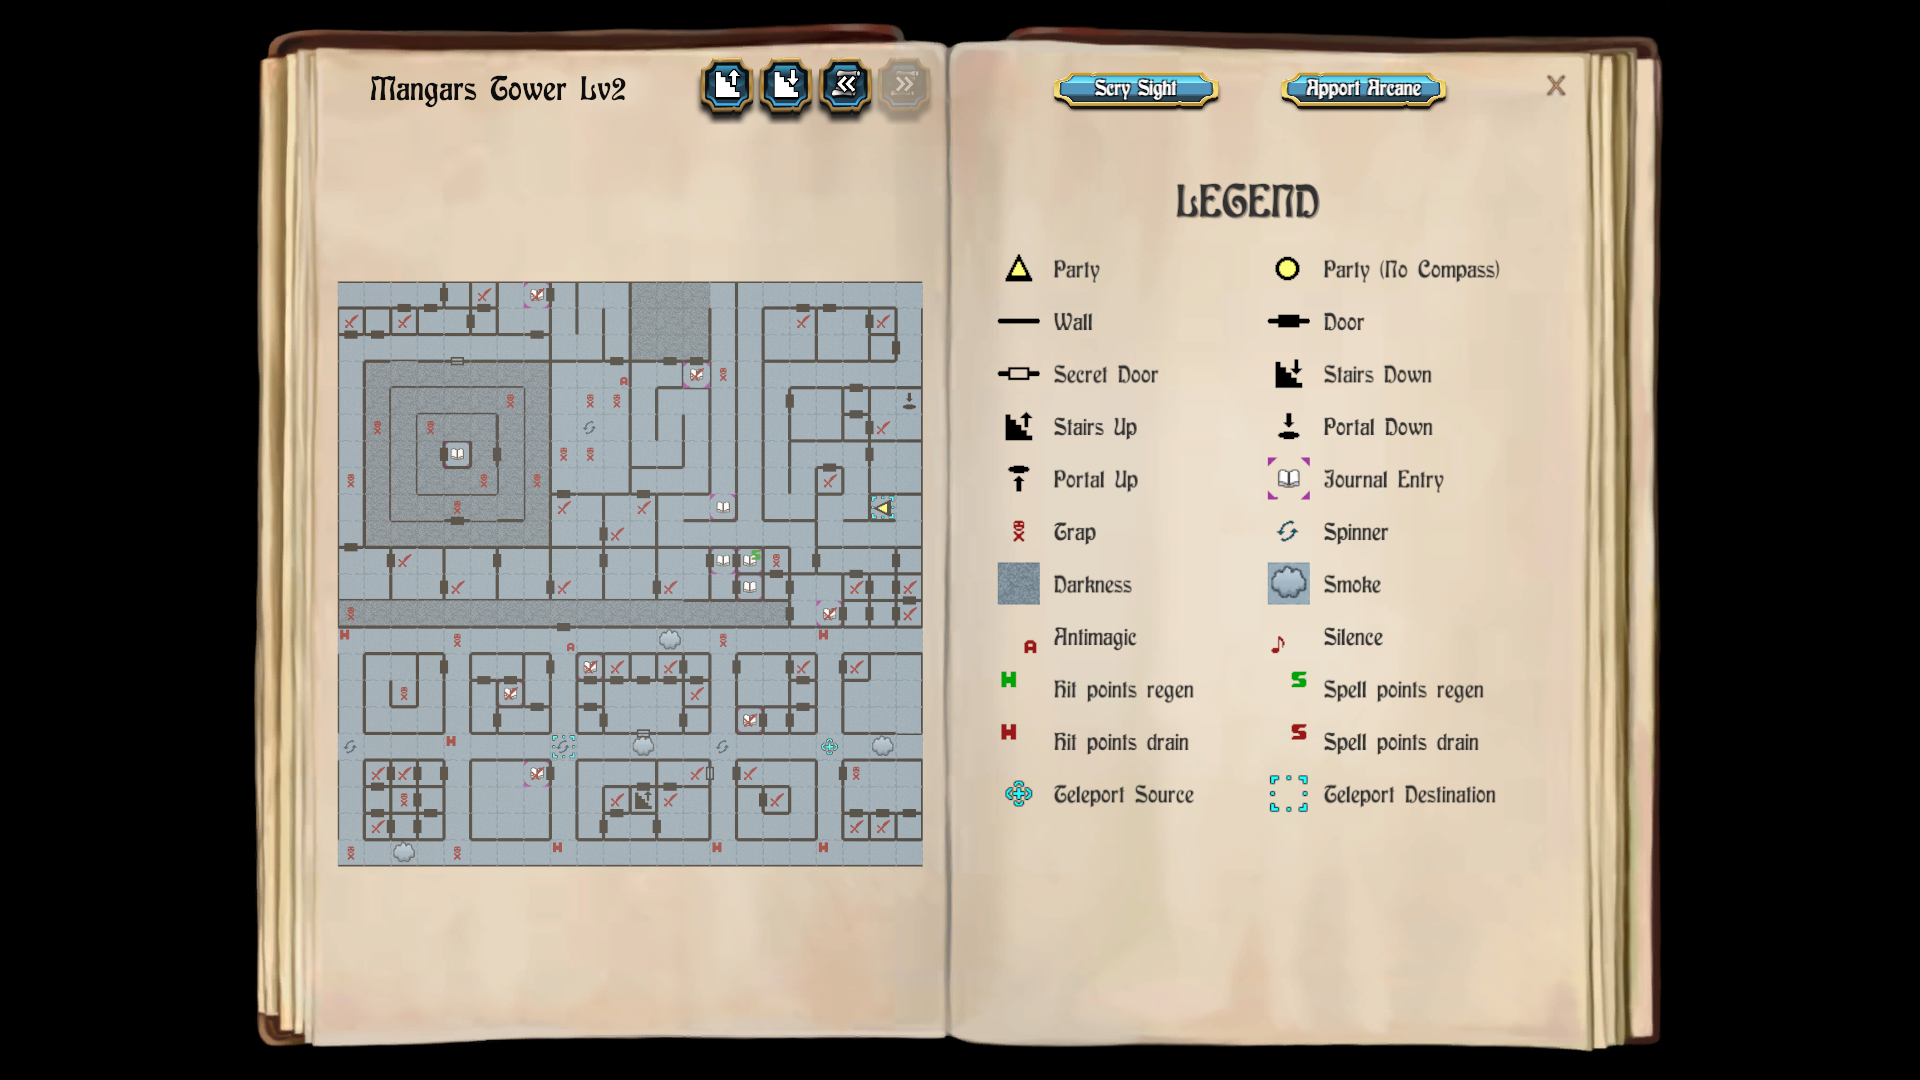
MANGAR'S TOWER, LEVEL 2
New monsters show up. Ice Giants, War Giants, and Bone Crushers show up as monsters capable of doing more physical damage. Grey Dragons are a little more powerful still than White Dragons.
There will also be new monsters that can inflict nasty afflictions on contact. Vampires can either drain levels with their physical attacks, or try to use Hypnotic Image to try and stall the party for the combat round. A Paladin with a high saving throw bonus can nullify the latter power.
Demons can cause Insanity, or use a fiery breath weapon that can inflict plenty of damage.
Two new types of monsters, each of which brings an instant-kill threat, are Basilisks and Master Ninjas. The former can cause Petrification, while the latter can score Critical Hits. If they start off at a distance, kill them off with spells before they close in. If they start off in melee range but are few in number, have your warriors prioritize killing them off as quickly as possible. If they start off numerous AND in melee range, one method is to have a Wizard use the Far Foes spell to push them safely away so that I can kill them off with spells. However, a high enough AC on account of a constant Traveller's Tune from Ariel is actually sufficient for me to avoid those nasty possibilities.
I again do a thorough exploration to show how to manually reach the next level, and to get the needed Silver Circle at the same time. And I get some of the new items I want along the way. The list is as follows:
1st Diamond Helm
I start off at 13N 20E. I first do the fight at 14N 18E. The fight at 16N 20E yields a Diamond Helm, which Lord Stygar equips for a 1 point improvement to AC.
I then win the fights against random monsters at 20N 2E, 21N 5E, 20N 20E and 20N 17E. After that, I go south down the long hallway just a little way to the west.
Mind Shadow
I go east and finish the fights against random monsters at 10N 19E, 10N 21E and 9N 21E.
At 9N 18E is a fight against a lone Mind Shadow, which isn't anything special. I cast Phase Door on the north wall of the room, and return to the hallway.
3 Basilisks
I start off at 12N 15E. I travel along the hallways in a sequence of W W W N E E N N N and then Trap Zap to get rid of the trap at 18N 14E. I continue N N N and W into a large dark room.
I go three squares south, and end up in a fight with 3 Basilisks. Trying to fight with Basilisks who arrive already within melee ranger can be risky, but I manage to kill them off before they can do anything since there's only three of them.
I go N W and S through the door to leave the dark room, and put my Cat Eyes spell back up.
1st Diamond Plate
I follow the next hallway to its end, and reach a fight against random monsters at 13N 11E. The fight includes a large group of Lesser Demons, so Talia is willing to use the Demon Strike spell against them.
I get a Diamond Plate armor as loot afterwards. Lord Stygar equips it for a 1 point improvement to AC.
1st Wizwand
I get a random fight almost immediately after the previous battle. I get a Wizwand as loot after the battle. It provides a limited number of charges of the Wizard War spell, but Talia equips it for its real perk, a 2 point improvement to AC. AC can be important even for back-rank characters, especially during the sequels when the enemies themselves can use missile weapons.
I then win the fights against random monsters at 12N 10E and 13N 8E.
97 Hobbits
I go north through the door and then use Trap Zap on the trap that is immediately in view.
I go straight north, and then use Phase Door to go through the north wall, with the point of avoiding the anti-magic square at 18N 10E.
At 21N 7E is a fight against 97 Hobbits. I blow them away with a Shock Sphere spell.
Silver Circle
First I cast Kiel's Magic Compass to help me navigate. Now I go two squares south and three squares west. I now go through the door to the south. I step into a large dark room that's divided into rings whereby you can bring yourself closer and closer to its central point when you go through the right door.
Waiting at 15N 4E will be the last of the silver items that I need, the Silver Circle, after I give the answer of "circle" to the Magic Mouth. I make my way back out the dark tunnels the way I came.
2nd Diamond Plate
First, I do the fight against random monsters at 20N 0E. I continue south along the hallway and use Trap Zap on the trap at 14N 0E.
I next do the fights against random monsters at 11N 2E and 10N 4E. I get a Diamond Plate armor as loot after the second fight. Zarathos equips it for a 1 point improvement to AC.
Arc's Hammer
I do the fights against random monsters at 10N 8E and 10N 12E.
I get an Arc's Hammer after the second fight. It does comparable damage to the Crystal Sword, but also provides a +1 bonus to attack rolls. It also provides limited charges of the Lesser Revelation spell. Lord Stygar equips it for the rest fo the game.
At 11N 15E is a room that recharges Spell Points. The room at 10N 15E provides a clue about the Spectre Snare.
I face south and cast Phase Door to pass through the wall to the south. I cast Phase Door again on the south wall, and pass through to get out of the dark hallway and into the southern section of the level. I cast Cat Eyes once that is done.
67 Samurai
I face west and then use Trap Zap on the trap at 8N 14E. I then win the fight against random monsters at 7N 17E.
At 5N 15E is a fight against 67 Samurai. A Shock Sphere spell kills them outright.
I also get a Lorehelm as loot after the fight. It's a helm that spellcasters can use with a 2 point bonus to armor class, and limited charges of Sorcerer's Sight. Talia equips it. I thereafter return to the hallways of the south section.
2nd Diamond Helm
I face west and then use Trap Zap on the trap at 8N 14E. I go one square west and then straight south to the spinner at 4N 14E. I make sure my compass is pointing south before I step off of it.
I almost immediately thereafter get a random monster encounter. I get a second Diamond Helm after the battle is over. Zarathos equips it for a 1 point improvement to AC.
I conclude the video by winning fights against random monsters at 3N 15E and 2N 16E, and then leaving the room.
1st Conjurstaff
From 3N 14E I go S S S E E E E N N and N. I face east and use Trap Zap on the trap on the other side of the door.
I go to 1N 19E and win the fight against random monsters there. I get a Conjurstaff, which halves the Spell Point cast of any spell its wielder casts, as loot following the battle. It is an item that I wanted to get, but also with the intention of selling it to Garth so as to save it for the sequel. Mage Staves are adequate for my Wizards during the first game. The Conjurstaff becomes more meaningful during the sequels, partly because be other ways to recoup Spell Points besides Mage Staves during the sequels, but also the Spell Point costs of more powerful spells goes up in the sequels.
Travel Helm
I win the fight against random monsters at 1N 20E. I get a Travel Helm as loot. Ariel equips it. It provides the same AC bonus as the Adamant Helm she had been wearing, although it also provides limited charges of the Apport Arcane spell. So it could work in an anti-magic square for example. I leave the room and go back to the hallways of the south section.
2nd Conjurstaff
From 3N 18E I go S S S E E E E N N N and N onto the spinner at 4N 0E. I make sure I go north off the spinner.
I continue N N N W W W W S and E through the door, to win the fight against random monsters at 7N 19E.
Now I go W N E E E E E E E E S S S S S W and W for a fight against random monsters at 3N 2E. I also win fights against random monsters at 3N 1E and 1N 1E.
It is after the last fight that I get a second Conjurstaff. I leave this cluster of rooms and go back to the hallways of the south section.
32 Ghouls
From 3N 4E I go N E E E and E onto the spinner at 4N 8E. I make sure that I am facing south (using the Kiel's Magic Compass spell to navigate) before I step off the spinner.
I go south and west through the door for a fight against 32 Ghouls at 3N 7E. I blow them away in short order with a Repel Dead spell, and then step back out the door.
2nd Soul Sucker
Now I north past the spinner, then north another three squares and then west through the door. That in turn leads to a series of other doors that eventually leads to another Soul Sucker at 7N 9E. This one is obviously much easier to defeat on account of my party members being much higher in level. I go back out the way I came.
1st Wargloves
I go south three squares to get back to the spinner at 4N 8E, but this time insist on going east of the spinner. I go two more squares east and get smoke in the eyes.
I go north through the door and fight random monsters at 7N 12E. I also win the next fight against random monsters at 6N 13E, and get a pair of Wargloves as loot. Lord Stygar wears them for a 1 point improvement to AC.
2 Bandersnatches
First I win the fight against random monsters at 7N 10E. Waiting for me at 7N 9E will be 2 Bandersnatches. Bandersnatches are the most powerful of the Werewolf-type monsters in this game, typically found only in the fourth and fifth levels of the Tower, but I have an easy enough time defeating only two of them.
I go back to where I got 'smoke in the eyes' and go east another square from there.
2nd WizWand
First I go two squares east to the spinner at 4N 14E. I make sure to go south from the spinner.
I go west through the door and fight random monsters at 3N 13E, 2N 12E and 2N 10E. I get a second WizWand after the last fight, and I have Mordred equip it.
The stairs to the third level are at 2N 11E. But I don't take them for now, and instead teleport to the stairs leading back to Skara Brae. I still have some items that I want to grind for, and I have levelling up to do as well.
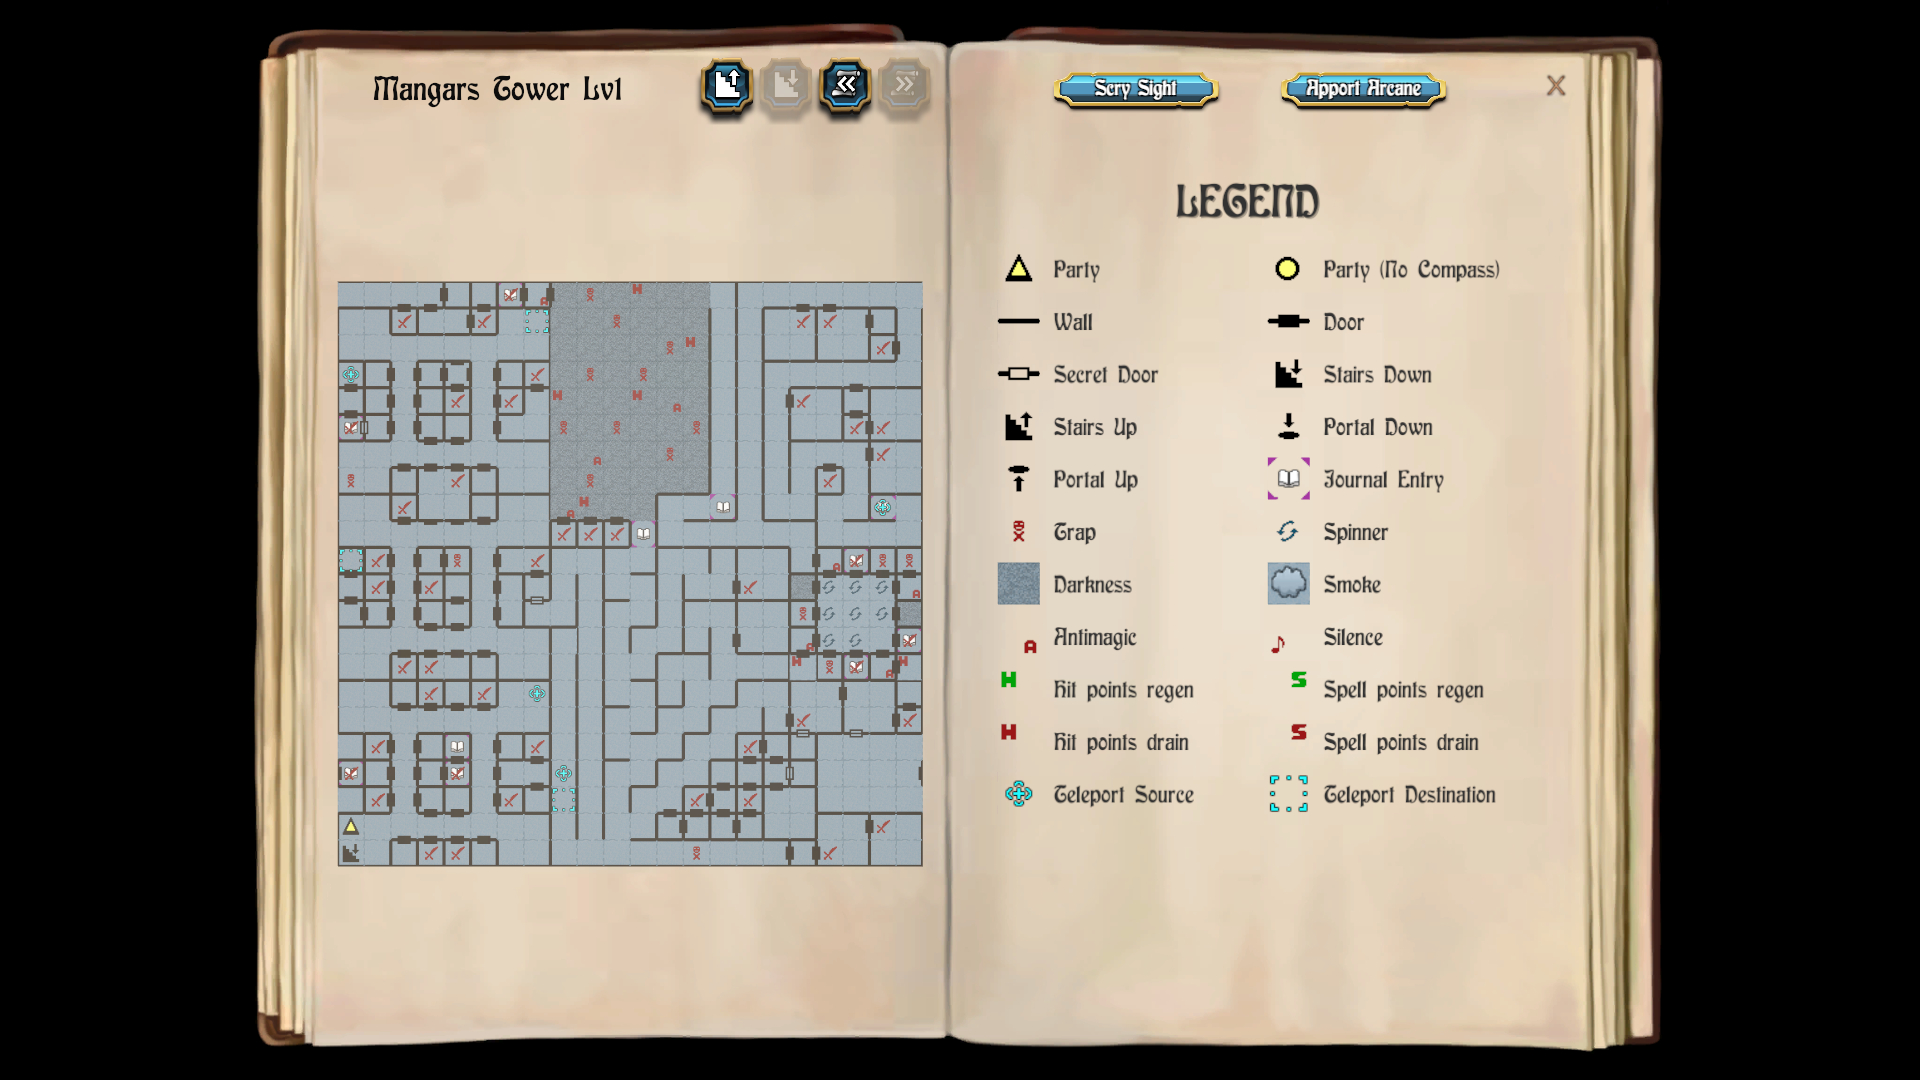
43rd Level
First, I go to Roscoe's and have him identify the special properties on some of my newfound items. As it is night time, I enter the Adventurer's Guild and leave to reset time to early morning, and then put my persistent spells back up.
Now I go to the Review Board to advance Talia and Modred to their 38th levels as Wizards, and everyone else to their 43rd levels.
I then return to Mangar's Tower and cast Apport Arcane with coordinates of 13 -2 0 to get to the Magic Mouth that sends me on to the second level.
2nd Lore Helm
Now I show the grind cycle I use for this level. It involves (after getting teleported by the Magic Mouth) doing the fights against random monsters in a sequence of 14N 18E, 20N 17E, 20N 20E, 20N 2E, 21N 5E and finally 16N 20E.
I get a second Lore Helm at the end of the last fight, which Mordred equips.
Resetting the sequence involves going down the portal 17N 21E and then making my way back to the Magic Mouth that teleports me back up to the second level. However, I have enough xp to advance everyone another level (after having done the sequence two times previously not shown in the video). So I go down the portal and then cast Apport Arcane with coordinates -17 -21 0, and then leave the Tower.
3rd Diamond Plate
I get a third Diamond Plate armor during one of the grinding cycles afterwards. Ariel equips it for a 3 point improvement to AC.
I show how to reset the cycle towards the end of the video. Take the portal down, cast Phase Door on the north wall if you want to avoid any battles that won't yield any of the new items, and then follow the hallway till you reach the Magic Mouth at 13N 20E to get back to the second level.
1st Speedboots
Another grind cycle yields a pair of Speedboots as loot after one of the fights. Boots have their own separate inventory slot, so they can be worn in addition to everything else. These boots increase the probability of running away from a fight, should you select that option. Lord Stygar equips the pair I just found.
3rd Diamond Helm
Another grind cycle leads to obtaining a third Diamond Helm, which Gallard equips for a 1 point improvement to AC.
I have enough xp to advance everyone another level after the last fight of the cycle, so I cast Apport Arcane with coordinates 6 2 -1 to leave the Tower.
2nd Wargloves
I resume grinding, and get a second pair of Wargloves during one of the cycles. Zarathos equips them for a 1 point improvement to AC.
2nd Speedboots
I continue to grind afterwards, and get a second pair of Speedboots during one of the cycles. Zarathos equips them.
3rd Speedboots
I get a third pair of Speedboots at the end of another cycle. Ariel equips them.
Talia and Mordred have enough experience to gain another level, so I do one more fight to make sure that the others have enough xp for level ups as well. Once I've done that, I cast Scry Sight to determine my location and then Apport Arcane with the right coordinates (revealed by Scry Sight) to leave the Tower.
4th Speedboots
I continue to grind, and get a fourth pair of Speedboots during one of the cycles. Ariel equips them.
5th Speedboots
I grind some more, and get a fifth pair of Speedboots during my last cycle for this level. Cassandra equips them.
I now have enough xp to advance everyone another level, so I teleport everyone out of the Tower for now.
49th Level
I sell off my excess loot at Garth's and then head over to the Review Board. Talia and Mordred advance to their 44th levels as Wizards. Everyone else advances to their 49th levels.
Now I return to the Tower, and cast Apport Arcane with the coordinates 2 11 1, which brings me to the stairs to the third level.