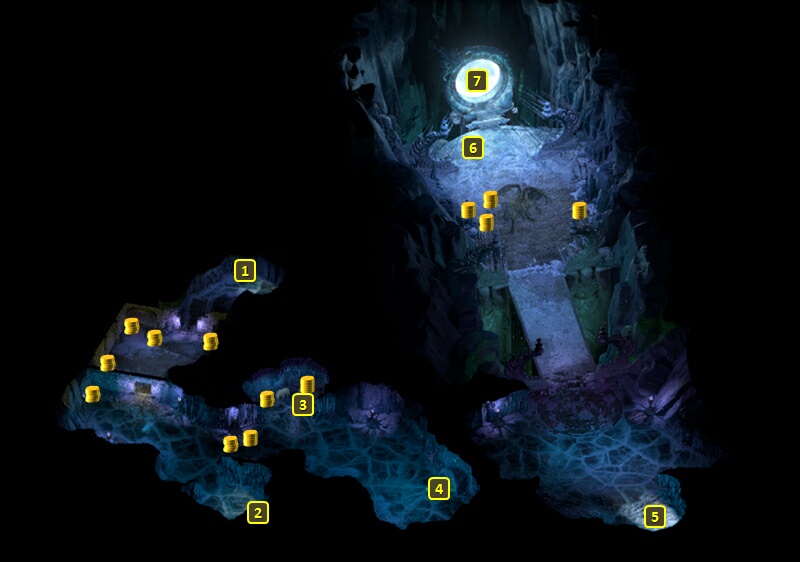
Harbinger Nyrvardir will be at #6 on the map of Harbinger's
Watch. He wants fluid from metal machines as an ingredient in his
search for the perfectly brewed liquor.
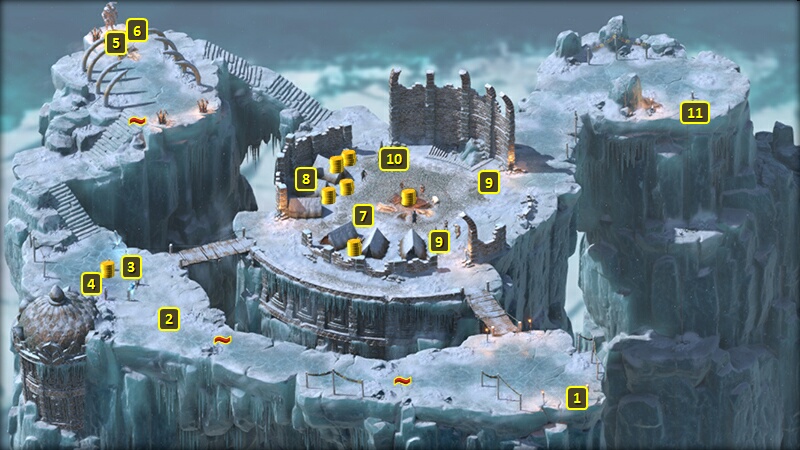
You start off at #1. At #7 is where you'll have to fight a cult of
Rymrgand, led by Champion-Ascendant Grymgaer. His cult includes several
Pilgrims of varying classes, as well as Bear Companions. Dealing with
this cult is the focus of The Higher-Ups
Task, but getting them out of the way facilitates completing this Task
at the same time.
The fight is complicated by the presence of Sigils of Death at points
marked #9, and a Sigil of Pain at #10. One approach is to try and draw
the cult away from the sigils, and then destroy the sigils from a safe
distance afterwards.
There will be a rope and grappling hook at #11, and it leads down to
the Rimebound Temple
through a scripted interaction.
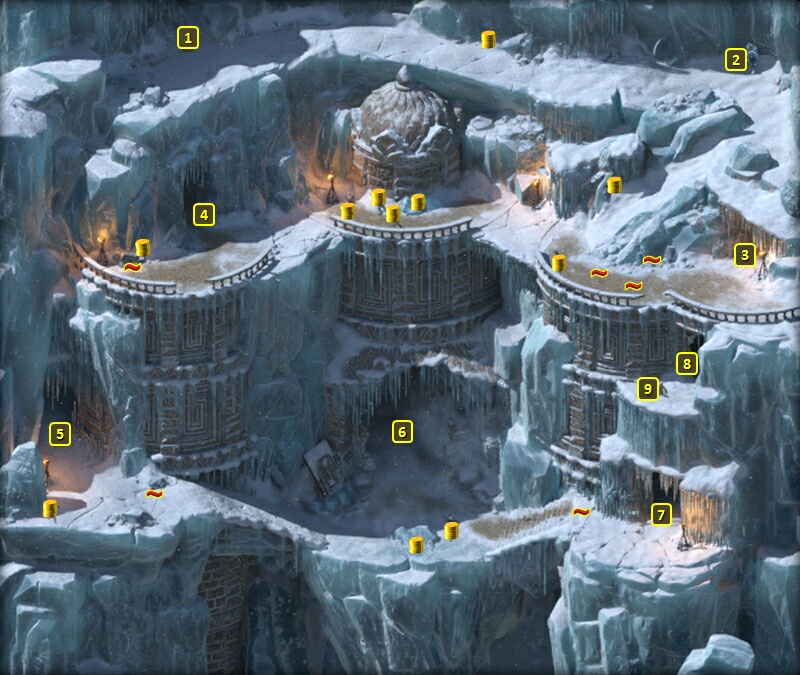
A Perception check of 14 on the way down reveals an object lodged in the
ice. You can have a character make a Might check of 16 to pull it out of
the ice. Making the check will result in a War Hammer called Glacierbane
going into your inventory then and there.
If you initially attempt to get the item but decide you can't make the
Might check, a couple of alternatives become available. Those
alternatives are to use either a fire-based spell (e.g., Fireball) or an
Immolator to melt the ice around
it. Glacierbane will drop
down to the bottom. That means you'll have to make your to the Rimebound
Temple and then pick it up.
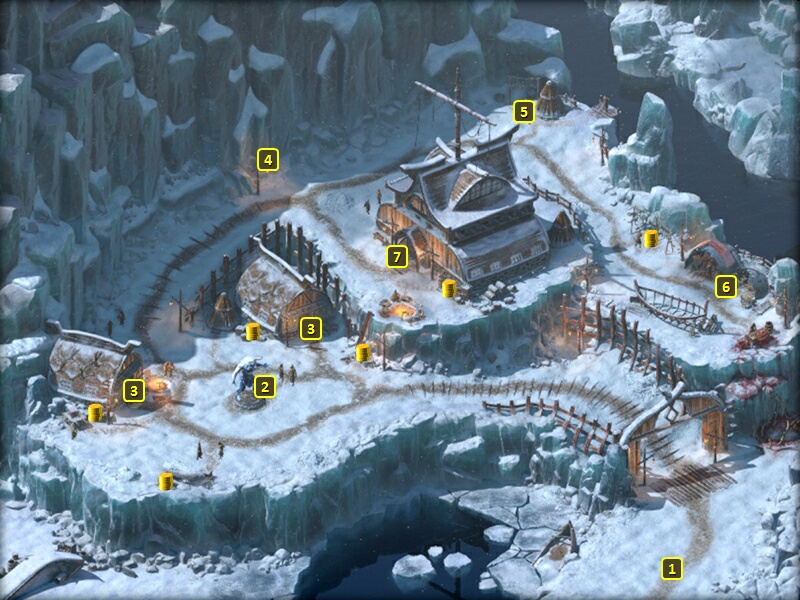
You'll start off at
#1. At #2 will be a Damaged Rime Construct, along with a couple of other
Rime Constructs.
The objective is to obtain the Rime
Construct Fluid from the Damaged Construct. If you click on it,
you can make either a Dexterity check of 15 or a Mechanics check of 12
to extract the Fluid. You can still extract the Fluid without making the
checks, but doing so results in an Injury to the Watcher. The Constructs
will attack in any event afterwards. Alternatively, you can simply
force-attack the Constructs and then pick up the Fluid afterwards.
There will be a broken down construct lying in a pool of green liquid at
#3. Click on it to begin a scripted interaction. A Perception check of
11 indicates a smell like rotten Koiki Fruit mixed with rust and
something else. An Alchemy check of 16 verifies that the liquid is too
toxic for Kith to consume. A Sleight of Hand check of 9 will obtain the
Rime Construct Fluid
without an Injury. Failing the check will result in an Acute Rash (-5
Fortitude, -3 Corrosive Armor Rating) Injury.
Return to Nyrvardir with the Rime
Construct Fluid. Choosing the dialogue option of "here you go"
leads to a 2,500+ xp reward. There are a few different possibilities
afterwards.
Giving him the Fluid then and there means he'll give you a ring called Finality's Claim, but nothing
else. He'll have a nearby Harbinger sample the new concoction, who
promptly falls over dead from poisoning. Nyrvardir won't be bothered by
that fact and the Task will conclude.
Choosing the "not so fast" opens up more possibilities. You can follow
up with a warning that the Fluid is toxic. And from there you go ahead
and give him the Fluid anyway, which plays out the same as if you had
given it to him right away. Alternatively, you can choose a Benevolent
option that destroys the fluid. That will leave you with only the xp
reward, and no material reward from Nyrvardir himself.
You can also follow up "not so fast" by insisting on a discussion of
compensation. He'll offer either 4,000cp or Finality's
Claim, but not both. You can accept one or the other with dialogue
options that do not involve skill checks. A Diplomacy check of 14 means
increasing the fee to 8,000cp but no Finality's
Claim. A Diplomacy check of 16 will get you both the 4,000cp and Finality's Claim.
Accepting one of the offers of compensation means an additional choice
afterwards. You can give him the Fluid as part of the deal, and again a
nearby Harbinger will end up poisoning himself. Or you can choose a
Shady dialogue option that destroys the fluid. That causes Nyrvardir to
attack you, although the rest of the villagers will remain friendly.
Sorcerer's
Place is a project run entirely by fans and for fans. Maintaining
Sorcerer's Place and a stable environment for all our hosted sites requires a substantial amount of our time and funds on a regular basis, so please consider supporting us to keep the site up & running smoothly. Thank you!
Supporting Sorcerer's Place
Has Sorcerer's Place been useful? If you'd like to show your appreciation
for our hard work on the site, and help us pay the bills the site generates
every month, please consider helping support SP.
Thank you!

 You'll start off at
#1. At #2 will be a Damaged Rime Construct, along with a couple of other
Rime Constructs.
You'll start off at
#1. At #2 will be a Damaged Rime Construct, along with a couple of other
Rime Constructs.